Auto Scaling Components for Google Cloud Platform
Table of Contents
Auto Scaling Components for Google Cloud Platform
Prepare to deploy a VM-Series firewall on a Google® Compute
Engine instance.
Typical GCP auto scaling deployments use a host project
and a service project and form a common VPC network between the
two. The Panorama plugin for GCP can secure an auto scaling deployment
in a single project with host and service VPCs, or host and service
projects in a shared VPC or peered VPC network configuration, where
the host project contains the VM-Series firewalls and the shared
VPC networks, and the service project contains your application
deployment. If your application is deployed in a Kubernetes cluster,
a peered VPC is required.
Auto Scaling Requirements
Ensure that you meet the software version requirements
for auto scaling on Google Cloud Platform (GCP).
- General Requirements—Ensure your environment meets the basic requirements.
- Panorama Plugin for GCP—If you have not done so, Install the Panorama Plugin for GCP.If you previously installed the Panorama plugin for GCP version 1.0.0, remove it before you install 2.0.X. You cannot upgrade.
- Palo Alto Networks Auto Scale templates version 1.0—Palo Alto Networks provides the templates to deploy VM-Series firewall instances in the host project and configure and deploy a sample application in a service project. See About the Auto Scaling Templates for more about the templates.Download the templates from GitHub. The zip file contains separate zip files for the firewall and application templates.
Prepare to Deploy the Auto Scaling Templates
Complete the following tasks before you deploy the auto
scaling templates.
Prepare a Host Project and Required Service Accounts
You need a host project and a service project
to form the shared VPC topology that supports the firewall and application
templates. You can create a new host project or prepare an existing
project to act as your host.
To set up the Shared VPC an
organization administrator must grant the host project administrator
the Shared VPC Admin role. The Shared VPC Admin can enable a project to act
as a host, and grant the Service Project Admin role to the service project
administrator. Review the GCP documentation on Administrators and IAM roles.
- In the GCP console, create a GCP project to act as the host. If you want to use an existing project, skip to the next step.To create a new project, select your organization or No organization, click New Project and fill in your project information. Note, this is your only chance to EDIT the project ID.The Google Cloud SDK must be installed and configured so that you can authenticate with your host project from the CLI. You will use the command line interface to deploy the firewall template and the application template, and to attach the service project to the host project.Enable APIs and services required for auto scaling. The required APIs are:
- Cloud Pub/Sub API
- Cloud Deployment Manager API
- Cloud Storage API
- Compute Engine API
- Google Compute Engine Instance Group Manager API
- Google Compute Engine Instance Group Updater API
- Google Compute Engine Instance Groups API
- Kubernetes Engine API
- Stackdriver API
- Stackdriver Logging API
- Stackdriver Monitoring API
You can enable APIs from the GCP console or the GCP CLI, as shown below.Enable APIs from the GCP console- Select the host project, and from the Navigation menu, select APIs & Services.
- Search for and view each required API.
- ENABLE any APIs that do not display the “API enabled” status.
Enable APIs from the CLI- In the CLI, view your configuration to ensure that you are in the correct project.
gcloud config list
If not, set the project as follows:gcloud config set project <project-name>
- Issue the following commands to enable the required APIs.
gcloud services enable pubsub.googleapis.com
gcloud services enable deploymentmanager.googleapis.com
gcloud services enable storage-component.googleapis.com
gcloud services enable compute.googleapis.com
gcloud services enable replicapool.googleapis.com
gcloud services enable replicapoolupdater.googleapis.com
gcloud services enable resourceviews.googleapis.com
gcloud services enable container.googleapis.com
gcloud services enable stackdriver.googleapis.com
gcloud services enable logging.googleapis.com
gcloud services enable monitoring.googleapis.com
- Confirm that the required APIs are enabled.
gcloud services list --enabled
Create a service account for deploying the VM-Series firewall, and assign the IAM roles required for auto scaling a service or a Kubernetes cluster.When you configure the firewall templates you add the email address for this service account to the VM-Series firewall .yaml file. Within the host project, the template uses credentials from this service account to create a host VPC with subnets, deploy VM-Series firewalls in the VPC, configure Stackdriver custom metrics, create a Pub/Sub topic, and more.- In the GCP console select and select +CREATE SERVICE ACCOUNT.Fill in the service account details and click CREATE.
- Give the service account permission to auto-scale resources in this project.Select a role type from the drop menu, and on the right, select an appropriate access level. For example, select Project > Editor. You can select multiple roles for a service account.
- Compute Engine > Compute Admin
- Compute Engine > Compute Network User
- Pub/Sub > Admin
- Monitoring > Monitoring Metric Writer
- Stackdriver > Stackdriver Accounts Editor
- Storage > Storage Admin
- (GKE only) Kubernetes > Kubernetes Engine Cluster Admin
- (GKE only) Kubernetes > Kubernetes Engine Viewer
![]() Continue when you are finished adding roles.
Continue when you are finished adding roles. - Click +CREATE KEY to create a key for the host service account.
- (Optional) Add email addresses to grant other users or administrators access to this service account.
- Click JSON to download the private key in JSON form.
- Store the key in a safe location. You will need this key when you Deploy GCP Auto Scaling Templates.
- Click DONE.
Create a service account that a Panorama administrator can use to interact with this host project.- In the GCP console select and select +CREATE SERVICE ACCOUNT.
- Fill in the service account details and click CREATE.
- Grant service account access.Select a role type from the drop menu, and on the right, select an appropriate access level. For example, select Project > Editor. You can select multiple roles for a service account.
- Compute Engine > Compute Viewer
- Deployment Manager > Viewer
- Pub/Sub > Admin
Click CONTINUE. - Click +CREATE KEY to create a key for the host service account.
- (Optional) Add email addresses to grant other users or administrators access to this service account.
- Select JSON to download the private key in JSON form.
- Store the key in a safe location. You will need this key when you Configure the Panorama Plugin for GCP to Secure an Auto Scaling Deployment.
(optional) In the CLI, ensure you can communicate with your new host project.- Set your project to the host project you just created.gcloud set project <your-autoscale-host-project-name>Create a configuration for auto scaling. Your new configuration is automatically activated unless you disable activation.gcloud config configurations create <CONFIGURATION_NAME> gcloud config list
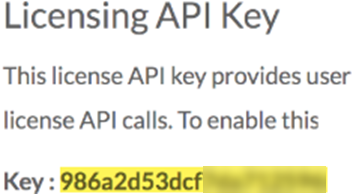
Obtain a Licensing API Key
You need a Licensing API key so Panorama can license and de-license managed assets in GCP.- Log in to the Support portal and select and click Enable. The key is displayed.Only a Super User can view the Enable link to generate this key. See How to Enable, Regenerate, Extend the Licensing API Key.
![]() Select the key and copy it.From the CLI, SSH in to Panorama and issue the following command, replacing <key> with the API key you copied from the support portal:
Select the key and copy it.From the CLI, SSH in to Panorama and issue the following command, replacing <key> with the API key you copied from the support portal:request license api-key set key <key>API Key is successfully setConfigure the Panorama Plugin for GCP to Secure an Auto Scaling Deployment
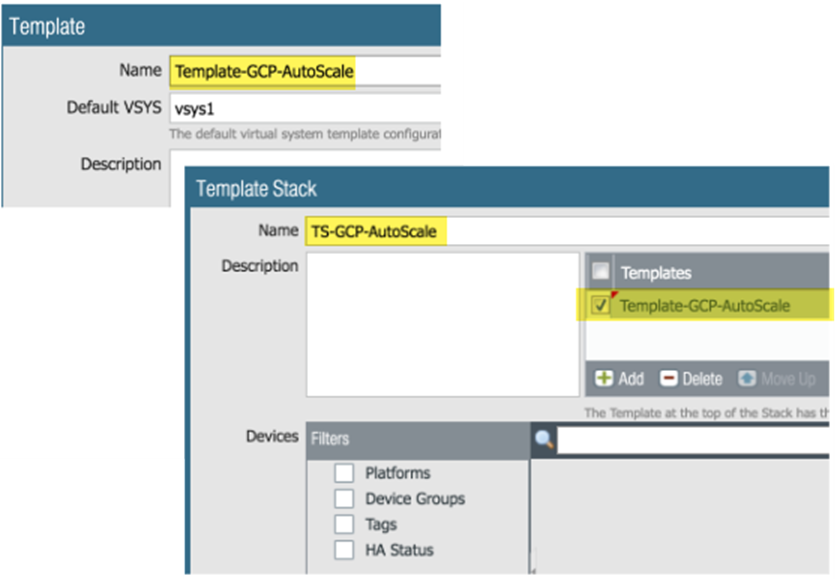
In Panorama, create assets to support the auto scaling firewall deployment.- Create a template, and a template stack that includes the template, and Commit the changes.
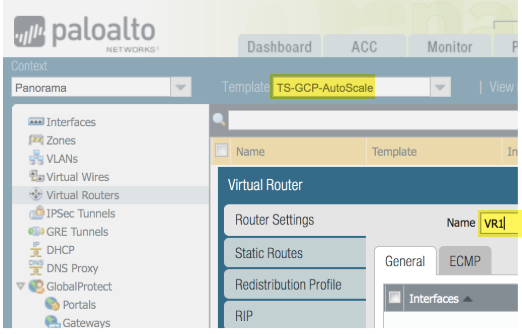
![]() In the Network context, select either the template or the template stack. Select Virtual Routers and Add a virtual router.When the firewall template creates static routes, they are added to this virtual router.Define only one router for the auto scale deployment.
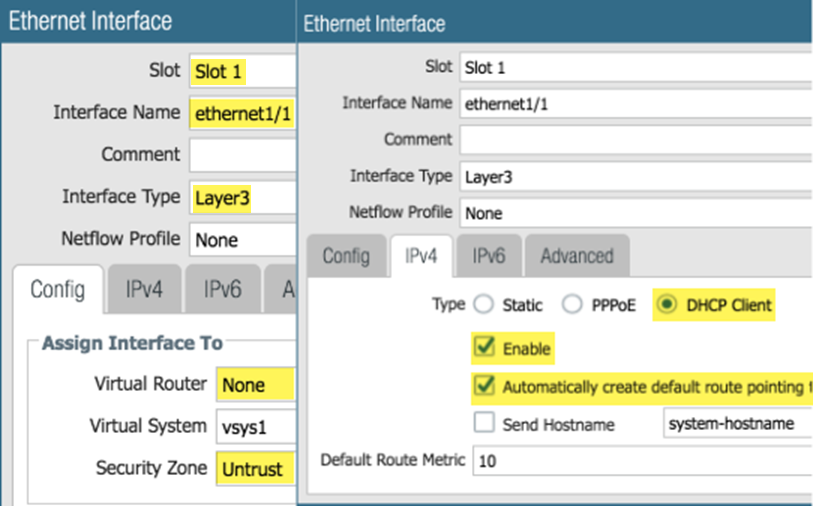
In the Network context, select either the template or the template stack. Select Virtual Routers and Add a virtual router.When the firewall template creates static routes, they are added to this virtual router.Define only one router for the auto scale deployment.![]() In the Network context, select the template you created, select Interfaces and Add Interface.
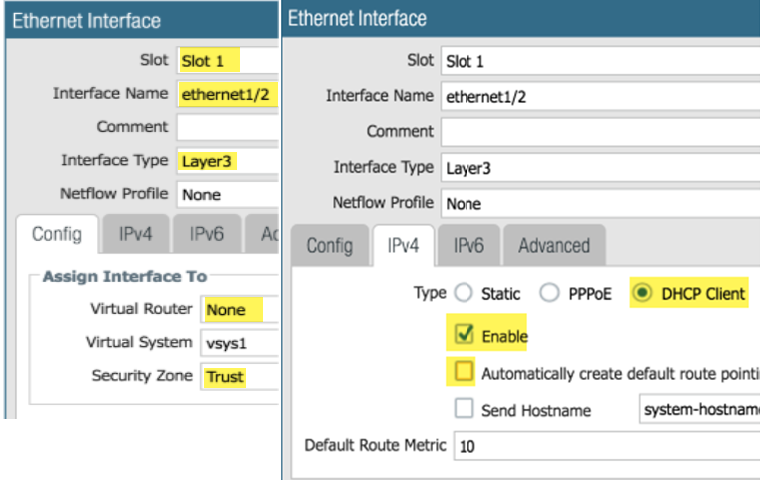
In the Network context, select the template you created, select Interfaces and Add Interface.- On the Config tab, select a slot, select the Interface name and select the Layer3 Interface Type. From the Security Zone menu, select New Zone, name the zone Untrust and click OK.
- On the IPv4 tab enable DHCP Client and Automatically create default route pointing to default gateway provided by server (enabled by default) and click OK.
![]() Add the ethernet1/2 (Trust) Layer 3 interface.
Add the ethernet1/2 (Trust) Layer 3 interface.- On the Config tab, chose the same slot as the previous step, select the Interface name (ethernet1/2), and select the Layer3 Interface Type. From the Security Zone menu, select New Zone name the zone Trust and click OK.
- On the IPv4 tab enable DHCP Client, disable Automatically create default route pointing to default gateway provided by server and click OK.
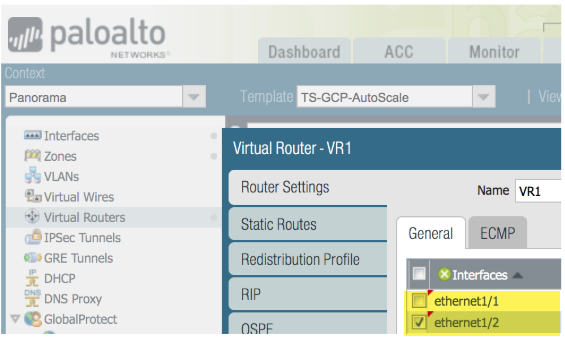
![]() Return to your template stack and the virtual router you created earlier. Place the untrust and trust interfaces (ethernet1/1 and ethernet1/2) in the virtual router, and click OK.
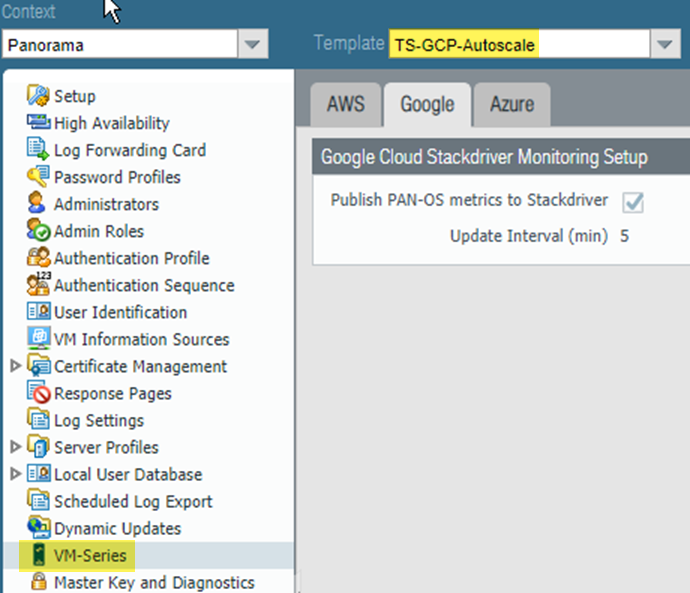
Return to your template stack and the virtual router you created earlier. Place the untrust and trust interfaces (ethernet1/1 and ethernet1/2) in the virtual router, and click OK.![]() Configure Stackdriver for your auto scaling deployment.You must have the VM-Series plugin on Panorama to configure Stackdriver.
Configure Stackdriver for your auto scaling deployment.You must have the VM-Series plugin on Panorama to configure Stackdriver.- In the Device context, select the template stack you created earlier from the Template drop menu.Select and click the Edit cog (). Enable Publish PAN-OS metrics to Stackdriver.
![]()
![]() Commit your changes.Create a Device Group that references the template or template stack you created in step 1.This Device Group will contain the VM-Series firewalls you create with the firewall template.
Commit your changes.Create a Device Group that references the template or template stack you created in step 1.This Device Group will contain the VM-Series firewalls you create with the firewall template.- Add a security policy that allows web-browsing traffic from Untrust to Trust.In the Policies context, select the Device Group you just created. Select and Add the following security policy.
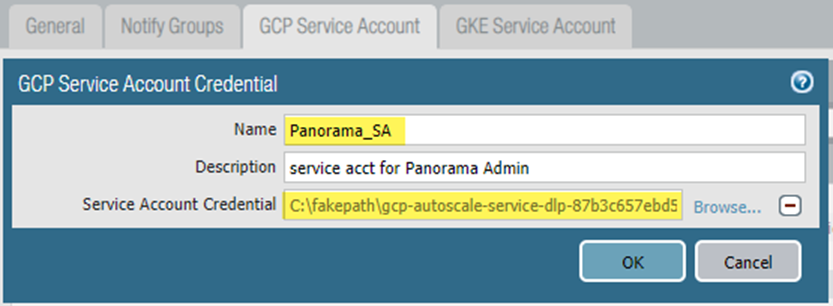
![]() Set up the GCP service account for the host project.
Set up the GCP service account for the host project.- In the Panorama context, expand Google Cloud Platform, select Setup, and click Add.Supply a name and description for the host service account you created in Step 4.Upload the JSON credentials file you created in Step 4.4.
![]() After you add a service account credential, you can validate the credential from your Panorama command line (you cannot validate from the web interface):
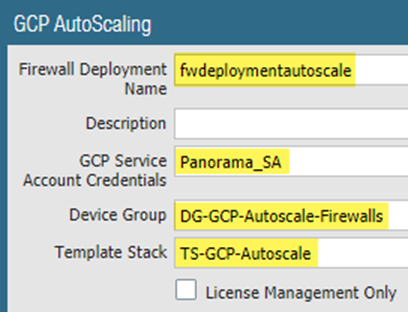
After you add a service account credential, you can validate the credential from your Panorama command line (you cannot validate from the web interface):request plugins gcp validate-service-account gcp_service_account <svc-acct-credential-name>Set up auto scaling on the Panorama plugin for GCP.- In the Panorama context, expand Google Cloud Platform, select AutoScaling, and click Add.Supply the Firewall Deployment Name and an optional description for the deployment.For the GCP Service Account Credential, supply the GCP service account name from Step 8.
![]() Chose the Device Group you created in Step 7, and the Template Stack you created in Step 1.Disable License Management Only to ensure traffic is secured.Commit your changes.
Chose the Device Group you created in Step 7, and the Template Stack you created in Step 1.Disable License Management Only to ensure traffic is secured.Commit your changes.Prepare a VM-Series Firewall Bootstrap Package for Auto Scaling
During bootstrap, the initial request from the firewall provides the host IP address and serial number, and the VM auth key so Panorama can validate the VM auth key and add the firewall as a managed device. Panorama can then assign the firewall to the appropriate device group and template so that you can centrally configure and administer the firewall using Panorama.In this case, you must generate a VM auth key on Panorama and include the key in the init-cfg.txt file that you use for bootstrapping. The VM auth key allows Panorama to authenticate the newly bootstrapped VM-Series firewall. The bootstrap package must include.- In the /config directory, an init-cfg.txt file that includes the Panorama IP address
- In the /license directory, the VM authentication key in a file named authcodes.The lifetime of the key can vary between 1 hour and 8760 hours (1 year). After the specified time, the key expires and Panorama will not register VM-Series firewalls without a valid auth-key in this connection request.
- Set up a Google storage bucket with the folders required to Bootstrap the VM-Series Firewall on Google Cloud Platform. You can use an existing bootstrap package or create a new bootstrap package, for these folders.Edit the values in the sample init-cfg.txt file to customize the file for your environment.The firewall templates include a sample init-cfg.txt file.
Parameter Value Comment type dhcp-client hostname <pa-vm> Optional name you assigned when you prepared the host project. Only required if a specific host is necessary, and dhcp-send-hostname is no. vm-auth-key <vmauthkey> A key that Panorama must validate before adding a firewall as a managed device. See Generate the VM Auth Key On Panorama. panorama-server <panorama-ip> The IP address of the Panorama management device you configured in Configure the Panorama Plugin for GCP to Secure an Auto Scaling Deployment tplname <template-stack-name> The template stack you created in Configure the Panorama Plugin for GCP to Secure an Auto Scaling Deployment. dgname <dg-name> The name of the Device Group you created in the Panorama Plugin for GCP. dns-primary Your primary DNS server. dns-secondary Your secondary DNS server. dhcp-send-hostname yes Leave as is. dhcp-send-client-id yes Leave as is. dhcp-accept-server-hostname yes Leave as is. dhcp-accept-server-domain yes Leave as is. Upload your edited init-cfg.txt file to the /config folder in your bootstrap package.If you are using BYOL, create a text file named authcodes (no extension), add your auth code, and upload the file to the /license folder.