Deploy the GCP Active/Passive HA
Table of Contents
Deploy the GCP Active/Passive HA
You can use the following procedures manage
your existing deployment profiles.
Preparing to set-up an active/passive HA in GCP
- Enable the required APIs, generate an SSH key, and clone the Github repository using:gcloud services enable compute.googleapis.com ssh-keygen -f ~/.ssh/vmseries-tutorial -t rsa git clone https://github.com/PaloAltoNetworks/google-cloud-vmseries-ha-tutorial cd google-cloud-vmseries-ha-tutorialCreate a terraform.tfvars file.cp terraform.tfvars.example terraform.tfvarsEdit the new terraform.tfvars file and set variables for the following variables:
Variable Description project_id Set to your Google Cloud deployment project. public_key_path Set to match the full path you created previously. mgmt_allow_ips Set to a list of IPv4 ranges that can access the VM-Series management interface. prefix (Optional) If set, this string will be prepended to the created resources. vmseries_image_name (Optional) Defines the VM-Series image to deploy. A full list of images can be found here. (Optional) If you are using BYOL image (i.e. vmseries-flex-byol-*), the license can be applied during deployment by adding your VM-Series authcode to bootstrap_files/authcodesSave your terraform.tfvars file.Deploying the GCP Active/Passive HA
- Initialize and apply the Terraform plan.terraform init terraform applyEnter yes to start the deployment. After all the resources are created, the Terraform displays the following message:Apply complete! Outputs: EXTERNAL_LB_IP = "ssh paloalto@1.1.1.1 -i ~/.ssh/vmseries-tutorial" EXTERNAL_LB_URL = "https://1.1.1.1" VMSERIES_ACTIVE = "https://2.2.2.2" VMSERIES_PASSIVE = "https://3.3.3.3"All the infrastructure should now be deployed and will boot up and configure by itself. Visit the external_nat_ip by using http://x.x.x.x after a few minutes after the deployment to find the default webpage from the workload-vm.
Testing the GCP Active/Passive HA deployment
You can now test the deployment by accessing the workload-vm that resides in the trust VPC network. All of the workload-vm traffic is routed directly through the VM-Series HA pair.- Use the output EXTERNAL_LB_URL to access the web service on the workload-vm through the VM-Series firewall.gcloud compute ssh workload-vmUse the output EXTERNAL_LB_SSH to open an SSH session through the VM-Series to the workload-vm.ssh paloalto@1.1.1.1 -i ~/.ssh/vmseries-tutorialRun a preloaded script on the workload VM, to test the failover mechanism across the VM-Series firewalls./network-check.shYou will observe an output similar to the codeblock below, where x.x.x.x is the IP address is EXTERNAL_LB_IP address.Wed Mar 12 16:40:18 UTC 2023 -- Online -- Source IP = x.x.x.x Wed Mar 12 16:40:19 UTC 2023 -- Online -- Source IP = x.x.x.x Wed Mar 12 16:40:20 UTC 2023 -- Online -- Source IP = x.x.x.x Wed Mar 12 16:40:21 UTC 2023 -- Online -- Source IP = x.x.x.xLogin to the VM-Series firewalls using the VMSERIES_ACTIVE and VMSERIES_PASSIVE output values. Notice the HA Status of the firewalls in the bottom right hand corner of the management window.Perform a user initiated failover.
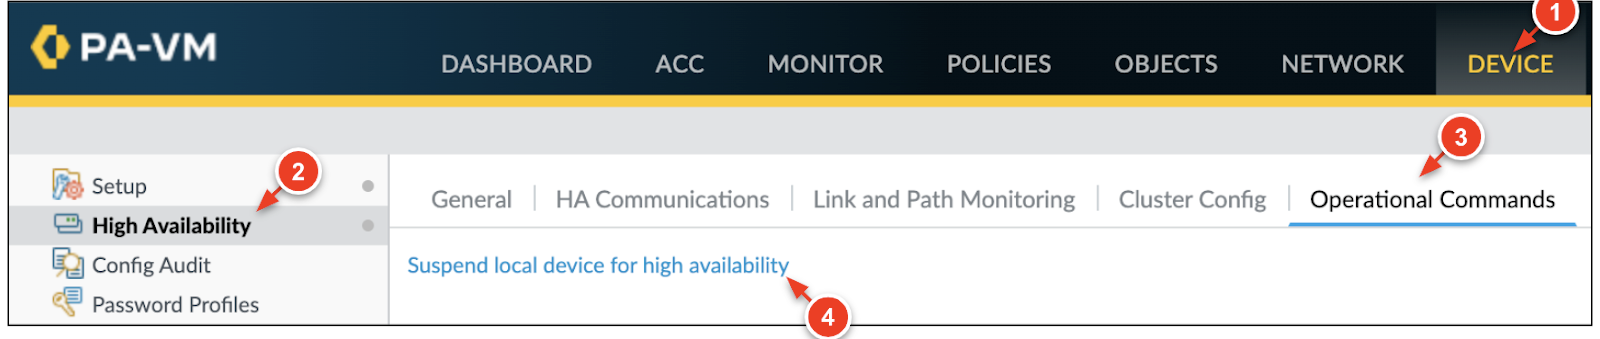
- On the Active firewall, click the Device > High Availabilty > Operational Commands.
- Click Suspend local device for high
availability.
![]()
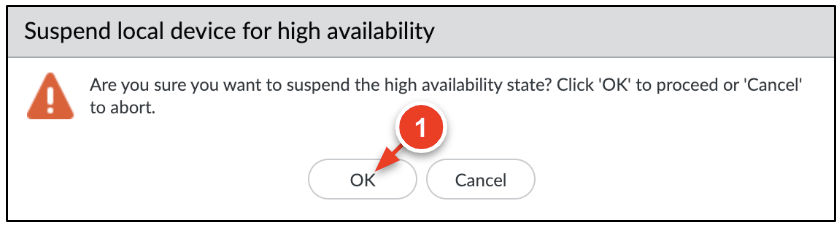
- When prompted, click OK to initiate the
failover.
![]()
- You may notice that the SSH session to the
workload-vm is still active. This indicates the
session successfully failed over between the VM-Series firewalls.
The script output should also display the same source IP
address.Wed Mar 12 16:47:18 UTC 2023 -- Online -- Source IP = x.x.x.x Wed Mar 12 16:47:19 UTC 2023 -- Online -- Source IP = x.x.x.x Wed Mar 12 16:47:21 UTC 2023 -- Offline Wed Mar 12 16:47:22 UTC 2023 -- Offline Wed Mar 12 16:47:23 UTC 2023 -- Online -- Source IP = x.x.x.x Wed Mar 12 16:47:24 UTC 2023 -- Online -- Source IP = x.x.x.x
Onboarding Internet Applications
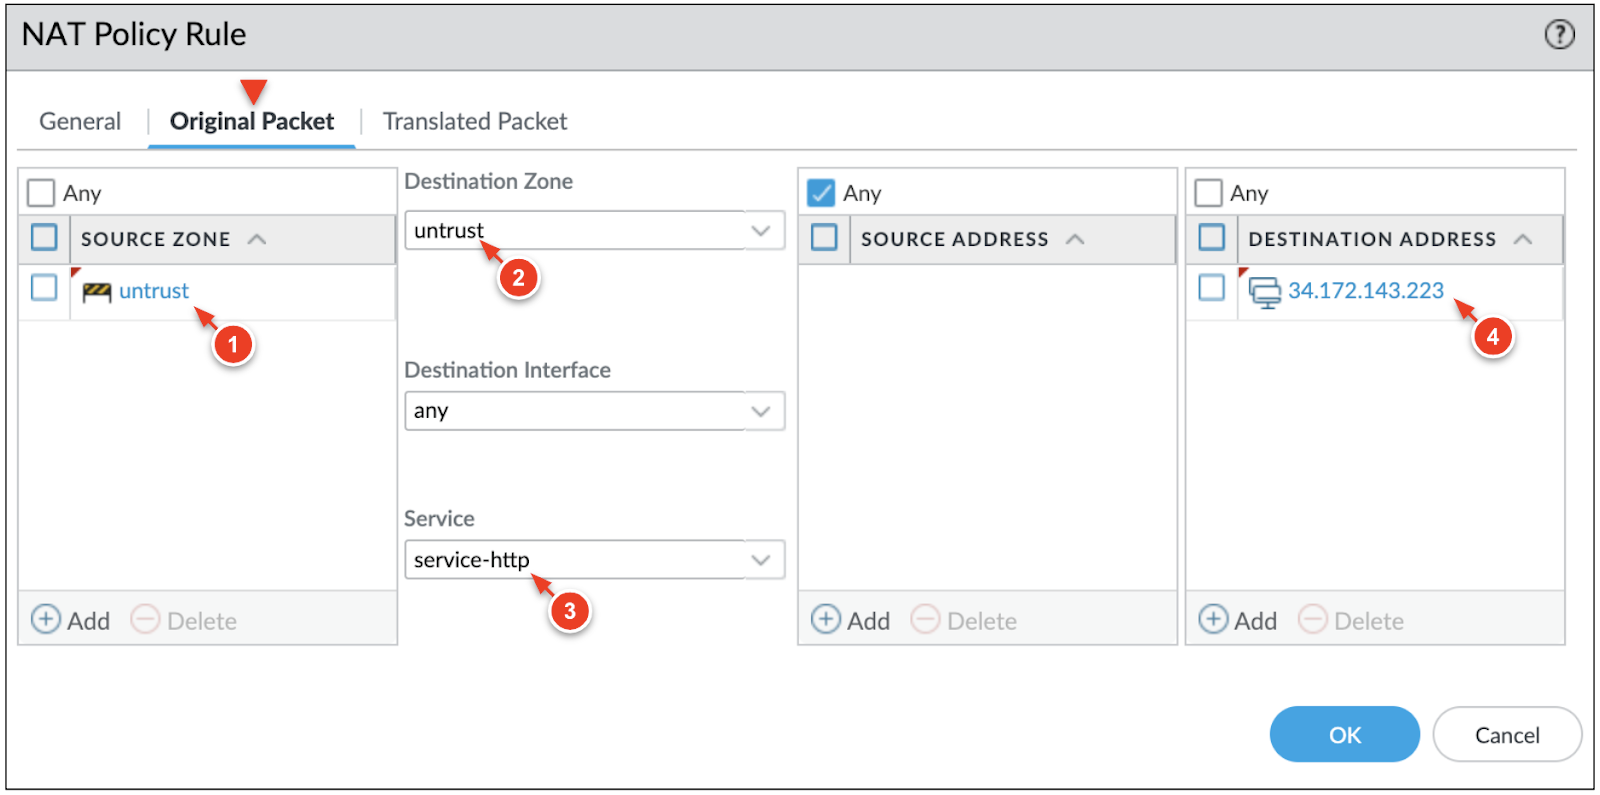
You can onboard and secure multiple internet facing applications through the VM-Series firewall. This is done by mapping forwarding rules on the external load balancer to NAT policies defined on the VM-Series firewall. - In Cloud Shell, deploy a virtual machine into a subnet within the trust VPC network. The virtual machine in this example runs a sample application for you.gcloud compute instances create my-app2 \ --network-interface subnet="panw-us-central1-trust",no-address \ --zone=us-central1-a \ --image-project=panw-gcp-team-testing \ --image=ubuntu-2004-lts-apache-ac \ --machine-type=f1-microRecord the INTERNAL_IP address of the new virtual machine.name: my-app2 ZONE: us-central1-a MACHINE_TYPE: f1-micro PREEMPTIBLE: INTERNAL_IP: 10.0.2.4 EXTERNAL_IP: status: RUNNINGCreate a new forwarding rule on the external TCP load balancer.gcloud compute forwarding-rules create panw-vmseries-extlb-rule2 \ --load-balancing-scheme=EXTERNAL \ --region=us-central1 \ --ip-protocol=L3_DEFAULT \ --ports=ALL \ --backend-service=panw-vmseries-extlbRetrieve and record the address of the new forwarding rule.gcloud compute forwarding-rules describe panw-vmseries-extlb-rule2 \ --region=us-central1 \ --format='get(IPAddress)'(output)34.172.143.223On the active VM-Series, click Policies > NAT > Add and enter a name for the rule.Configure the Original Packet as follows:
- Source Zone: untrust
- Destination Zone: untrust
- service: service-http
- Destination Address: Set to the forwarding rule's IP address (i.e. 34.172.143.223).
![]() In the Translated Packet tab, configure the Destination Address Translation as follows:
In the Translated Packet tab, configure the Destination Address Translation as follows:- Translated Type: Static IP
- Translated Address: Set to the INTERNAL_IP of the sample application (i.e. 10.0.2.4).
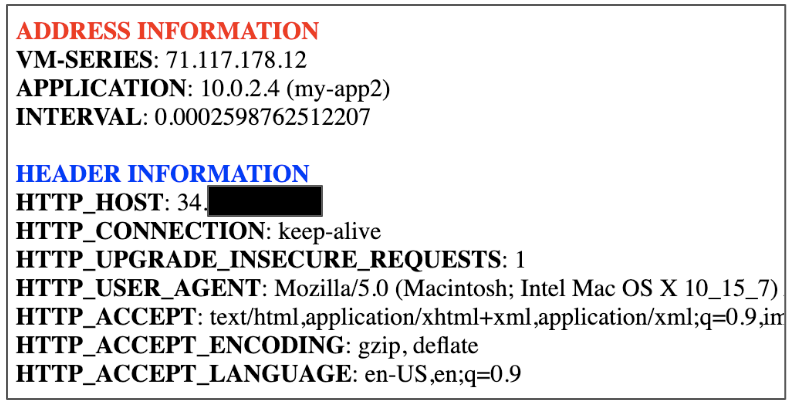
![]() Click OK and commit the changes.Access the sample application using the forwarding rule's address.http://34.172.143.223/
Click OK and commit the changes.Access the sample application using the forwarding rule's address.http://34.172.143.223/![]()
Deleting the Resources
You can delete all the resources when you no longer need them. - (Optional) If you onboarded an additional application, delete the forwarding rule and sample application machine.gcloud compute forwarding-rules delete panw-vmseries-extlb-rule2 \ --region=us-central1 gcloud compute instances delete my-app2 \ --zone=us-central1-aDelete the Terraform using the command:terraform destroyAt the prompt to perform the actions, enter yes. After all the resources are deleted, Terraform displays the following message:Destroy complete!