Apply Security Policy to the VM-Series Firewall on NSX-T
Table of Contents
9.1 (EoL)
Expand all | Collapse all
-
- VM-Series Deployments
- VM-Series in High Availability
- Enable Jumbo Frames on the VM-Series Firewall
- Hypervisor Assigned MAC Addresses
- Custom PAN-OS Metrics Published for Monitoring
- Interface Used for Accessing External Services on the VM-Series Firewall
- PacketMMAP and DPDK Driver Support
-
- VM-Series Firewall Licensing
- Create a Support Account
- Serial Number and CPU ID Format for the VM-Series Firewall
-
- Activate Credits
- Transfer Credits
- Create a Deployment Profile
- Manage a Deployment Profile
- Provision Panorama
- Migrate Panorama to a Software NGFW License
- Renew Your Software NGFW Credits
- Amend and Extend a Credit Pool
- Deactivate License (Software NGFW Credits)
- Delicense Ungracefully Terminated Firewalls
- Create and Apply a Subscription-Only Auth Code
- Migrate to a Flexible VM-Series License
-
- Generate Your OAuth Client Credentials
- Manage Deployment Profiles Using the Licensing API
- Create a Deployment Profile Using the Licensing API
- Update a Deployment Profile Using the Licensing API
- Get Serial Numbers Associated with an Authcode Using the API
- Deactivate a VM-Series Firewall Using the API
- Use Panorama-Based Software Firewall License Management
- What Happens When Licenses Expire?
- Install a Device Certificate on the VM-Series Firewall
-
- Supported Deployments on VMware vSphere Hypervisor (ESXi)
-
- Plan the Interfaces for the VM-Series for ESXi
- Provision the VM-Series Firewall on an ESXi Server
- Perform Initial Configuration on the VM-Series on ESXi
- Add Additional Disk Space to the VM-Series Firewall
- Use VMware Tools on the VM-Series Firewall on ESXi and vCloud Air
- Use vMotion to Move the VM-Series Firewall Between Hosts
- Use the VM-Series CLI to Swap the Management Interface on ESXi
-
-
- VM-Series Firewall for NSX-V Deployment Checklist
- Install the VMware NSX Plugin
- Apply Security Policies to the VM-Series Firewall
- Steer Traffic from Guests that are not Running VMware Tools
- Add a New Host to Your NSX-V Deployment
- Dynamically Quarantine Infected Guests
- Migrate Operations-Centric Configuration to Security-Centric Configuration
- Use Case: Shared Compute Infrastructure and Shared Security Policies
- Use Case: Shared Security Policies on Dedicated Compute Infrastructure
- Dynamic Address Groups—Information Relay from NSX-V Manager to Panorama
-
- Supported Deployments of the VM-Series Firewall on VMware NSX-T (North-South)
- Components of the VM-Series Firewall on NSX-T (North-South)
-
- Install the Panorama Plugin for VMware NSX
- Enable Communication Between NSX-T Manager and Panorama
- Create Template Stacks and Device Groups on Panorama
- Configure the Service Definition on Panorama
- Deploy the VM-Series Firewall
- Direct Traffic to the VM-Series Firewall
- Apply Security Policy to the VM-Series Firewall on NSX-T
- Use vMotion to Move the VM-Series Firewall Between Hosts
- Extend Security Policy from NSX-V to NSX-T
-
- Components of the VM-Series Firewall on NSX-T (East-West)
- VM-Series Firewall on NSX-T (East-West) Integration
- Supported Deployments of the VM-Series Firewall on VMware NSX-T (East-West)
-
- Install the Panorama Plugin for VMware NSX
- Enable Communication Between NSX-T Manager and Panorama
- Create Template Stacks and Device Groups on Panorama
- Configure the Service Definition on Panorama
- Launch the VM-Series Firewall on NSX-T (East-West)
- Add a Service Chain
- Direct Traffic to the VM-Series Firewall
- Apply Security Policies to the VM-Series Firewall on NSX-T (East-West)
- Use vMotion to Move the VM-Series Firewall Between Hosts
- Extend Security Policy from NSX-V to NSX-T
- Use Migration Coordinator to Move Your VM-Series from NSX-V to NSX-T
-
-
- Deployments Supported on AWS
-
- Planning Worksheet for the VM-Series in the AWS VPC
- Launch the VM-Series Firewall on AWS
- Launch the VM-Series Firewall on AWS Outpost
- Create a Custom Amazon Machine Image (AMI)
- Encrypt EBS Volume for the VM-Series Firewall on AWS
- Use the VM-Series Firewall CLI to Swap the Management Interface
- Enable CloudWatch Monitoring on the VM-Series Firewall
- VM-Series Firewall Startup and Health Logs on AWS
- Use Case: Secure the EC2 Instances in the AWS Cloud
- Use Case: Use Dynamic Address Groups to Secure New EC2 Instances within the VPC
-
-
- What Components Does the VM-Series Auto Scaling Template for AWS (v2.0) Leverage?
- How Does the VM-Series Auto Scaling Template for AWS (v2.0 and v2.1) Enable Dynamic Scaling?
- Plan the VM-Series Auto Scaling Template for AWS (v2.0 and v2.1)
- Customize the Firewall Template Before Launch (v2.0 and v2.1)
- Launch the VM-Series Auto Scaling Template for AWS (v2.0)
- SQS Messaging Between the Application Template and Firewall Template
- Stack Update with VM-Series Auto Scaling Template for AWS (v2.0)
- Modify Administrative Account and Update Stack (v2.0)
-
- Launch the Firewall Template (v2.1)
- Launch the Application Template (v2.1)
- Create a Custom Amazon Machine Image (v2.1)
- VM-Series Auto Scaling Template Cleanup (v2.1)
- SQS Messaging Between the Application Template and Firewall Template (v2.1)
- Stack Update with VM-Series Auto Scaling Template for AWS (v2.1)
- Modify Administrative Account (v2.1)
- Change Scaling Parameters and CloudWatch Metrics (v2.1)
-
-
- Enable the Use of a SCSI Controller
- Verify PCI-ID for Ordering of Network Interfaces on the VM-Series Firewall
-
- Deployments Supported on Azure
- Deploy the VM-Series Firewall from the Azure Marketplace (Solution Template)
- Deploy the VM-Series Firewall from the Azure China Marketplace (Solution Template)
- Deploy the VM-Series Firewall on Azure Stack
- Enable Azure Application Insights on the VM-Series Firewall
- Set up Active/Passive HA on Azure
- Use the ARM Template to Deploy the VM-Series Firewall
-
- About the VM-Series Firewall on Google Cloud Platform
- Supported Deployments on Google Cloud Platform
- Create a Custom VM-Series Firewall Image for Google Cloud Platform
- Prepare to Set Up VM-Series Firewalls on Google Public Cloud
-
- Deploy the VM-Series Firewall from Google Cloud Platform Marketplace
- Management Interface Swap for Google Cloud Platform Load Balancing
- Use the VM-Series Firewall CLI to Swap the Management Interface
- Enable Google Stackdriver Monitoring on the VM Series Firewall
- Enable VM Monitoring to Track VM Changes on GCP
- Use Dynamic Address Groups to Secure Instances Within the VPC
- Locate VM-Series Firewall Images in the GCP Marketplace
-
- Prepare Your ACI Environment for Integration
-
-
- Create a Virtual Router and Security Zone
- Configure the Network Interfaces
- Configure a Static Default Route
- Create Address Objects for the EPGs
- Create Security Policy Rules
- Create a VLAN Pool and Domain
- Configure an Interface Policy for LLDP and LACP for East-West Traffic
- Establish the Connection Between the Firewall and ACI Fabric
- Create a VRF and Bridge Domain
- Create an L4-L7 Device
- Create a Policy-Based Redirect
- Create and Apply a Service Graph Template
-
- Create a VLAN Pool and External Routed Domain
- Configure an Interface Policy for LLDP and LACP for North-South Traffic
- Create an External Routed Network
- Configure Subnets to Advertise to the External Firewall
- Create an Outbound Contract
- Create an Inbound Web Contract
- Apply Outbound and Inbound Contracts to the EPGs
- Create a Virtual Router and Security Zone for North-South Traffic
- Configure the Network Interfaces
- Configure Route Redistribution and OSPF
- Configure NAT for External Connections
-
-
- Choose a Bootstrap Method
- VM-Series Firewall Bootstrap Workflow
- Bootstrap Package
- Bootstrap Configuration Files
- Generate the VM Auth Key on Panorama
- Create the bootstrap.xml File
- Prepare the Licenses for Bootstrapping
- Prepare the Bootstrap Package
- Bootstrap the VM-Series Firewall on AWS
- Bootstrap the VM-Series Firewall on Azure
- Bootstrap the VM-Series Firewall on Google Cloud Platform
- Verify Bootstrap Completion
- Bootstrap Errors
End-of-Life (EoL)
Apply Security Policy to the VM-Series Firewall on NSX-T
Now that you have deployed the VM-Series firewall
and created traffic redirection rules to send traffic to the firewall,
you can use Panorama to centrally manage security policy rules on
the VM-Series firewall.
- Log in to Panorama.
- Create security policy rules.By default, the firewall creates a rule that allows Bidirectional Forwarding Detection (BFD). Do not create a rule that blocks BFD. If BFD is blocked, NSX-T thinks that the firewall is unavailable.
- Select PoliciesSecurityPrerules.
- Select the Device Group that you created for managing the VM-Series firewalls on NSX-T in Create Template Stacks and Device Groups on Panorama.
- Click Add and enter a Name and a Description for the rule. In this example, the security rule allows all traffic between the WebFrontEnd servers and the Application servers.
- Select the Source Zone and Destination Zone.
- For the Source Address and Destination
Address, select or type in an address, static address
group, or region.The VM-Series firewall on NSX-T does not support dynamic address groups for North-South traffic.
- Select the Application to allow.
In this example, we create an Application Group that
includes a static group of specific applications that are grouped
together.
- Click Add and select New Application Group.
- Click Add to select the application to include in the group.
- Click OK to create the application group.
- Specify the action— Allow or Deny—for the traffic, and optionally attach the default security profiles for antivirus, anti-spyware, and vulnerability protection, under Profiles.
- Click Commit, select Commit to Panorama. Click OK.
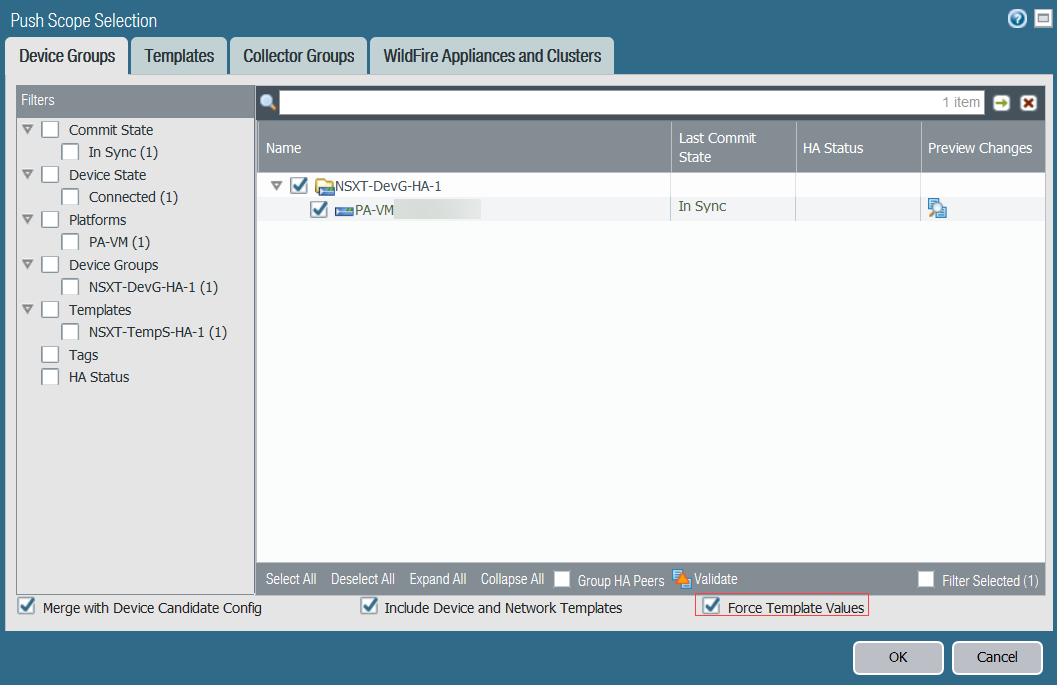
- Apply the policies to the VM-Series firewalls on NSX-T.
- Click CommitPush to DevicesEdit Selections.
- Select the device group and click OK.
- Select Force Template Values. By default, Panorama does not override objects on the firewall with objects on Panorama that share a name. You must select Force Template Values to push policy to the managed firewalls.
- Click Yes to confirm force template values.
- Click OK.
- Verify that the commit is successful.
![]()
- (Optional) Use template to push a base configuration
for network and device configuration such as DNS server, NTP server,
Syslog server, and login banner.Refer to the Panorama Administrator’s Guide for information on using templates.