Prepare the VM-Series Firewall Image for Cisco ENCS
Table of Contents
Prepare the VM-Series Firewall Image for Cisco ENCS
Download or create the files necessary to convert the
PAN-OS qcow2 file, and convert the file to a Cisco ENCS image.
You can convert a PAN-OS qcow2 file from the
NFVIS graphical user interface or the command line interface.
Convert a qcow2 File from the Graphical User Interface
- In NFVIS, go to .
- Fill in
the package information as shown below, supplying your own values.
- Enter a Package Name and VM Version, and for the VM Type, choose Firewall.
- Enable the Serial Console.
- Leave the Sriov Driver(s) field blank, as SR-IOV is not supported.
- Select Local to choose a qcow2 file you uploaded previously, or click Upload Raw Images to upload a qcow2 file.
- Log in to the Palo Alto Networks Customer Support Portal.If you have not already done so, create a support account and register the VM-Series firewall.
- Select and from the Filter By drop-down, select Pan OS for VM-Series KVM Base Image, for example, version 9.1.
- Download the qcow2 image.
![]()
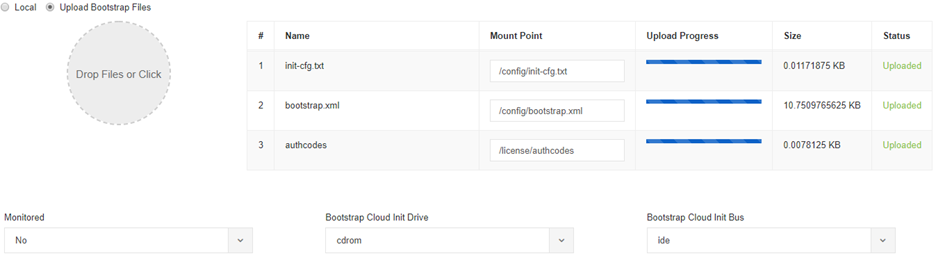
- Upload the bootstrap files. The bootstrapping package for Cisco ENCS only supports init-cfg.txt, bootstrap.xml, and authcodes; it does not support dynamic or software updates.
![]()
- Set the Advanced Configuration.
![]()
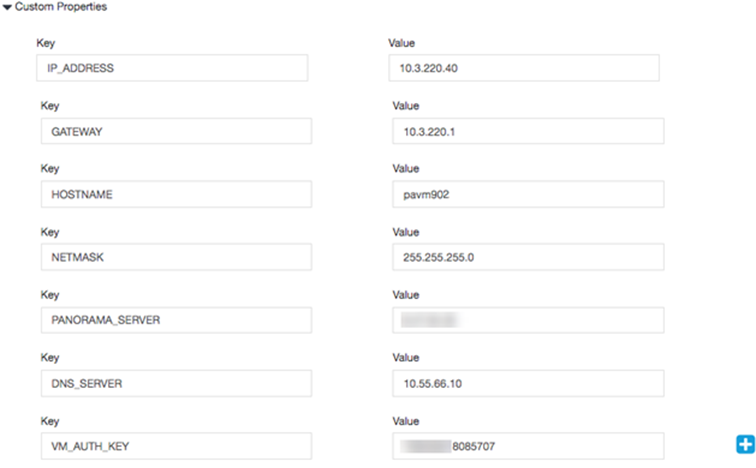
- Enter values for Custom Properties.
![]()
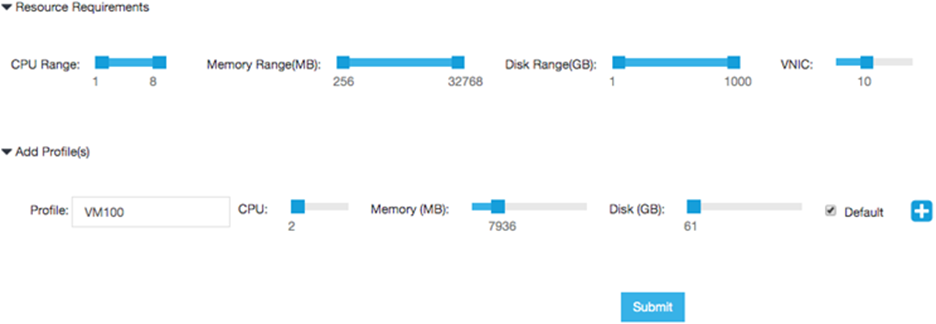
- Set values for your resource requirements and choose
the Default profile, or add a profile for the current configuration.Click Submit to save your package.
![]()
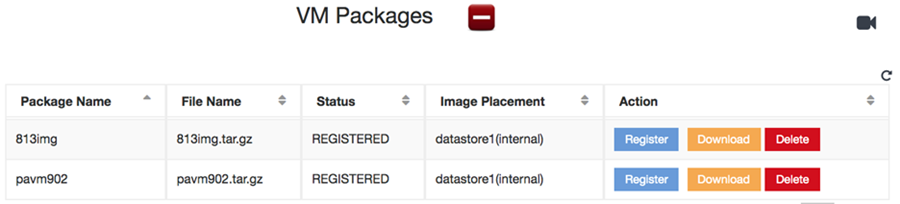
- Click Register to register the
new image.
![]()


Convert a qcow2 File from the Command Line Interface
To create a bootstrap file from the command
line interface, you create the file image_properties_template.xml then
use the using the VM Image Packaging utility to
create a .tar file, which you convert using
the nfvpt.py script. The output is a tar.gz file
that can be uploaded from the NFVIS user interface.
The
bootstrapping package for Cisco ENCS only supports init-cfg.txt,
bootstrap.xml, and authcodes; it does not support dynamic or software
updates.
- Create or choose a folder on your local machine (the conversion folder) in which you want to download and save the files necessary to convert the VM-Series firewall qcow2 image to the Cisco ENCS format.
- Obtain
the VM-Series firewall qcow2 image.
- Log in to the Palo Alto Networks Customer Support Portal.If you have not already done so, create a support account and register the VM-Series firewall.
- Select and from the Filter By drop-down, select Pan OS for VM-Series KVM Base Image, for example, version 9.1.
- Download the qcow2 image to the conversion folder.
- Log in to the Palo Alto Networks Customer Support Portal.
- Create
the following init-cfg.txt file
in the conversion folder.
type=static ip-address=${IP_ADDRESS} default-gateway=${GATEWAY} netmask=${NETMASK} ipv6-address= ipv6-default-gateway= hostname=${HOSTNAME} vm-auth-key=${VM_AUTH_KEY} panorama-server=${PANORAMA_SERVER} panorama-server-2= tplname= dgname= dns-primary=${DNS_SERVER} dns-secondary= op-command-modes=jumbo-frame, mgmt-interface-swap** dhcp-send-hostname=yes dhcp-send-client-id=yes dhcp-accept-server-hostname=yes dhcp-accept-server-domain=yes - Create a text file named authcodes (no extension), and enter the auth codes for the VM-Series firewall capacity and subscriptions. Save the file in the conversion folder.
- Create
the following image_properties_template.xml file
in the conversion folder, and supply values for your deployment:
<image_properties> <vnf_type>FIREWALL</vnf_type> <name>pafw</name> <version>9.1.0</version> <bootup_time>-1</bootup_time> <root_file_disk_bus>virtio</root_file_disk_bus> <root_image_disk_format>qcow2</root_image_disk_format> <vcpu_min>2</vcpu_min> <vcpu_max>8</vcpu_max> <memory_mb_min>4096</memory_mb_min> <memory_mb_max>16384</memory_mb_max> <vnic_max>8</vnic_max> <root_disk_gb_min>32</root_disk_gb_min> <root_disk_gb_max>60</root_disk_gb_max> <console_type_serial>true</console_type_serial> <sriov_supported>true</sriov_supported> <pcie_supported>false</pcie_supported> <monitoring_supported>false</monitoring_supported> <monitoring_methods>ICMPPing</monitoring_methods> <low_latency>true</low_latency> <privileged_vm>true</privileged_vm> <custom_property> <HOSTNAME> </HOSTNAME> </custom_property> <custom_property> <IP_ADDRESS> </IP_ADDRESS> </custom_property> <custom_property> <NETMASK> </NETMASK> </custom_property> <custom_property> <GATEWAY> </GATEWAY> </custom_property> <custom_property> <PANORAMA_SERVER> </PANORAMA_SERVER> </custom_property> <custom_property> <DNS_SERVER> </DNS_SERVER> </custom_property> <custom_property> <VM_AUTH_KEY> </VM_AUTH_KEY> </custom_property> <default_profile>VM-50</default_profile> <profiles> <profile> <name>VM-50</name> <description>VM-50 profile</description> <vcpus>2</vcpus> <memory_mb>5120</memory_mb> <root_disk_mb>60000</root_disk_mb> </profile> <profile> <name>VM-100-n-200</name> <description>VM-100 and VM-200 profile</description> <vcpus>2</vcpus> <memory_mb>7168</memory_mb> <root_disk_mb>60000</root_disk_mb> </profile> <profile> <name>VM-300</name> <description>VM-300 profile</description> <vcpus>2</vcpus> <memory_mb>9216</memory_mb> <root_disk_mb>60000</root_disk_mb> </profile> <profile> <name>VM-1000-HV</name> <description>VM-1000-HV profile</description> <vcpus>4</vcpus> <memory_mb>9216</memory_mb> <root_disk_mb>60000</root_disk_mb> </profile> <profile> <name>VM-500</name> <description>VM-500 profile</description> <vcpus>4</vcpus> <memory_mb>16384</memory_mb> <root_disk_mb>60000</root_disk_mb> </profile> </profiles> <cdrom>true</cdrom> <bootstrap_file_1>/config/init-cfg.txt</bootstrap_file_1> <bootstrap_file_2>/config/bootstrap.xml</bootstrap_file_2> <bootstrap_file_3>/license/authcodes</bootstrap_file_3> </image_properties> - Download the image packaging utility.
- Log in to the Enterprise NFVIS user interface and select .
- Click the Browse Datastore tab, and navigate to .
- Download nfvisvmpackagingtool.tar to the conversion folder.
- Untar the file:
tar -xvf nfvisvmpackagingtool.tar
- In the conversion folder that contains the qcow2, the init-config.txt and
the authcodes file, run the nfvpt.py script.
See the nfvpt.py image packaging utility documentation.The following sample creates the image file Palo-Alto-9.1.0, and a VM-100 profile. Options are space-separated (the sample shows options on separate lines for clarity only) and custom options are key-value pairs with a colon separator.
./nfvpt.py -o Palo-Alto-9.1.0 -i PA-VM-KVM-9.1.0.qcow2
-n PAN902 -t FIREWALL -r 9.1.0
--monitored false
--privileged true
--bootstrap /config/init-cfg.txt:init-cfg.txt,/license/authcodes:authcodes
--min_vcpu 2 --max_vcpu 8
--min_mem 4096 --max_mem 16384
--min_disk 10 --max_disk 70
--vnic_max 8
--optimize true
--console_type_serial true
--profile VM-100,"VM-100 profile",2,7168,61440
--default_profile VM-100
--custom HOSTNAME:hello
--custom IP_ADDRESS:10.2.218.24
--custom NETMASK:255.255.255.0
--custom GATEWAY:10.2.218.1
--custom DNS_SERVER:10.55.66.10
--custom PANORAMA_SERVER:0.10.10.0
--custom VM_AUTH_KEY:123451234512345
- Upload the converted image.
- In the NFVIS user interface, select and click the blue Images icon to show the Drop Files or Click circle.
- Drag the converted file into the circle, or click to browse and select your file.
- In the Status column, click Start. When the upload is complete, the image is registered, and the file you uploaded displays in the Image Registration tab Images list.