Deploy the Template to Azure
Table of Contents
Deploy the Template to Azure
Use the following instructions to deploy the
template to Azure.
- Deploy the template.Currently not available for deploying in Azure China.
- Access the template from https://github.com/PaloAltoNetworks/azure-applicationgateway
- Click Deploy to Azure.
- Fill in the details for deploying the template. See VM-Series
and Azure Application Gateway Template Parameters for a description
and the default values, if any, for each parameter.At a minimum, you have to pick the Azure Subscription, Resource Group, Location, Storage Account Name, and a Username/password or SSH Key for the administrative account on the VM-Series firewalls.
- Click Purchase to accept the
terms and conditions and deploy the resources.If you have validation errors, click to view the details and fix your errors.
- On the Azure portal, verify that you have successfully
deployed the template resources, including the VM-Series firewalls.
- Select , select the resource group.
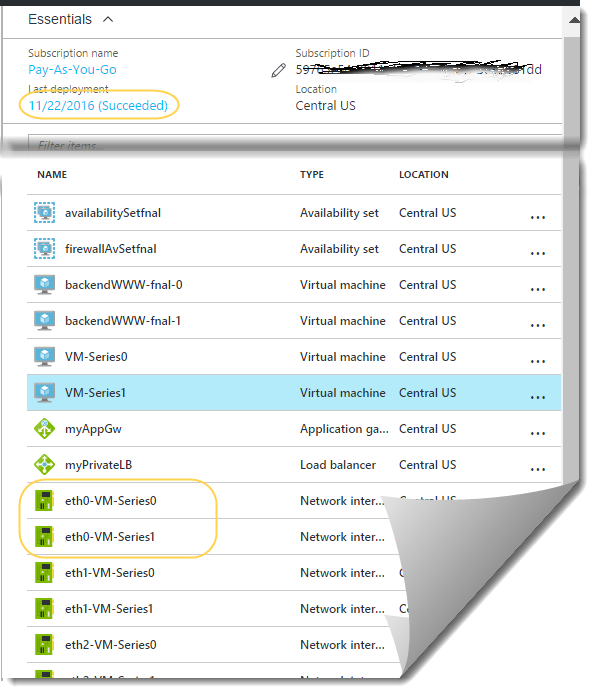
- Select Overview to review all the resources that have been deployed. The deployment status should display Succeeded.
![]()
- Note the Public IP address or the DNS name assigned to eth0-VM-Series0 and eth0-VM-Series1 to access the management interface of the VM-Series firewalls.
- Log in to the firewalls.
- Using a secure connection (https) from your web browser, log in to the IP address for eth0-VM-Series0 or the DNS name for the firewall.
- Enter the username/password you defined in the parameters file. You will see a certificate warning; that is okay. Continue to the web page.
- Configure
the VM-Series firewall.You can either configure the firewall manually or import the Sample Configuration File provided in the GitHub repository and customize it for your security needs.
- Configure the firewall manually—You must do the following at a minimum:
- Configure the dataplane network interfaces as Layer 3 interfaces on the firewall ().
- Add a static rule to the virtual router on the firewall. This static rule specifies the firewall’s untrust interface IP address as the nexthop address for any traffic destined for ethernet1/1. (, select the router and click Static Routes).
- Create security policy rules () to allow inbound and outbound traffic on the firewall.
- Add NAT policies (). You must create destination
NAT and source NAT rules on the firewall to send traffic to the
web servers and back out to the client who initiated the request.The destination NAT rule is for all traffic that arrives on the firewall’s untrust interface. This rule is required to translate the destination IP address on the packet to that of the internal load balancer so that all traffic is directed to the internal load balancer and on to the backend web servers.The source NAT rule is for all traffic from the backend web server and destined to the untrust interface on the firewall. This rule translates the source address to the IP address of the trust interface on the firewall
- Commit your changes.
- Import the sample configuration file:
- Download and save the Sample Configuration File to your local client.
- Select , click Import named configuration snapshot, Browse to the sample configuration file that you have saved locally, and click OK.
- Click Load named configuration snapshot, select the Name of the sample configuration file you just imported, and click OK.
- Change the IP address of the address objects and the static route to match the IP address from the CIDR block you used. Update address objects to use the private IP addresses for eth1-VM-Series0 and eth1-VM-Series1.
- Important! Create a new admin user account. Select and Add a new account.
- Modify the Hostname in the General Settings widget in .
- Commit your changes, and log
out. The commit overwrites the running configuration with the sample
configuration file and updates you just made. On commit, the hostname
and the administrator user account that you specified when deploying
the template are overwritten. You will now need to log in using
the new admin user account and password.
- Log in to the firewall—Use the credentials you created and delete the pandemo administrative account imported as part of the sample configuration file.
- Log in and configure the other instance of the VM-Series
firewall.See step Configure the VM-Series firewall.
- Verify that you have configured the firewalls properly.From your web browser, use http to access the IP address or DNS name for the app gateway. You should be able to view the default Apache 2 Ubuntu web page.
![]() If you have used the sample configuration firewall, log in to the firewall and view the Traffic logs generated on session start in .
If you have used the sample configuration firewall, log in to the firewall and view the Traffic logs generated on session start in .