Configure the Cloud Identity Engine as a Mapping Source on the Firewall or Panorama
Table of Contents
Expand all | Collapse all
-
- Cloud Identity Engine Attributes
- Collect Custom Attributes with the Cloud Identity Engine
- View Directory Data
- Cloud Identity Engine User Context
- Create a Cloud Dynamic User Group
- Configure Third-Party Device-ID
- Configure an IP Tag Cloud Connection
- View Mappings and Tags
- Configure Dynamic Privilege Access in the Cloud Identity Engine
- Send Cortex XDR Risk Signals to Okta
- Configure SSF Okta Receiver as a Risk Connection
- Configure the Secrets Vault
-
- Set Up Password Authentication
-
- Configure Azure as an IdP in the Cloud Identity Engine
- Configure Okta as an IdP in the Cloud Identity Engine
- Configure PingOne as an IdP in the Cloud Identity Engine
- Configure PingFederate as an IdP in the Cloud Identity Engine
- Configure Google as an IdP in the Cloud Identity Engine
- Configure a SAML 2.0-Compliant IdP in the Cloud Identity Engine
- Set Up a Client Certificate
- Configure an OIDC Authentication Type
- Set Up an Authentication Profile
- Configure Cloud Identity Engine Authentication on the Firewall or Panorama
- Configure the Cloud Identity Engine as a Mapping Source on the Firewall or Panorama
- Configure Dynamic Privilege Access in the Cloud Identity Engine
- Get Help
Configure the Cloud Identity Engine as a Mapping Source on the Firewall or Panorama
When you configure the Cloud Identity Engine as a User-ID source, the firewall or Panorama
retrieves the group mapping information from the Cloud Identity Engine. You can then
use the group information from the Cloud Identity Engine to create and enforce
group-based security policy rules.
If your tenant contains an Okta directory that uses
subdomains, enter the following CLI command on the firewall before configuring the
Cloud Identity Engine profile: debug user-id dscd subdomains on.
This command is disabled by default. To disable the subdomain capability, use the
debug user-id dscd subdomains off CLI command. These commands
are supported for PAN-OS version 10.2.9.
The Cloud Identity Engine retrieves the information for your tenant based on your
device certificate. It also uses the Palo Alto Networks Services service route, so make sure to allow
traffic for this service route or configure a custom service route.
To ensure that the Cloud Identity Engine can successfully
retrieve users and groups, all user or group names must meet the following
requirements: the name is case-sensitive and can have up to 63 characters on the
firewall or up to 31 characters on Panorama. It must be unique and use only letters,
numbers, hyphens, and underscores.
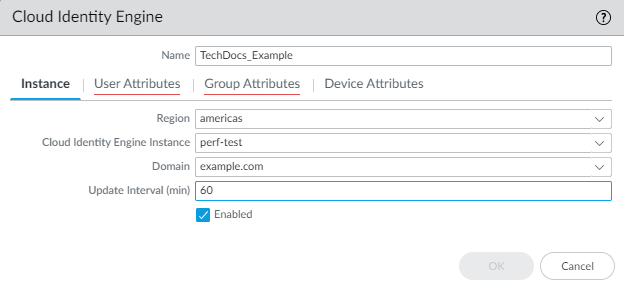
- On the firewall, select DeviceUser IdentificationCloud Identity Engine and Add a profile.On Panorama, to configure the Cloud Identity Engine as a User-ID source for managed devices, select DeviceUser IdentificationCloud Identity Engine. To configure the Cloud Identity Engine as a User-ID source for Panorama administrators, select PanoramaUser IdentificationCloud Identity Engine.For the Instance, specify each of the following:
- Region—Select the regional endpoint for your tenant. The region you select must match the region you select when you activate your Cloud Identity Engine tenant.
- Cloud Identity Engine Instance—If you have more than one tenant, select the tenant you want to use.
- Domain—Select the domain that contains the directories you want to use.
If you have enabled subdomain retrieval for Okta, select the subdomain you want to use for this profile.
- Update Interval (min)—Enter the number of minutes that you want the firewall to wait between updates from the Cloud Identity Engine app to the firewall (also known as a refresh interval). The default is 60 minutes and the range is 5—1440.
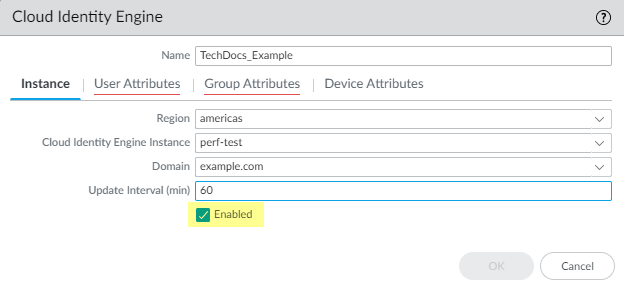
![]() Verify that the profile is Enabled.
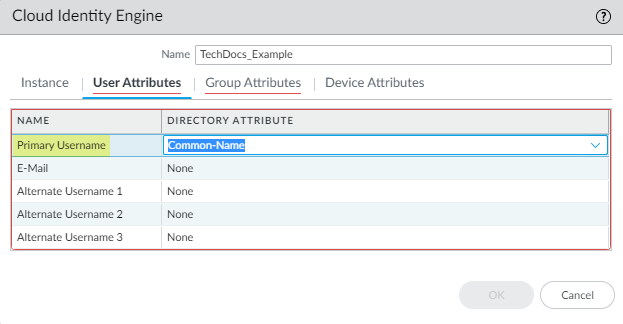
Verify that the profile is Enabled.![]() For the User Attributes, select the format for the Primary Username. You can optionally select the formats for the E-Mail and an Alternate Username. You can configure up to three alternate username formats if your users log in using multiple username formats.
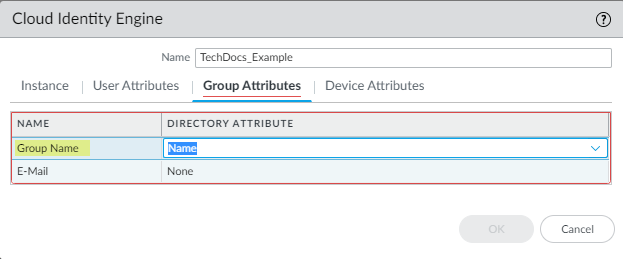
For the User Attributes, select the format for the Primary Username. You can optionally select the formats for the E-Mail and an Alternate Username. You can configure up to three alternate username formats if your users log in using multiple username formats.![]() For the Group Attributes, select the format for the Group Name.
For the Group Attributes, select the format for the Group Name.![]() For the Device Attributes, select the Endpoint Serial Number.If you are using GlobalProtect and you have enabled Serial Number Check, select the Endpoint Serial Number option to allow the Cloud Identity Engine to collect serial numbers from managed endpoints. This information is used by the GlobalProtect portal to check if the serial number exists in the directory for verification that the endpoint is managed by GlobalProtect.
For the Device Attributes, select the Endpoint Serial Number.If you are using GlobalProtect and you have enabled Serial Number Check, select the Endpoint Serial Number option to allow the Cloud Identity Engine to collect serial numbers from managed endpoints. This information is used by the GlobalProtect portal to check if the serial number exists in the directory for verification that the endpoint is managed by GlobalProtect.![]() Click OK then Commit your changes.Configure security policy rules for your users (for example, by specifying one or more users or groups that the firewall retrieves from the Cloud Identity Engine as the Source User).The firewall collects attributes only for the users and groups that you use in security policy rules, not all users and groups in the directory.Verify that the firewall has the mapping information from the Cloud Identity Engine.
Click OK then Commit your changes.Configure security policy rules for your users (for example, by specifying one or more users or groups that the firewall retrieves from the Cloud Identity Engine as the Source User).The firewall collects attributes only for the users and groups that you use in security policy rules, not all users and groups in the directory.Verify that the firewall has the mapping information from the Cloud Identity Engine.- On the client device, use the browser to access a web page that requires authentication.Enter your credentials to log in.On the firewall, use the show user ip-user-mapping all command to verify that the mapping information is available to the firewall.


