Identity
Configure an IP Tag Cloud Connection
Table of Contents
Configure an IP Tag Cloud Connection
Learn how to configure the Cloud Identity Engine to collect IP-Tags for rule
enforcement.
| Where Can I Use This? | What Do I Need? |
|---|---|
| The Cloud Identity Engine service is free; however, the enforcement points utilizing directory data may require specific licenses. Click here for more information. |
An IP-Tag Cloud Connection enables the Cloud Identity Engine to collect IP
address-to-tag information from cloud service providers. To enforce a tag-based
Security policy that adapts to IP address changes, configure Dynamic Address Groups using the IP
address-to-tag information.
To configure the Cloud Identity Engine to collect IP address-to-tag (also known as
IP-tag) information for policy rule enforcement, configure a connection to your
cloud service provider to synchronize the mappings. The identity
management system provides the IP-tag information to the Cloud Identity Engine for
processing, which then provides the information to the firewalls for policy rule
enforcement.
To collect IP-tag information from your cloud service provider, you must grant the
Cloud Identity Engine the required permissions.
- Azure—Grant the read permissions as described in the Azure Monitoring section in the VM-Series documentation to the service account.
- Amazon Web Services (AWS)—Grant the service account the Amazon Role Name (ARN) roles as described in the IAM Roles and Permissions for Panorama section as shown in the JSON example in the VM-Series documentation. For more information on the ARN, refer to the AWS documentation.
- Google Cloud Platform (GCP)—Grant the IAM roles as described in the VM-Series documentation to the service account.
If you use Strata Cloud Manager, you can view your
IP-tag information using the unified interface and use it to create your tag-based Security policy.
For each region, you can synchronize up to 60,000 IP-tag mappings from a
cloud service in a monitoring configuration at one time. The Cloud Identity
Engine sync only the new or modified mappings each time. You can view up to
32,000 IP-tag mappings per page.
You can also view all IP-tag information in the Cloud Identity Engine ().
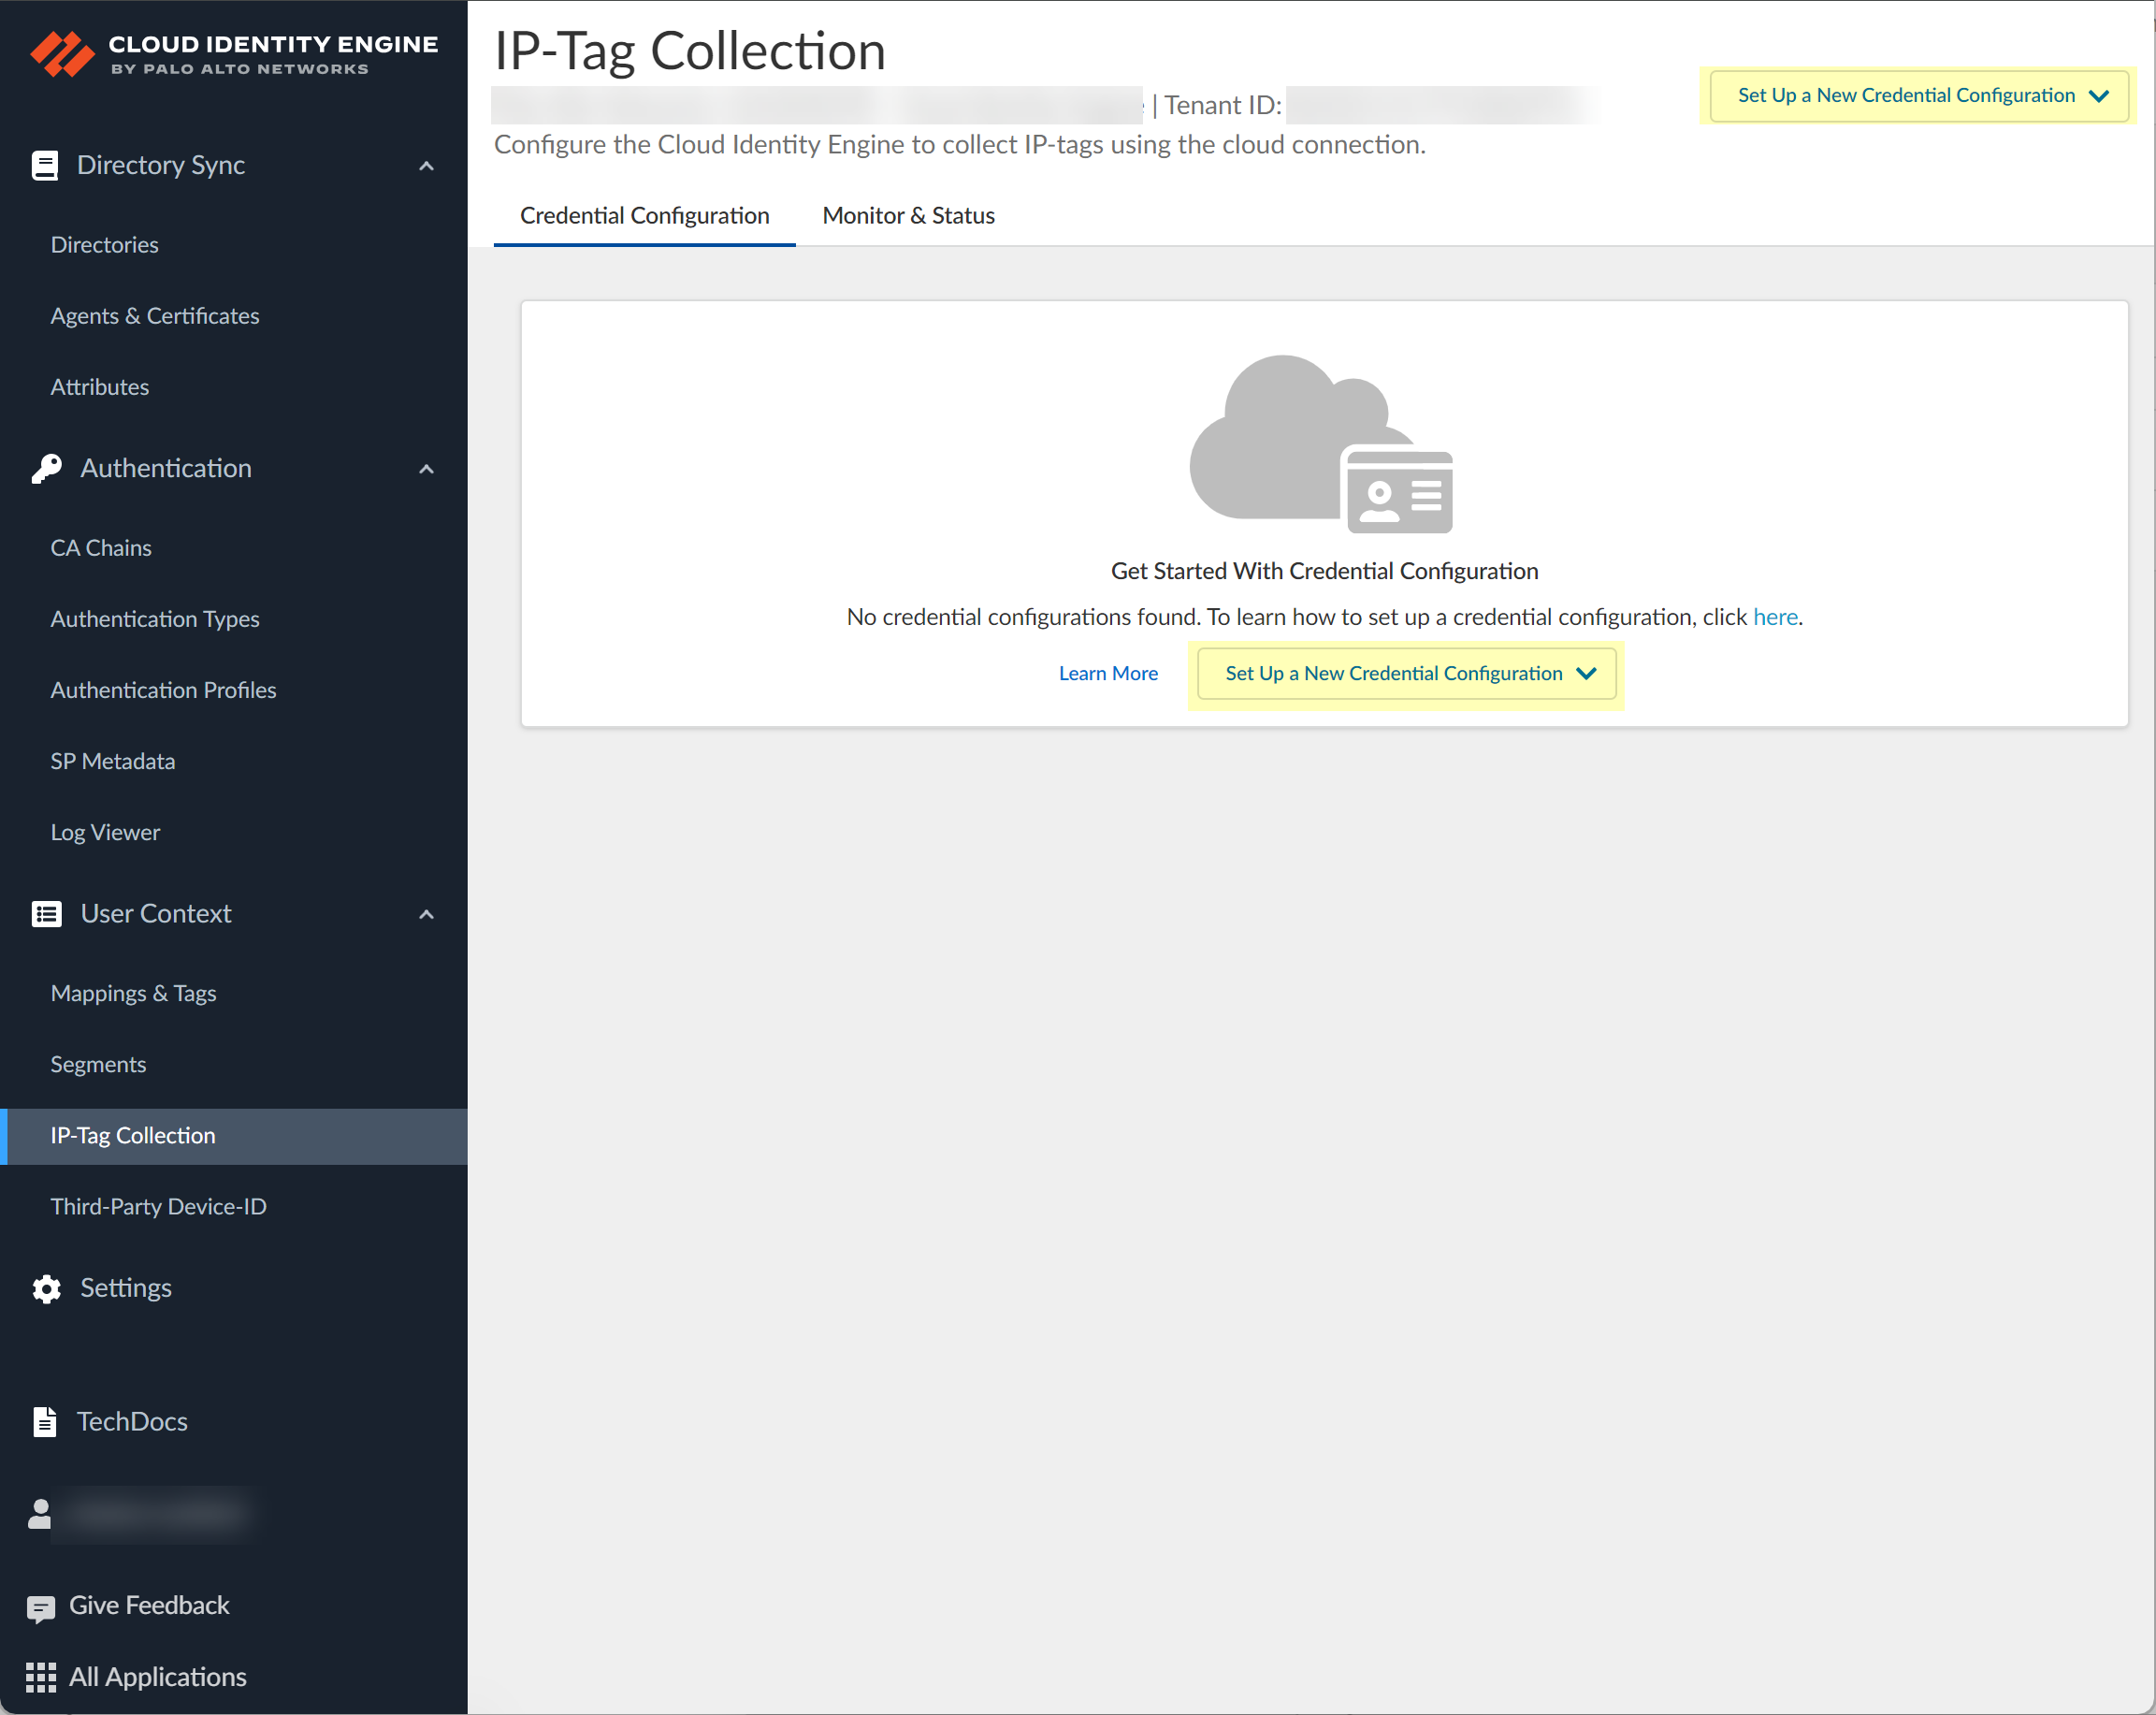
- If you have not already done so, activate User Context and use the default segment or configure a new segment to receive the mapping information.Select .
![]() Select the Credential Configuration tab (if it does not already display).To Set Up a New Credential Configuration, select the cloud service provider you want to use.
Select the Credential Configuration tab (if it does not already display).To Set Up a New Credential Configuration, select the cloud service provider you want to use.- AWS—Connect to an Amazon Web Services (AWS) instance.
- Azure—Connect to a Microsoft Azure Active Directory instance.
- Google Cloud Platform—Connect to a Google Cloud Platform (GCP) instance.
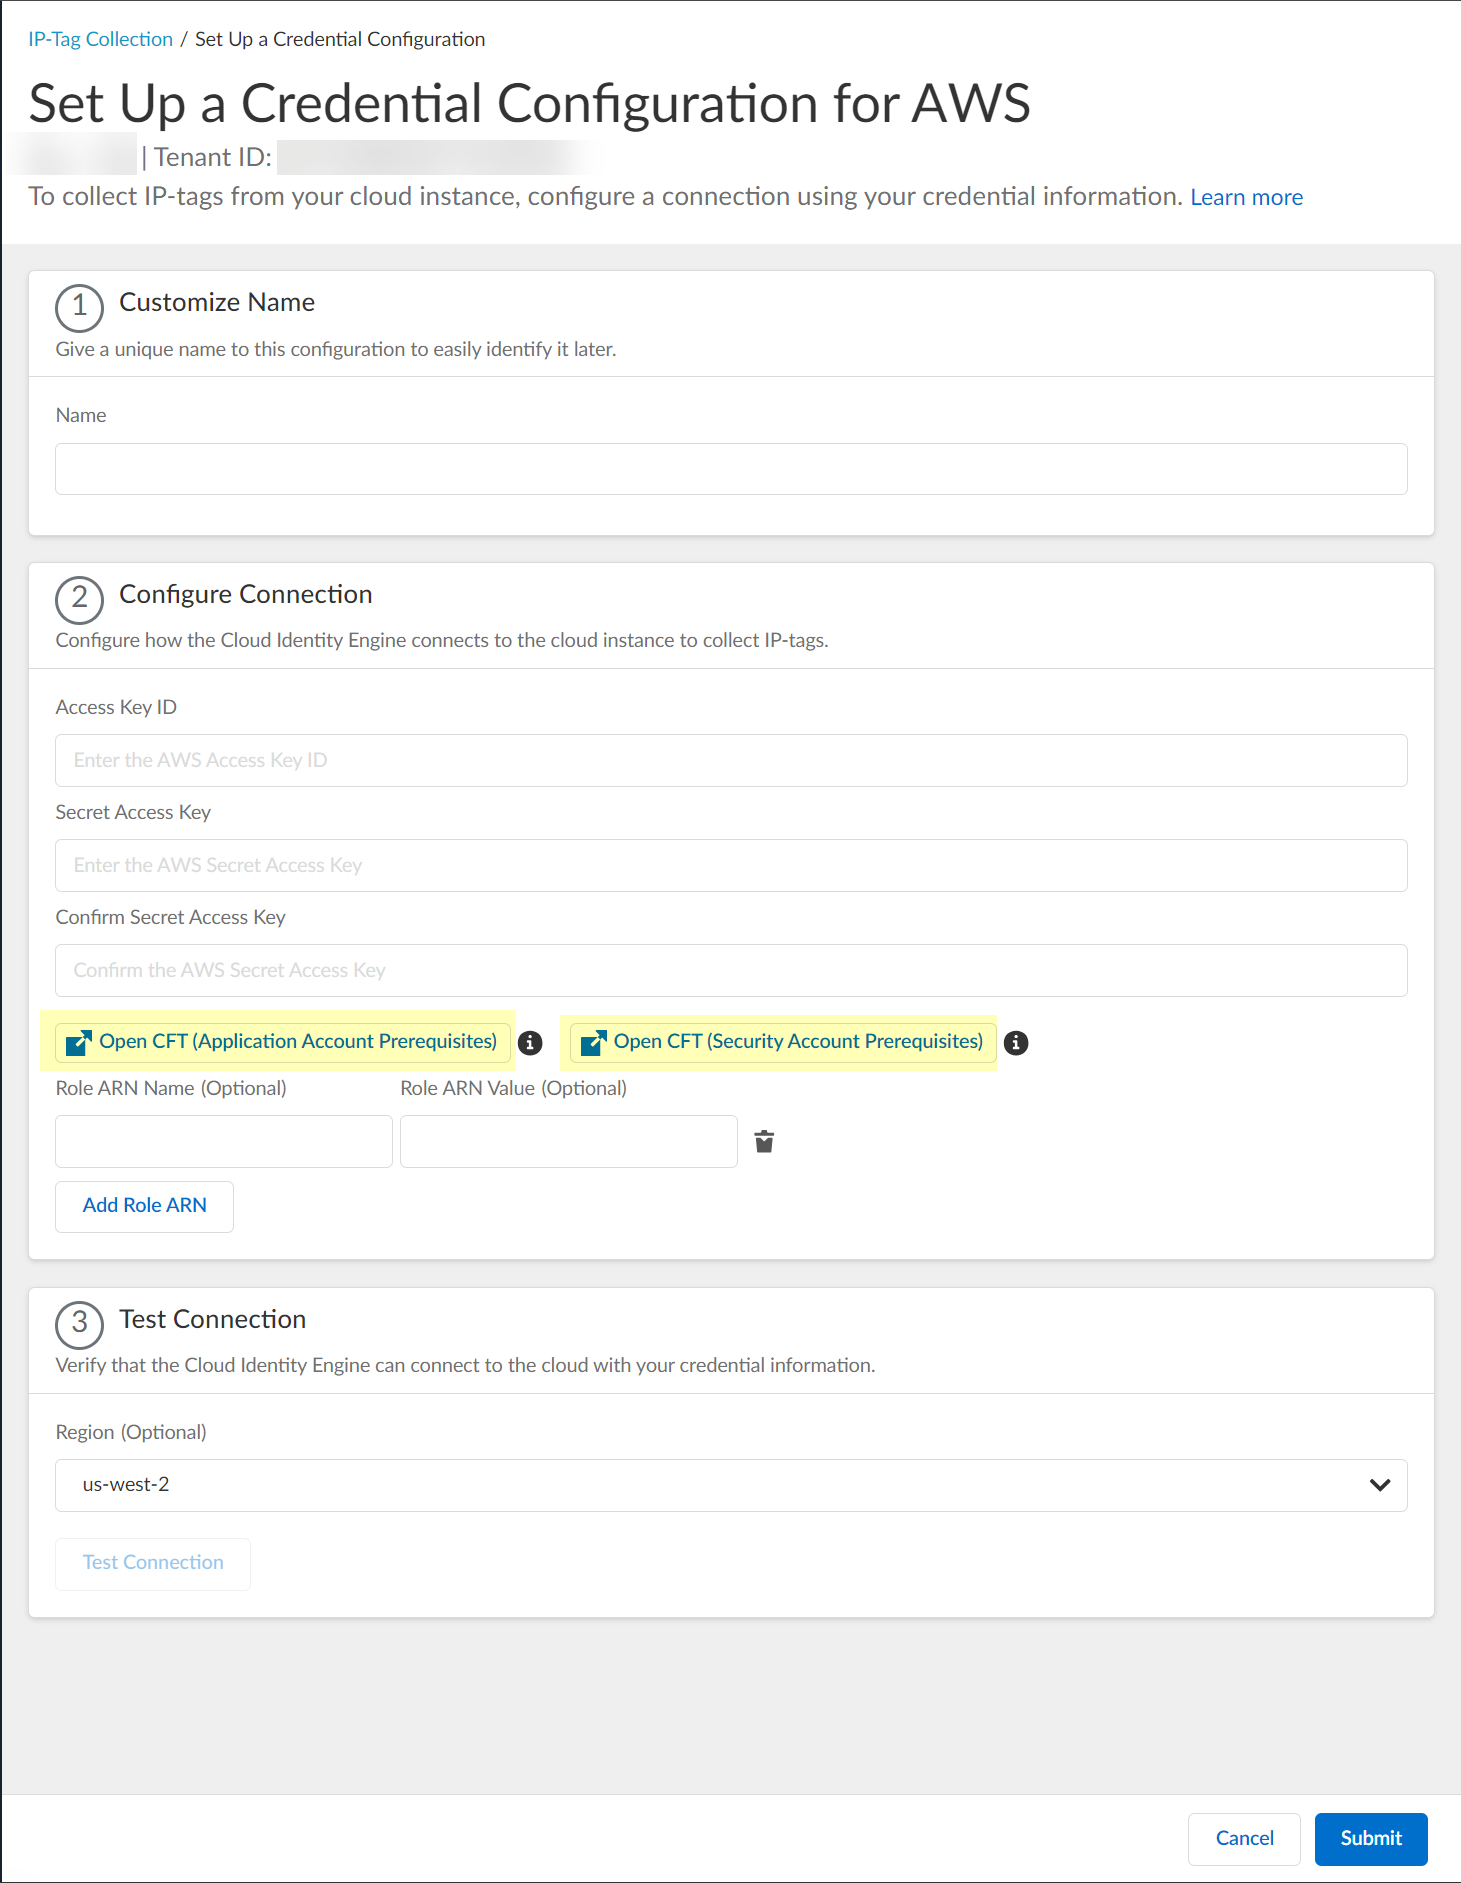
![]() Enter a unique and descriptive Name for the configuration.(AWS only) Configure your AWS connection.To open your AWS administrator portal in a new window so you can create or edit any necessary ARNs, select the type of CloudFormation template (CFT) you want to configure and log in with your AWS credentials.
Enter a unique and descriptive Name for the configuration.(AWS only) Configure your AWS connection.To open your AWS administrator portal in a new window so you can create or edit any necessary ARNs, select the type of CloudFormation template (CFT) you want to configure and log in with your AWS credentials.- Open CFT (Application Account Prerequisites)—Configure the Application Account prerequisites.
- Open CFT (Security Account Prerequisites)—Configure the Application Account prerequisites.
To enable monitoring using the current account, you only need to configure the application account prerequisites. If you want to use a different account, such as a service account or a cross-account role to collect the data, you must configure the application account prerequisites, the security account prerequisites, and a role ARN for the account. For more information, refer to the Amazon documentation.![]()
- Enter your Access Key ID.To learn how to obtain your access key ID and secret access key, refer to the AWS documentation.Enter your Secret Access Key.Reenter your secret access key to Confirm Secret Access Key.(Optional) Enter a Role ARN Name and Role ARN Value.To configure additional Role ARNs, click Add Role ARN for each Role ARN you want to include.(Azure only) Configure your Azure connection.
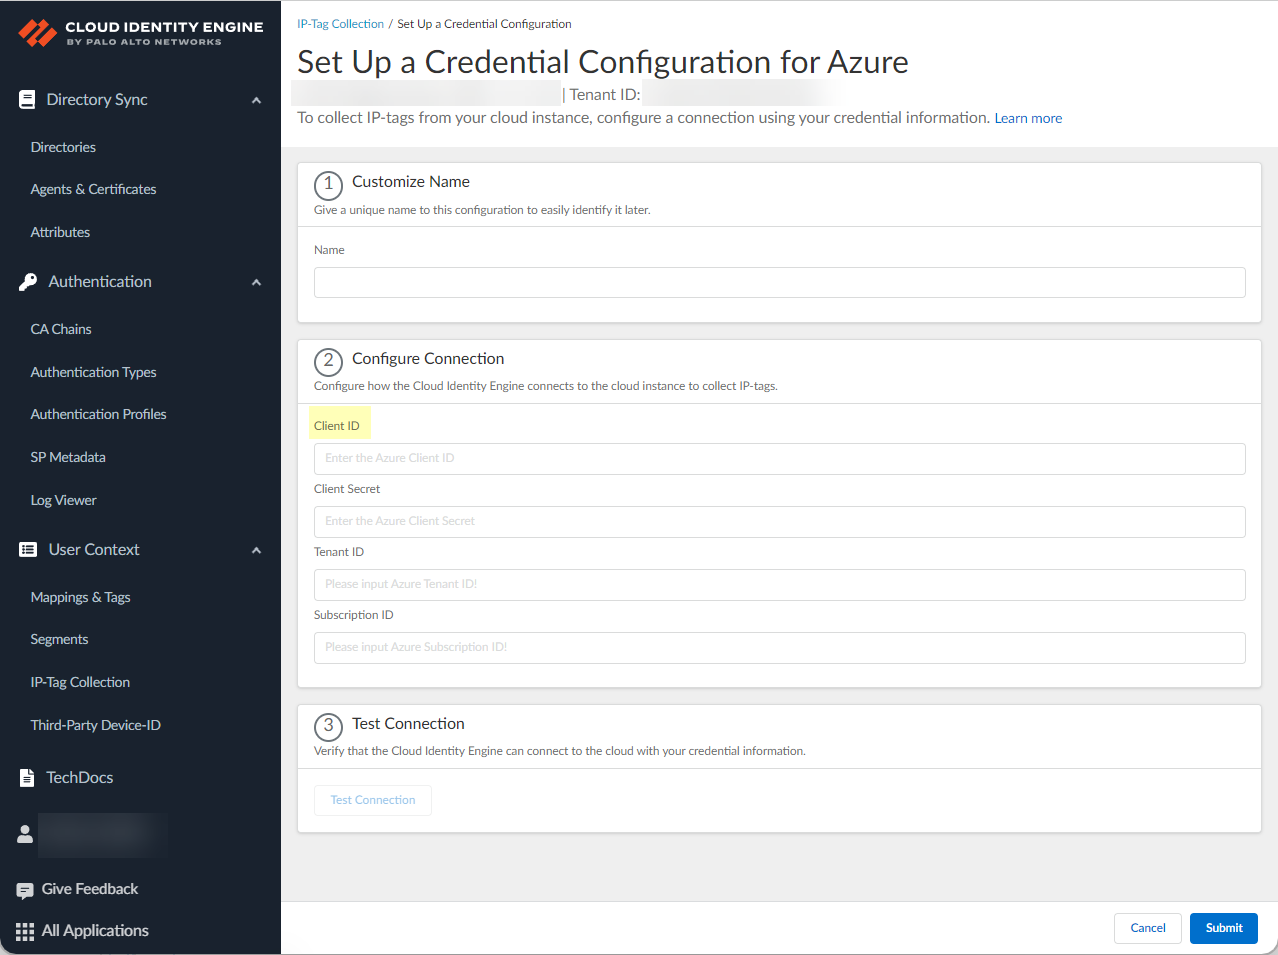
- Enter your Client ID.To learn how to obtain the client ID and client secret, refer to the Azure documentation.
![]() Enter your Client Secret.Enter your Tenant ID.To learn how to obtain the tenant ID and subscription ID, refer to the Azure documentation.Enter your Subscription ID.(Google Cloud Platform only) Configure your GCP connection.
Enter your Client Secret.Enter your Tenant ID.To learn how to obtain the tenant ID and subscription ID, refer to the Azure documentation.Enter your Subscription ID.(Google Cloud Platform only) Configure your GCP connection.- Create credentials for a service account in your Google Cloud console, and then download and save the JSON file in a safe location.Click Browse files and click Open to navigate to the JSON file or drag and drop the GCP credential JSON file.
![]() (Optional) Select the Region for the instance.You can optionally Search for a region. If you don't select a region, the Cloud Identity Engine uses the us-west-2 region. You can select one region per instance.
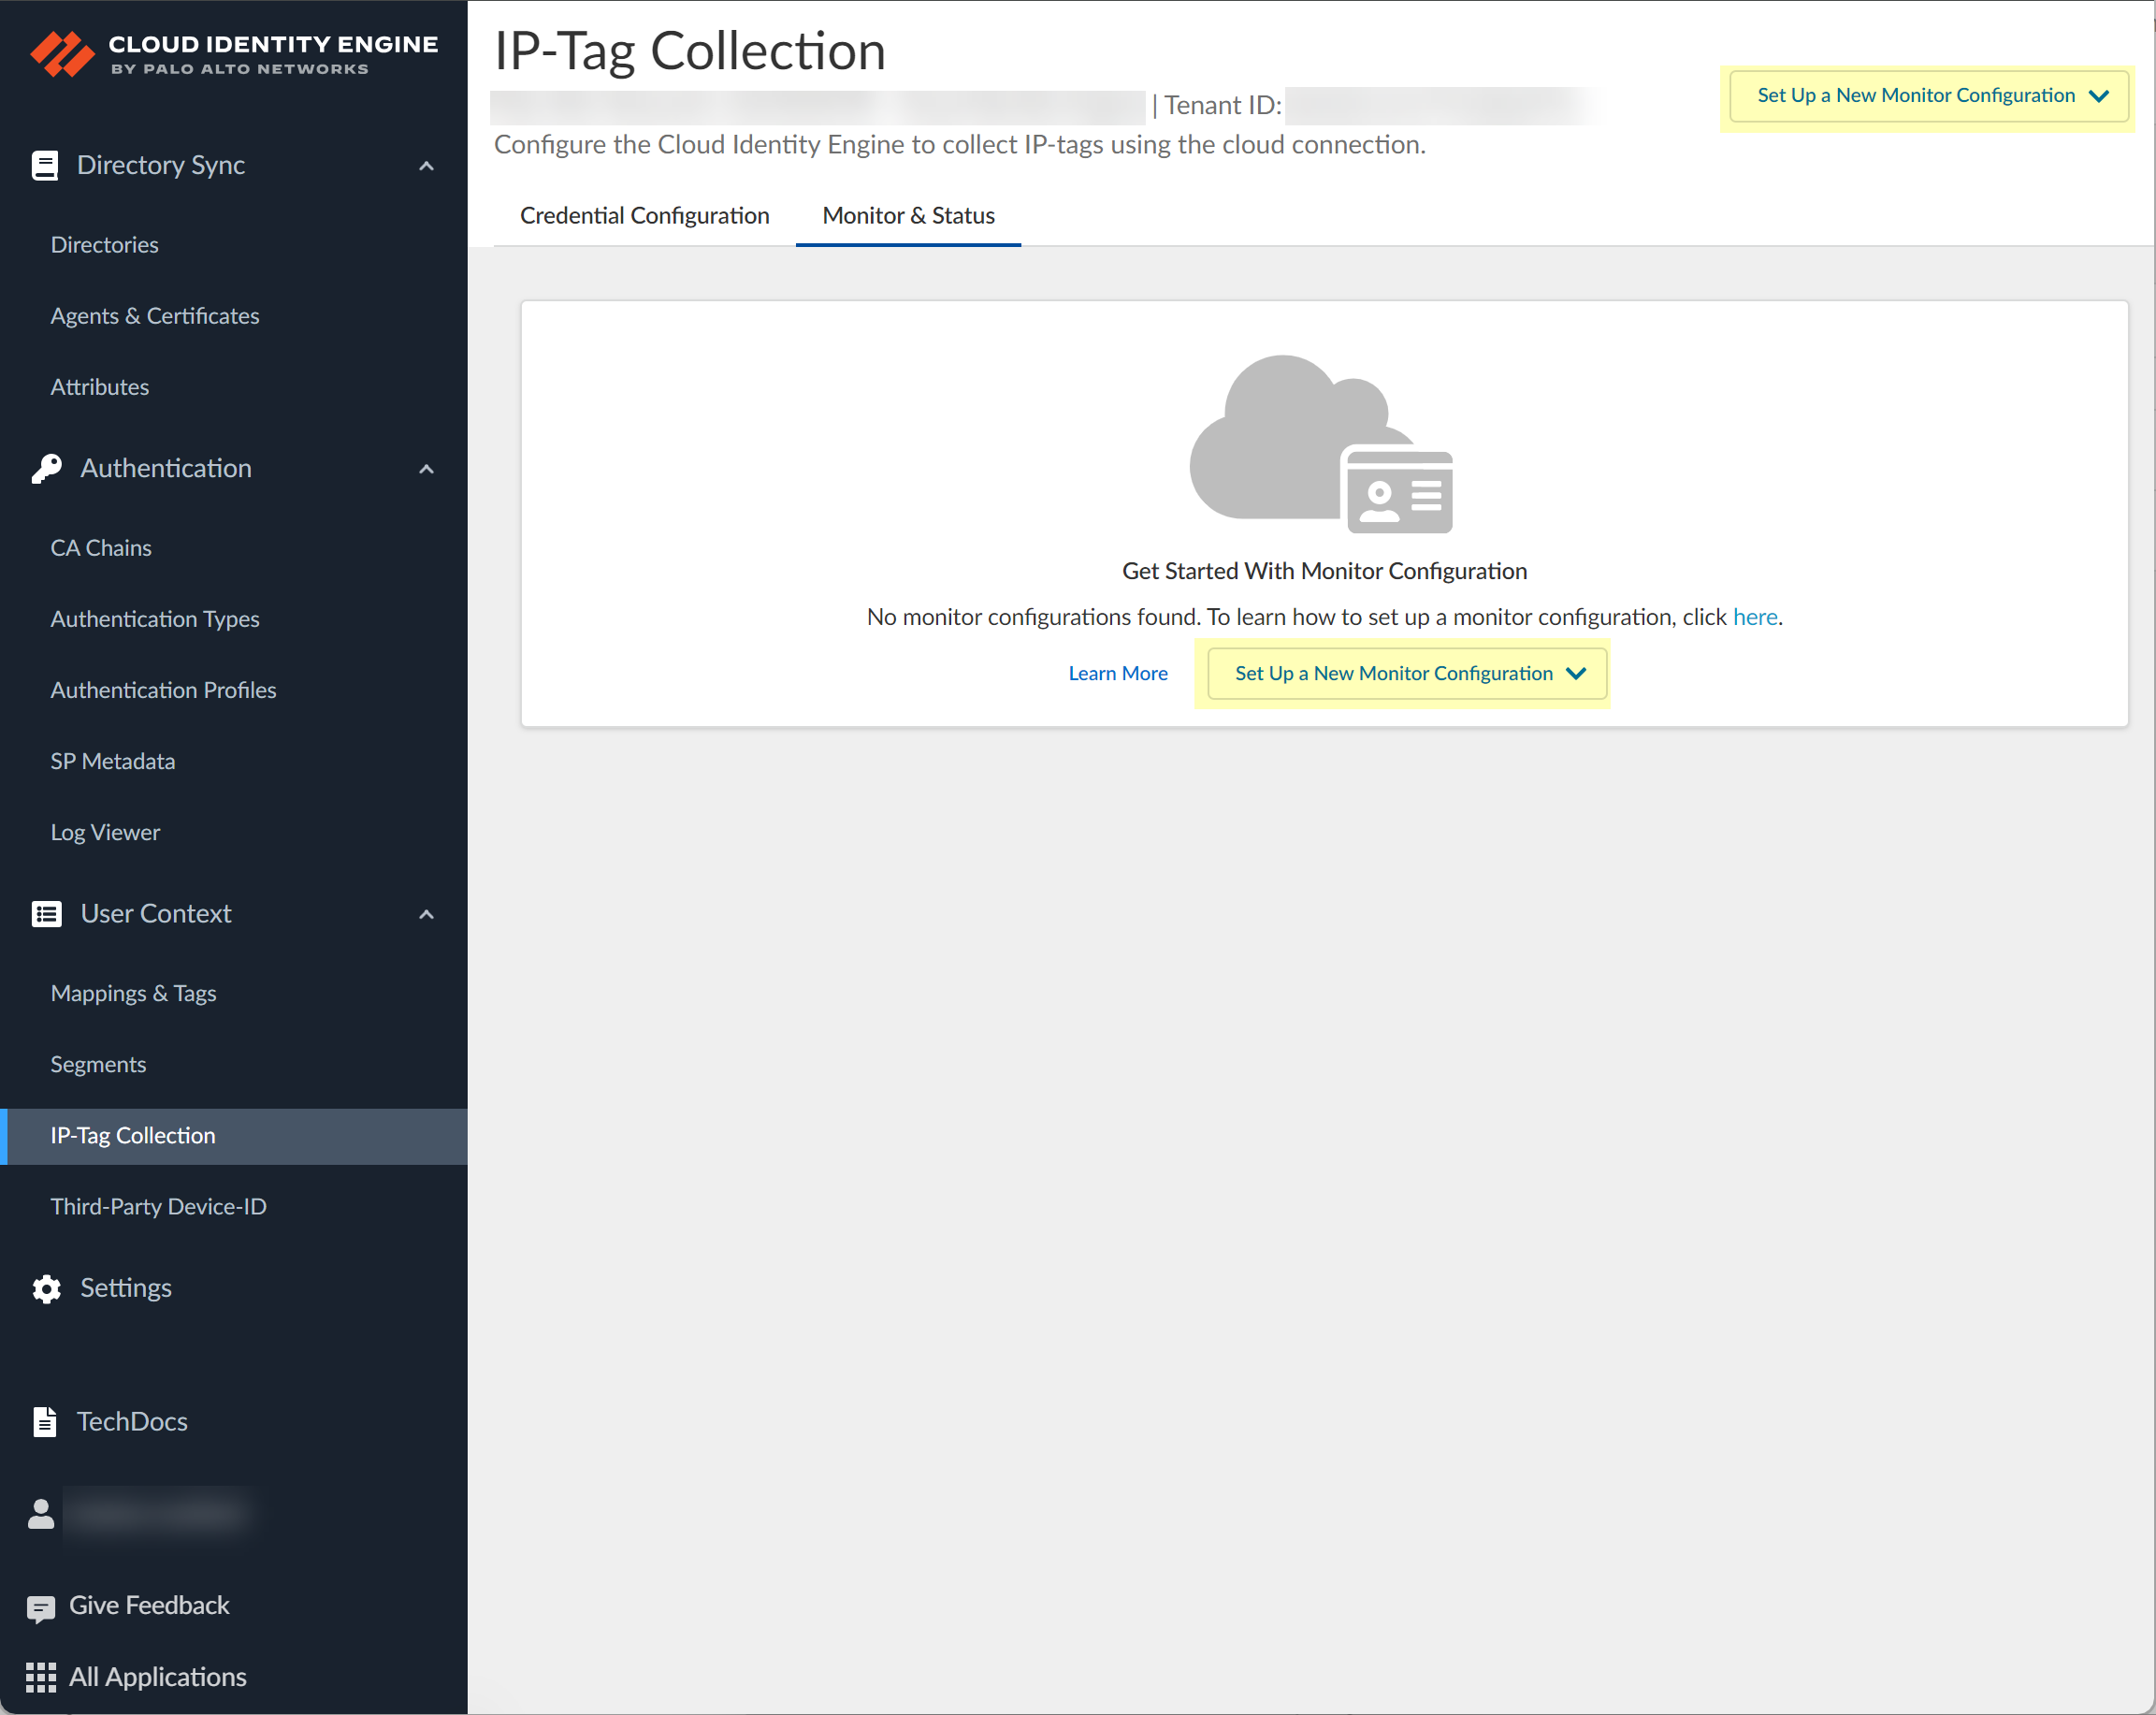
(Optional) Select the Region for the instance.You can optionally Search for a region. If you don't select a region, the Cloud Identity Engine uses the us-west-2 region. You can select one region per instance.![]() Verify the connection by clicking the Test Connection button.(AWS and Google Cloud Platform only) You can optionally select the Region before testing the connection. By default, the Cloud Identity Engine selects the US West region; if this region does not enable API requests, select a region that can enable API requests.Even if the connection test isn't successful, you can still submit your configuration; until you resolve the connectivity issues, the configuration status is Not connected. You must resolve the connection issues for the configuration to successfully retrieve the IP address-to-tag mappings.Submit the configuration.To collect and view your IP-Tag mappings, you must configure an IP-Tag monitor configuration.(Strata Cloud Manager only) If you're using Strata Cloud Manager, view the tags that the Cloud Identity Engine shares with Strata Cloud Manager by selecting an address group then select the Tags from CIE tab when you add match criteria.
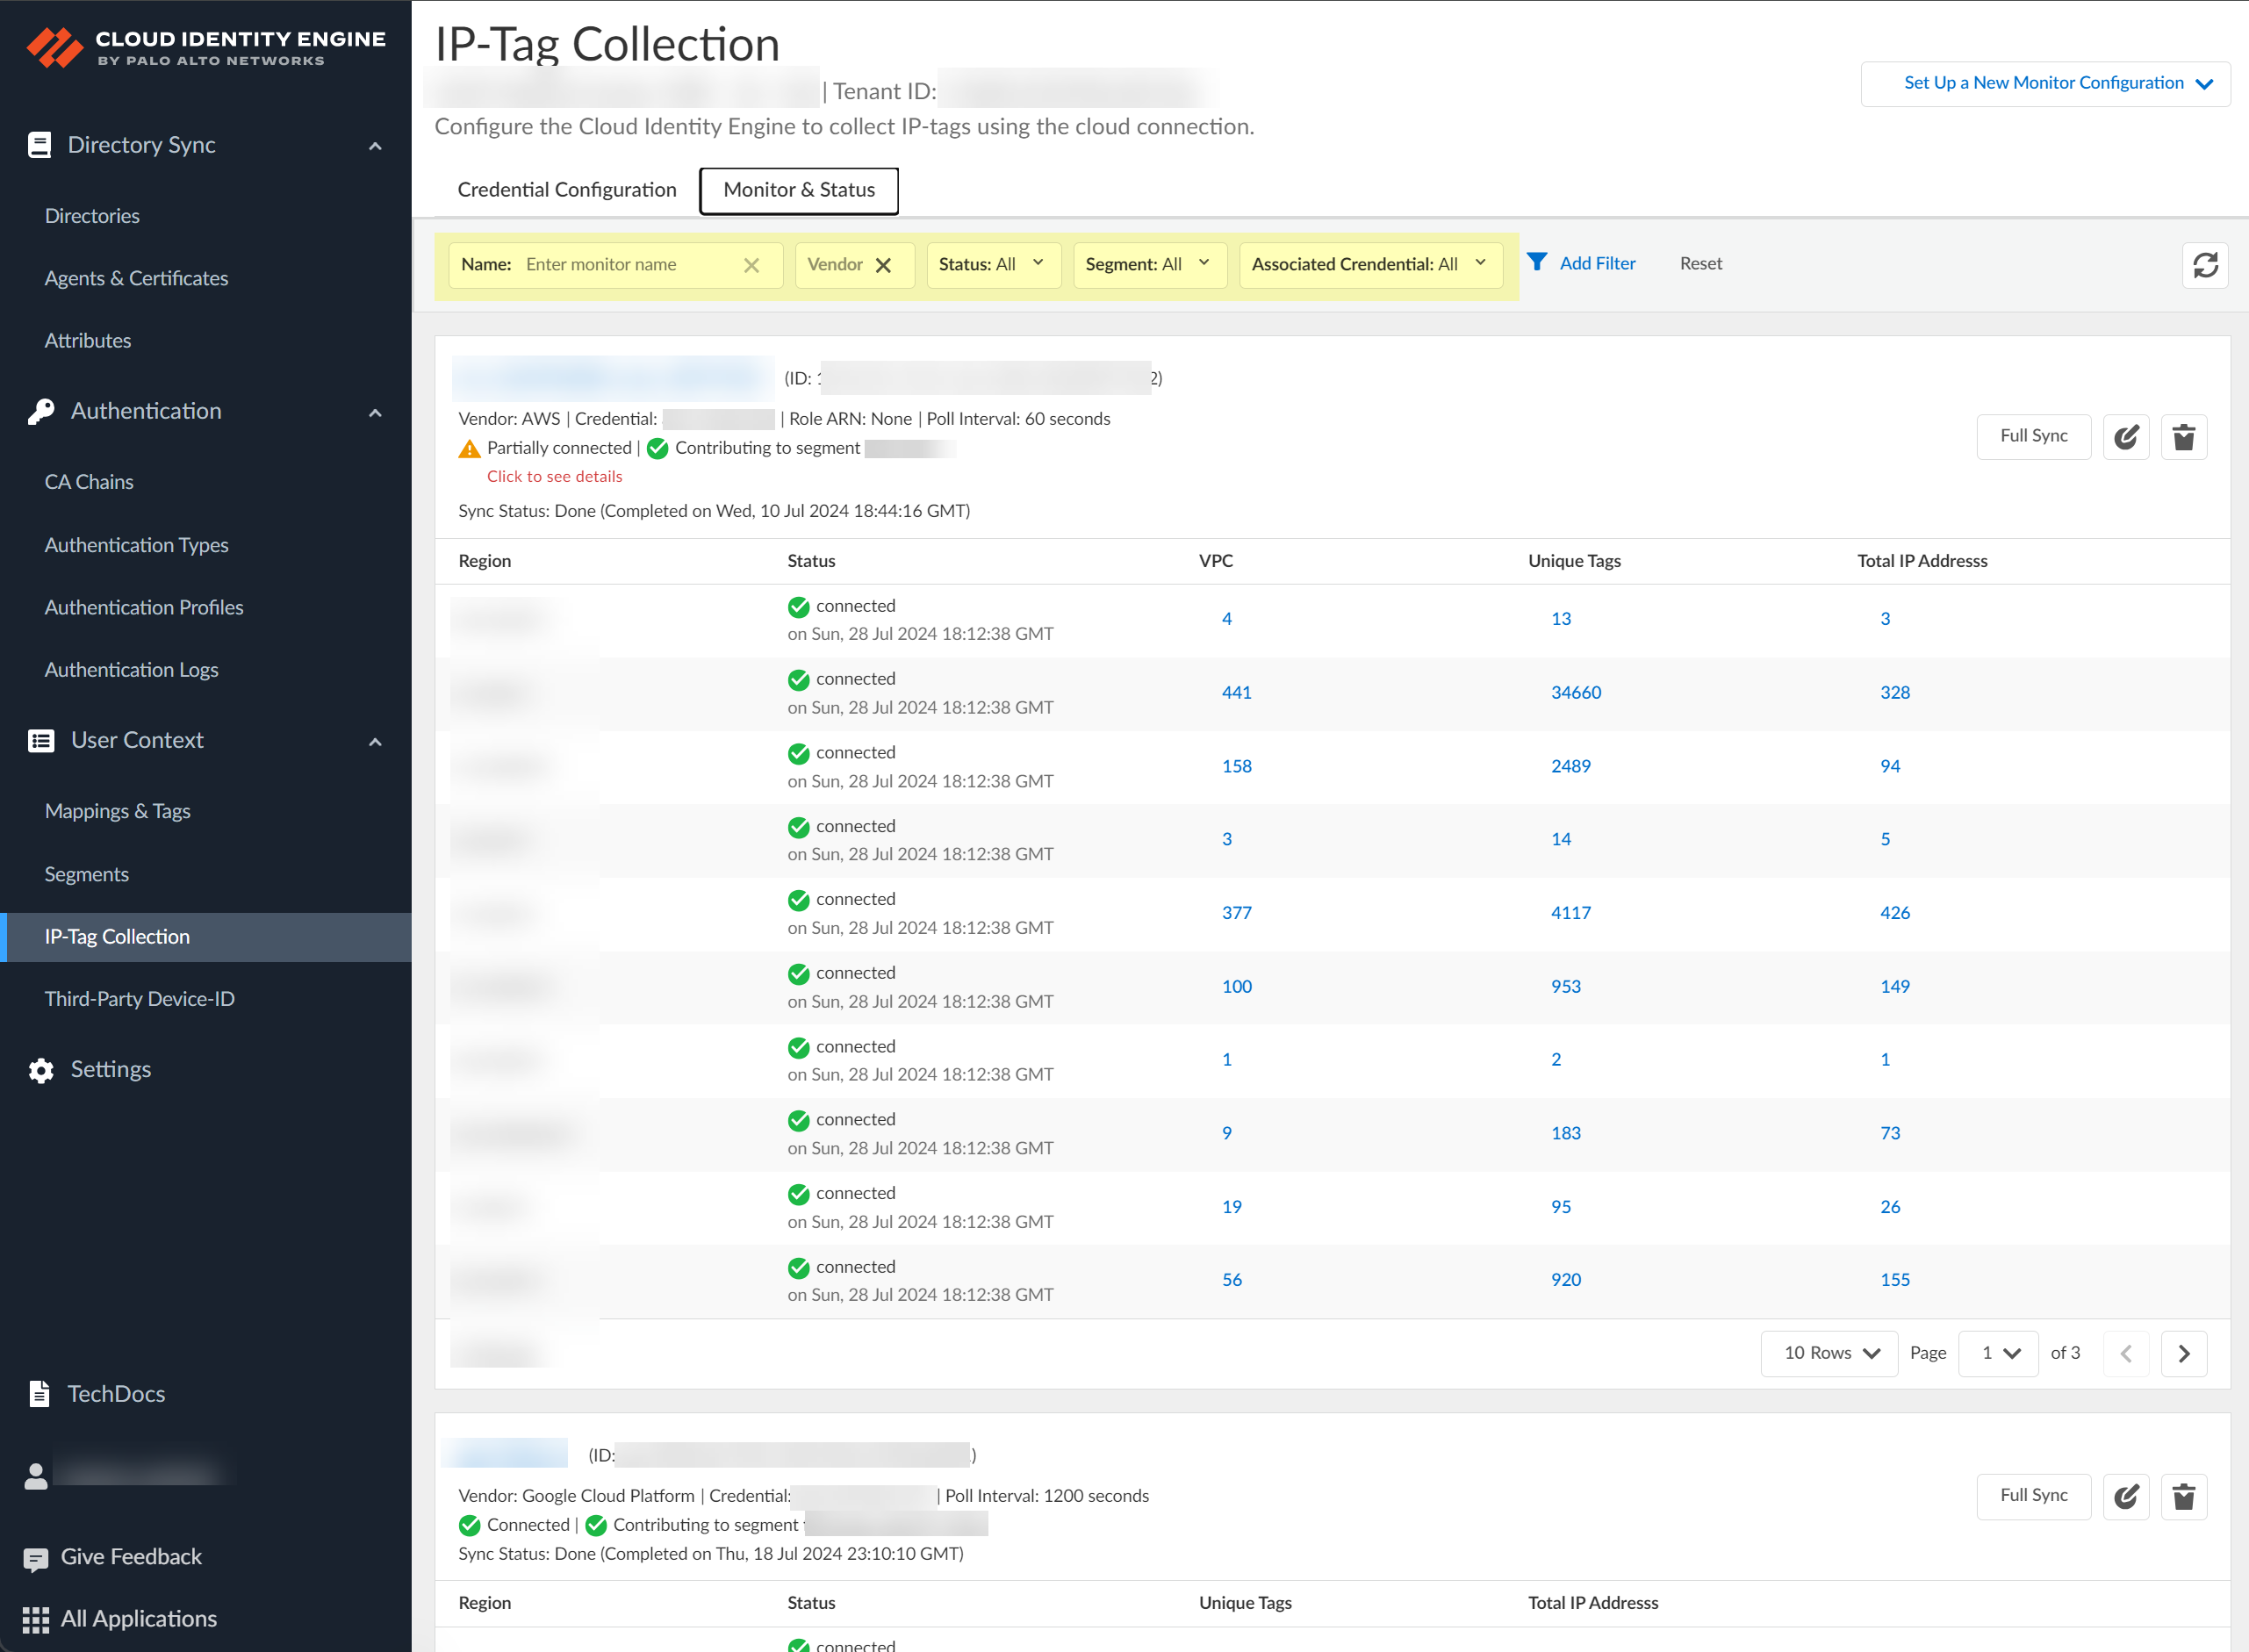
Verify the connection by clicking the Test Connection button.(AWS and Google Cloud Platform only) You can optionally select the Region before testing the connection. By default, the Cloud Identity Engine selects the US West region; if this region does not enable API requests, select a region that can enable API requests.Even if the connection test isn't successful, you can still submit your configuration; until you resolve the connectivity issues, the configuration status is Not connected. You must resolve the connection issues for the configuration to successfully retrieve the IP address-to-tag mappings.Submit the configuration.To collect and view your IP-Tag mappings, you must configure an IP-Tag monitor configuration.(Strata Cloud Manager only) If you're using Strata Cloud Manager, view the tags that the Cloud Identity Engine shares with Strata Cloud Manager by selecting an address group then select the Tags from CIE tab when you add match criteria.![]() To configure a connection to your cloud service provider for monitoring purposes (such as audits) or to share the IP address-to-tag mapping information using a segment, select the Monitor & Status tab.There are four states for the connection to the cloud service provider:
To configure a connection to your cloud service provider for monitoring purposes (such as audits) or to share the IP address-to-tag mapping information using a segment, select the Monitor & Status tab.There are four states for the connection to the cloud service provider:- Connected—The Cloud Identity Engine has successfully established a connection with the cloud service provider and can collect IP-tag mapping information.
- Partially connected—The Cloud Identity Engine could successfully establish a connection to some aspects of the configuration, such as the region for AWS, but not all of them. The Cloud Identity Engine receives IP-tag mappings from connected sources; it does not receive them from unconnected sources.
- Connection pending—The Cloud Identity Engine
has successfully established a connection but has not completed the
sync for the IP tag mappings from one or more regions. For more information on the connection status, select Click to see details.
- Not connected—The Cloud Identity Engine couldn’t successfully establish a connection with a cloud service provider using the current configuration.
![]()
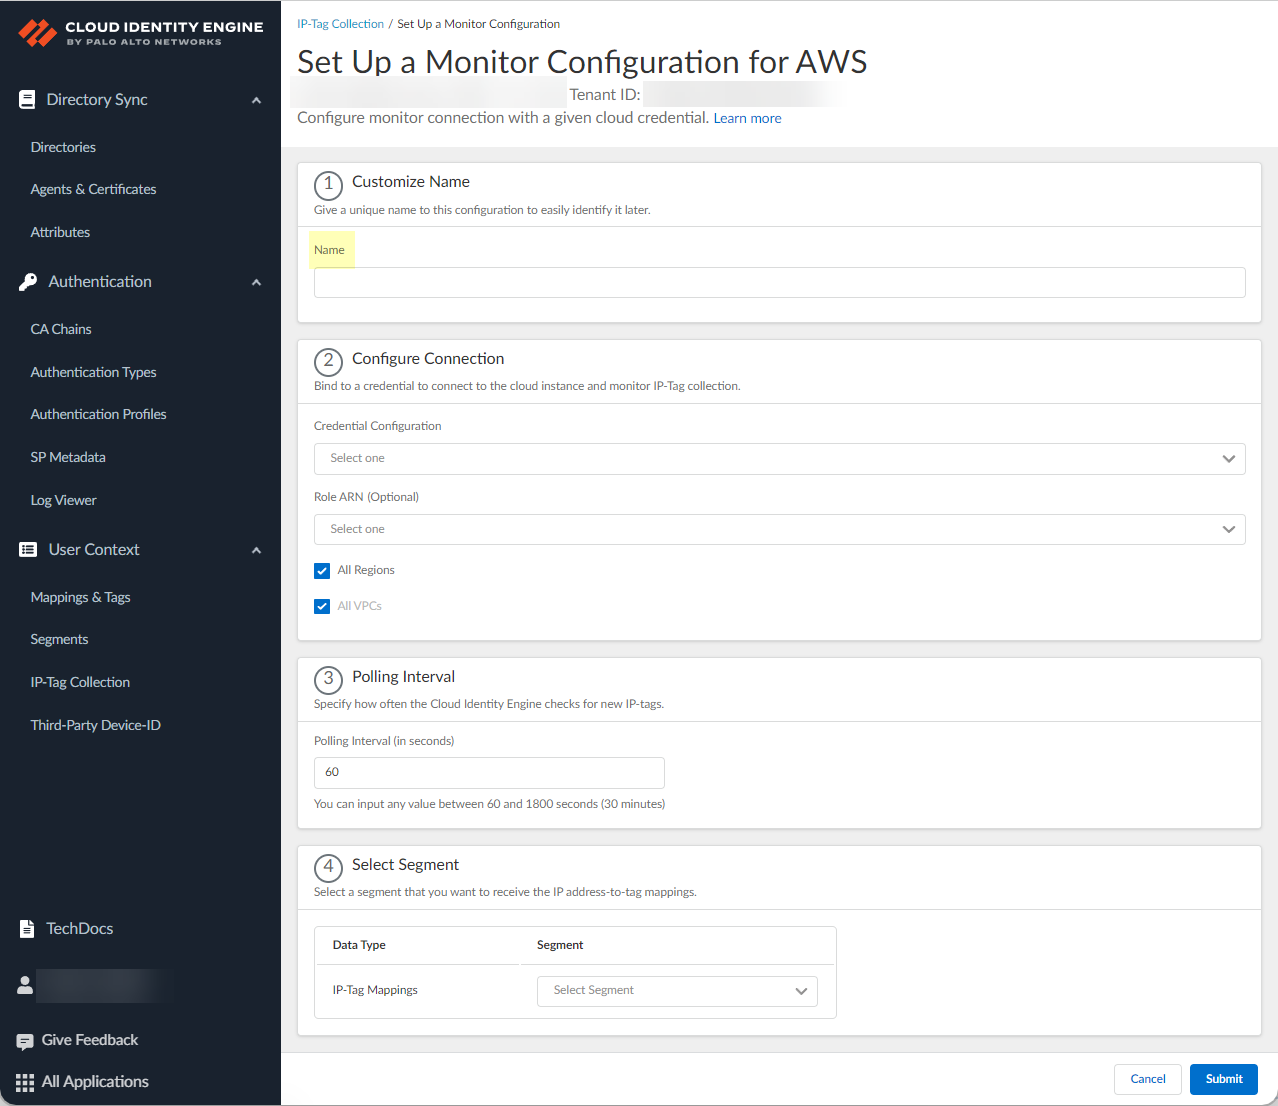
- Set Up a New Monitor Configuration and select the monitor configuration for the cloud service provider that you configured for credential configuration in step 4.
![]() Enter a unique and descriptive Name for the configuration.
Enter a unique and descriptive Name for the configuration.![]() Select the Credential Configuration that you configured in step 4.(AWS only) Optionally select the Role ARN you want to use.Select if you want to configure the connection for All Regions , All VPCs (AWS only) or All Project IDs (GCP only).To select a specific region or virtual private cloud (VPC), deselect the All Regions or All VPCs check box and wait for the list of regions or VPCs to populate, and then select the region or VPC you want to include. To select a specific VPC, you must first select one or more regions or select all regions.(Azure only) Select whether you want to Fetch Service Tags.Azure Service tags simplify security for Azure virtual machines and Azure virtual networks because you can restrict network access to just the Azure services you want to use. A service tag represents a group of IP address prefixes for a particular Azure service. For example, a tag can represent all storage IP addresses.Define the Polling Interval (in seconds) to specify how frequently the Cloud Identity Engine checks for new data.The default is 60 seconds and the range is 60–1800 seconds.If you want to share the mappings, select the segment you configured in step 1. Otherwise, if you want to create this configuration only for monitoring without sending mappings to any firewalls, select None.If you need to change the segment after you submit the configuration, you must create a new configuration and select the segment you want to use.Submit the configuration.Search and monitor your configurations in the Cloud Identity Engine.
Select the Credential Configuration that you configured in step 4.(AWS only) Optionally select the Role ARN you want to use.Select if you want to configure the connection for All Regions , All VPCs (AWS only) or All Project IDs (GCP only).To select a specific region or virtual private cloud (VPC), deselect the All Regions or All VPCs check box and wait for the list of regions or VPCs to populate, and then select the region or VPC you want to include. To select a specific VPC, you must first select one or more regions or select all regions.(Azure only) Select whether you want to Fetch Service Tags.Azure Service tags simplify security for Azure virtual machines and Azure virtual networks because you can restrict network access to just the Azure services you want to use. A service tag represents a group of IP address prefixes for a particular Azure service. For example, a tag can represent all storage IP addresses.Define the Polling Interval (in seconds) to specify how frequently the Cloud Identity Engine checks for new data.The default is 60 seconds and the range is 60–1800 seconds.If you want to share the mappings, select the segment you configured in step 1. Otherwise, if you want to create this configuration only for monitoring without sending mappings to any firewalls, select None.If you need to change the segment after you submit the configuration, you must create a new configuration and select the segment you want to use.Submit the configuration.Search and monitor your configurations in the Cloud Identity Engine.- Select the Monitor & Status tab.Use the filters to highlight the information you want to find.
- Name—Enter the name of a configuration to
filter results to this configuration. The search query does not need to be an exact match for the name.
- Vendor—Select the vendor type of the cloud service provider to filter the results to this vendor type.
- Status— Select the status type (such as Connected or Partially Connected) to filter the results to this status type.
- Segment— Select the Segment name to view the monitor segments that send mappings to the segment you select.
- Associated Credential— Select the name of the Associated Credential configuration to view monitor segments that use the credential configuration type you select.
![]() (Optional) To remove the filter, click Reset.Manage your IP-Tag Collection configuration.
(Optional) To remove the filter, click Reset.Manage your IP-Tag Collection configuration.- (Optional) To sync all new IP-tag mappings and use them in the Security policy immediately or to resolve any discrepancies in the IP-tag mappings, click Full Sync.
![]() The Sync Status displays the time and date of the last sync.
The Sync Status displays the time and date of the last sync.![]() (Optional) To change the IP-Tag Collection configuration, click Edit.
(Optional) To change the IP-Tag Collection configuration, click Edit.![]() (Optional) To remove the IP-Tag Collection configuration, click Delete and confirm the deletion.When you confirm the deletion, the Cloud Identity Engine removes all IP-tag mappings from the cloud service provider and from any firewalls that collect the IP-tag mappings to enforce Security policy.
(Optional) To remove the IP-Tag Collection configuration, click Delete and confirm the deletion.When you confirm the deletion, the Cloud Identity Engine removes all IP-tag mappings from the cloud service provider and from any firewalls that collect the IP-tag mappings to enforce Security policy.![]() View more details for a specific configuration.
View more details for a specific configuration.- Select the name of the configuration that you want to view from the IP-Tag Collection page.
![]() On the Monitor & Status page, review the Connection Details to view information such as the connection status.
On the Monitor & Status page, review the Connection Details to view information such as the connection status.![]() View the IP address-to-tag mapping information.Options vary depending on your configuration type.
View the IP address-to-tag mapping information.Options vary depending on your configuration type.- (AWS only) On the VPC tab, Search by VPC ID to view information for a specific VPC or select the number in the IPs column to view the IP addresses associated with the VPC ID in that row.
![]() Select the Tag To IP tab and Search by Tag to view all IP addresses that contain the tag you specify.You can view the results for an exact or partial match for your query. You can optionally limit the search to a specific region or select All Regions.
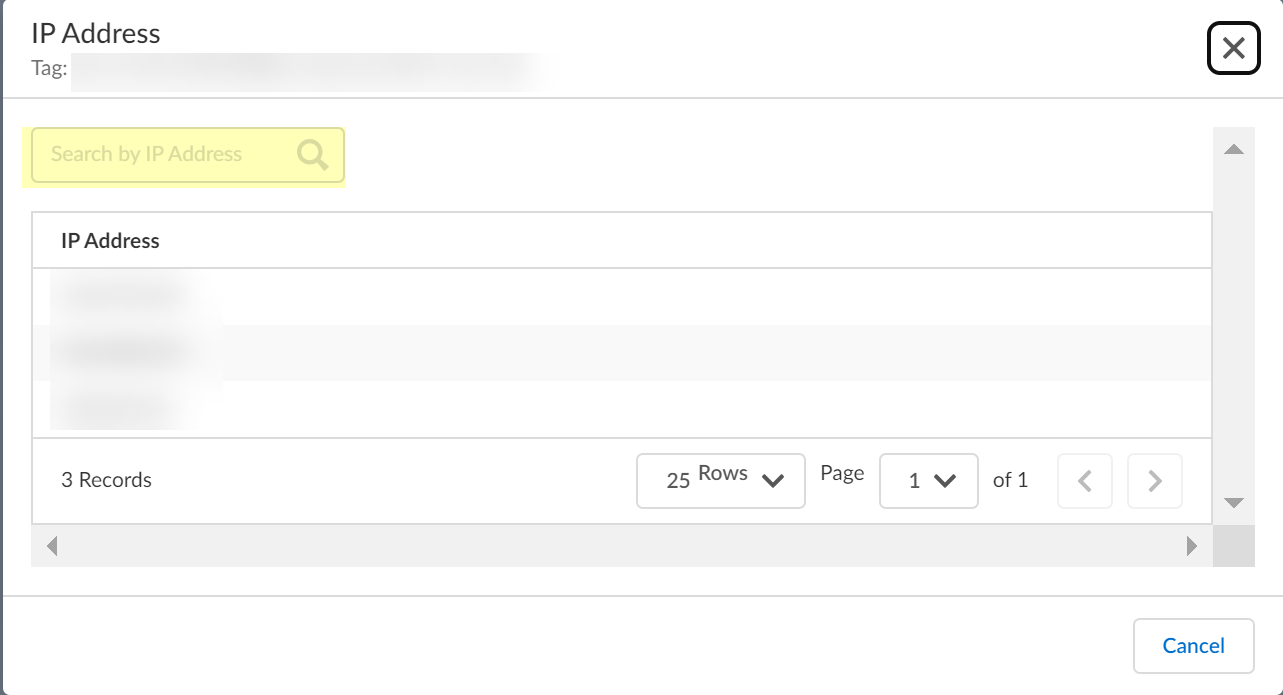
Select the Tag To IP tab and Search by Tag to view all IP addresses that contain the tag you specify.You can view the results for an exact or partial match for your query. You can optionally limit the search to a specific region or select All Regions.![]() Select the number in the IPs column to view the IP addresses that the Cloud Identity Engine has collected for the selected Tag.Search by IP Address then close the window or click Cancel after reviewing the IP addresses.
Select the number in the IPs column to view the IP addresses that the Cloud Identity Engine has collected for the selected Tag.Search by IP Address then close the window or click Cancel after reviewing the IP addresses.![]() Select the IP To Tag tab to Search by IP Address.For an AWS-based configuration, you can also search by VPC ID.
Select the IP To Tag tab to Search by IP Address.For an AWS-based configuration, you can also search by VPC ID.![]() Click the number in the Tags column to view the tags associated with the IP Address of that row.Search by Tag then close the window or click Cancel after reviewing the tags.
Click the number in the Tags column to view the tags associated with the IP Address of that row.Search by Tag then close the window or click Cancel after reviewing the tags.![]() Next Steps:
Next Steps:- View Mappings and Tags that the Cloud Identity Engine collects.
- Use Strata Cloud Manager, PAN-OS, or Panorama to automatically tag IP addresses for dynamic tag management.