Prisma SD-WAN
Configure GCP-NCC CloudBlade
Table of Contents
Expand All
|
Collapse All
Prisma SD-WAN Docs
-
-
- New Features Guide
-
- CloudBlade Integrations
- CloudBlades Integration with Prisma Access
-
-
-
-
- 6.5
- 6.4
- 6.3
- 6.2
- 6.1
- 5.6
- New Features Guide
- On-Premises Controller
- Prisma SD-WAN CloudBlades
- Prisma Access CloudBlade Cloud Managed
- Prisma Access CloudBlade Panorama Managed
Configure GCP-NCC CloudBlade
Learn to preconfigure the GCP-NCC CloudBlade before installing the Prisma SD-WAN
CloudBlade.
| Where Can I Use This? | What Do I Need? |
|---|---|
|
|
To configure the GCP-NCC CloudBlade, retrieve the following information from your
GCP-NCC account:
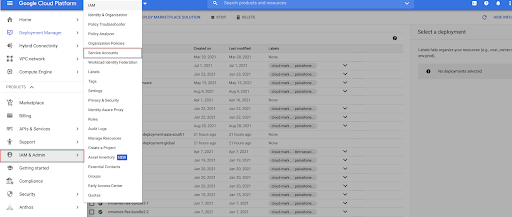
- Go to the GCP-NCC portal menu, select IAM & AdminService Accounts.
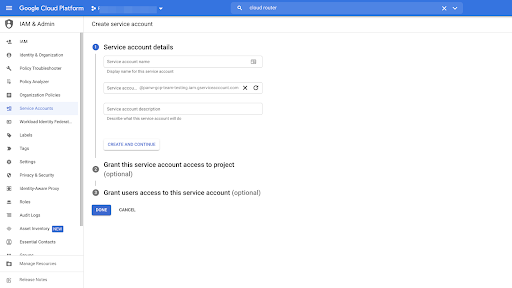
![]() Select a Service Account from the list, or to add a new service account, and click Create Service Account.
Select a Service Account from the list, or to add a new service account, and click Create Service Account.![]() Enter the Service Account name/description and click Create and Continue.Select the Service Account and click KeysAdd Key.You can either create a new key OR update an existing key.
Enter the Service Account name/description and click Create and Continue.Select the Service Account and click KeysAdd Key.You can either create a new key OR update an existing key.![]() Select JSON as the key type and click Create.The file downloads on your system and contains information required to configure the GCP-NCC CloudBlade.
Select JSON as the key type and click Create.The file downloads on your system and contains information required to configure the GCP-NCC CloudBlade.![]()
Configure GCP-NCC CloudBlade in Prisma SD-WAN
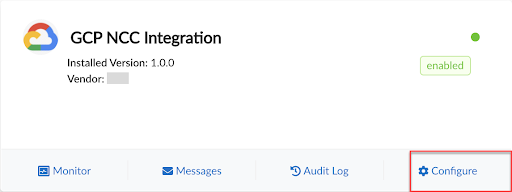
To configure the GCP-NCC Integration in Prisma SD-WAN:- From the Strata Cloud Manager, navigate to ConfigurationPrisma SD-WANCloudBlades.In CloudBlades, locate the GCP-NCC Integration tile, and click Configure.
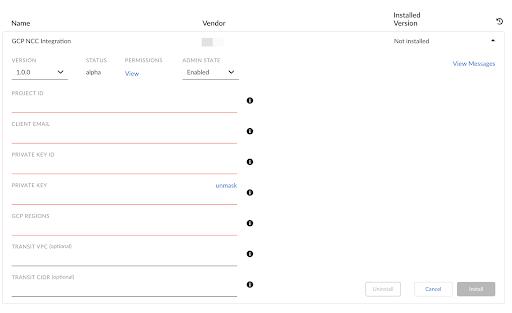
![]() In the GCP-NCC Integration page, enter the following information in the fields shown below, change where appropriate. The values in the service account JSON file created and downloaded need to be populated in these fields.
In the GCP-NCC Integration page, enter the following information in the fields shown below, change where appropriate. The values in the service account JSON file created and downloaded need to be populated in these fields.- VERSION: Select the version of the GCP- NCC Integration CloudBlade.
- ADMIN STATE: For Admin State, select/retain Enabled.
- PROJECT ID: Enter the project ID, which is a unique string used to differentiate your project from all others in Google Cloud. To locate your project ID, go to the API Console. From the projects list, select Manage all projects. The names and IDs for all the projects you are the member is displayed.
- CLIENT EMAIL: Enter the email address for the GCP service account. A service account is an identity that Google Cloud can use to run API requests.
- PRIVATE KEY ID: Enter the private key ID for the GCP service account.
- PRIVATE KEY: Enter the private key for the GCP service account. Ensure to include everything within quotes from the “private_key” entry in the JSON file.
- GCP REGIONS: Enter the GCP regions/locations where you want to access the GCP application resources as comma-separated values. Example: asia-south1,us-central1.
- TRANSIT VPC: For Brownfield (existing deployments), enter the name of the existing Transit VPC. Transit VPC is used to connect the Prisma SD-WAN ION devices to the GCP cloud router and the GCP Application VPC. If one does not exist with that name, a new Transit VPC is created in the specified region.
- Transit CIDR: For Brownfield (existing deployments), enter region-specific CIDR for Transit VPC subnets as comma-separated values. Example: us-central1:10.255.255.0/24,asia-south1:10.255.254.0/24.
![]() Click Save and Install after the settings are configured.
Click Save and Install after the settings are configured.Configure Cloud Router Advertisement
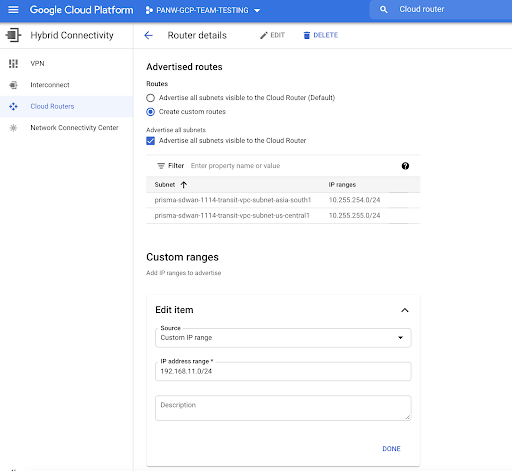
To configure the cloud router advertisement in GCP:- Select GCP menuCloud RoutersRouter Details.Click Edit.Select Create custom routesAdvertise all subnets visible to the Cloud Router.Provide the IP address range under Custom Ranges of the advertised routes.
![]()
Create VPC Network Peering
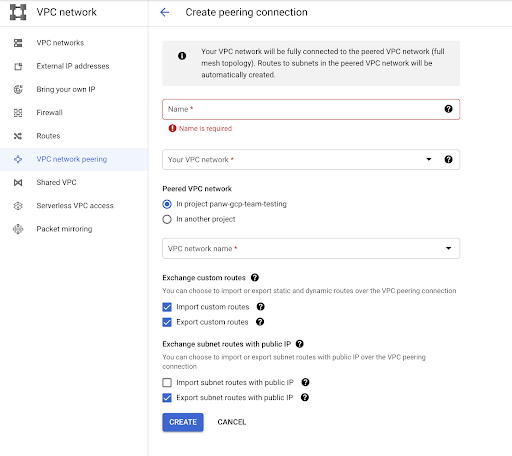
To create VPC peering between the workload VPC and the Transit VPC.- Select GCP menuVPC NetworkVPC Network PeeringCreate peering connection.Enter the Name and select Your VPC network.Select your project, choose to import and export custom routes, and choose to import and export subnet routes with public IP over the VPC peering connection.This establishes the peering connection to the VPC network.
![]()

