Prisma SD-WAN
Configure and Install the Azure Virtual WAN CloudBlade
Table of Contents
Expand All
|
Collapse All
Prisma SD-WAN Docs
-
-
-
- CloudBlade Integrations
- CloudBlades Integration with Prisma Access
-
-
-
-
- 6.5
- 6.4
- 6.3
- 6.2
- 6.1
- 5.6
- New Features Guide
- On-Premises Controller
- Prisma SD-WAN CloudBlades
- Prisma Access CloudBlade Cloud Managed
- Prisma Access CloudBlade Panorama Managed
Configure and Install the Azure Virtual WAN CloudBlade
Lets see how to configure and install the Azure Virtual WAN in Prisma SD-WAN and plan assign tags to objects in Prisma SD-WAN.
| Where Can I Use This? | What Do I Need? |
|---|---|
|
|
Configure the Prisma SD-WAN CloudBlade to prepare the Prisma SD-WAN controller for integration.
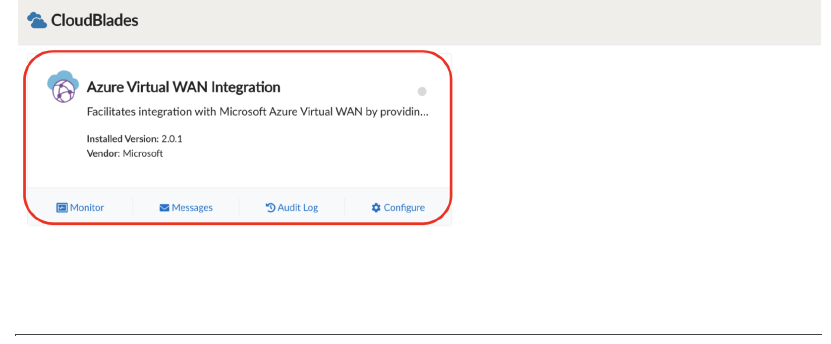
- From Strata Cloud Manager, select ConfigurationPrisma SD-WANCloudBlades and select the Azure Virtual WAN Integration CloudBlade. If this CloudBlade does not appear, please contact Palo Alto Networks support.
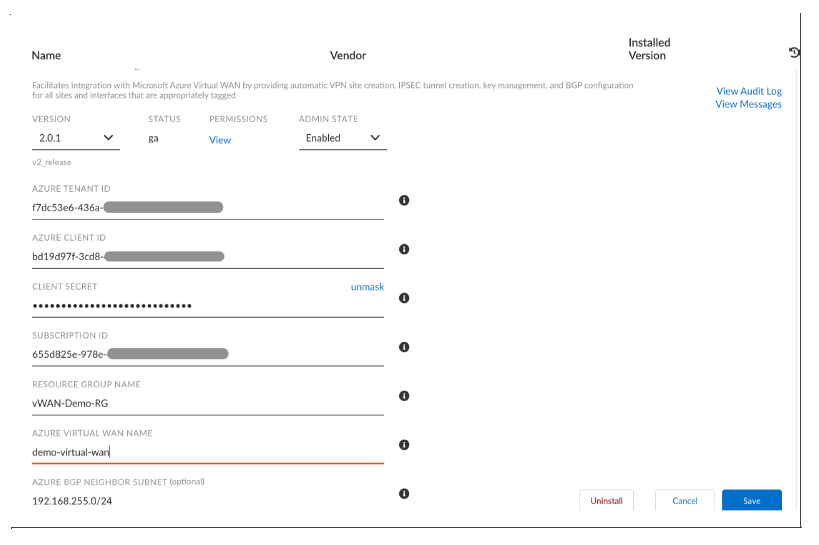
![]() Clicking on the Azure Virtual WAN Integration CloudBlade will bring up the installation page. Provide the following information:
Clicking on the Azure Virtual WAN Integration CloudBlade will bring up the installation page. Provide the following information:- Version: Select the version of the Azure Virtual Network Integration CloudBlade.Admin State: For Admin State, select/retain Enabled.Directory (tenant) ID: Provide the Directory ID generated in the previous section on Azure application registration.Application (client) ID: Provide the client ID generated in the previous section on Azure application registration.Client Secret: Provide the client secret generated under the Azure application registration.Subscription ID: Provide the subscription ID noted down from the previous section. Subscription ID is a GUID that uniquely identifies the subscription to use Azure services.Resource Group: Provide the name of the resource group created in the previous section.Azure Virtual WAN Name: Provide the name of the vWAN object created in the previous section.Azure BGP Neighbor Subnet: Provide an IP block the CloudBlade can pull, to be used when provisioning the Standard tunnel interface on the ION, which will also be the BGP neighbor defined in the Azure vWAN VPN site object.Once the settings have been configured, click Install and Save.
![]()
Assign tags to objects in the Prisma SD-WAN
Once the CloudBlade is configured, the next task is to tag Prisma SD-WAN sites and interfaces to denote which sites and interfaces are candidates for integration with Azure Virtual WAN.- In Strata Cloud Manager, go to ConfigurationPrisma SD-WANBranch Sites and select the site that needs to be tagged.Select the edit icon, and in the Tags (case sensitive.) field, add the azure_enabled tag and enable it for Azure vWAN.
![]() Select Done.Now, tag the interface that you can use to establish a Standard tunnel to the virtual WAN. Go to ION Devices and select the device to view the device configuration screen. Locate the interfaces tab, select the interface connected to the circuit you want to use to build the tunnel to Azure, and add a region-specific tag that corresponds to the region the vWAN Hub you want to connect to is in (e.g. azure_enabled_eastus).After completing this configuration, the next integration cycle (approximately 60 seconds) will initiate the creation and onboarding of Standard IPSEC tunnels between the Prisma SD-WAN ION and the Azure virtual WAN Hub. It may take several cycles for the tunnels to appear and become active on the Prisma SD-WAN and for the VPN site objects to show up in the Azure.
Select Done.Now, tag the interface that you can use to establish a Standard tunnel to the virtual WAN. Go to ION Devices and select the device to view the device configuration screen. Locate the interfaces tab, select the interface connected to the circuit you want to use to build the tunnel to Azure, and add a region-specific tag that corresponds to the region the vWAN Hub you want to connect to is in (e.g. azure_enabled_eastus).After completing this configuration, the next integration cycle (approximately 60 seconds) will initiate the creation and onboarding of Standard IPSEC tunnels between the Prisma SD-WAN ION and the Azure virtual WAN Hub. It may take several cycles for the tunnels to appear and become active on the Prisma SD-WAN and for the VPN site objects to show up in the Azure.


