Register the VM-Series Firewall (Software NGFW Credits)
Table of Contents
Expand all | Collapse all
-
- VM-Series Deployments
- VM-Series in High Availability
- Enable Jumbo Frames on the VM-Series Firewall
- Hypervisor Assigned MAC Addresses
- Custom PAN-OS Metrics Published for Monitoring
- Interface Used for Accessing External Services on the VM-Series Firewall
- PacketMMAP and DPDK Driver Support
- Enable ZRAM on the VM-Series Firewall
-
- VM-Series Firewall Licensing
- Create a Support Account
- Serial Number and CPU ID Format for the VM-Series Firewall
- Install a License API Key
- Use Panorama-Based Software Firewall License Management
-
- Maximum Limits Based on Memory
- Activate Credits
- Create a Deployment Profile
- Manage a Deployment Profile
- Register the VM-Series Firewall (Software NGFW Credits)
- Provision Panorama
- Migrate Panorama to a FW-Flex License
- Transfer Credits
- Renew Your Software NGFW Credit License
- Deactivate License (Software NGFW Credits)
- Create and Apply a Subscription-Only Auth Code
- Migrate to a Flexible VM-Series License
- What Happens When Licenses Expire?
-
- Supported Deployments on VMware vSphere Hypervisor (ESXi)
-
- Plan the Interfaces for the VM-Series for ESXi
- Provision the VM-Series Firewall on an ESXi Server
- Perform Initial Configuration on the VM-Series on ESXi
- Add Additional Disk Space to the VM-Series Firewall
- Use VMware Tools on the VM-Series Firewall on ESXi and vCloud Air
- Use vMotion to Move the VM-Series Firewall Between Hosts
- Use the VM-Series CLI to Swap the Management Interface on ESXi
-
-
- VM-Series Firewall for NSX-V Deployment Checklist
- Install the VMware NSX Plugin
- Apply Security Policies to the VM-Series Firewall
- Steer Traffic from Guests that are not Running VMware Tools
- Dynamically Quarantine Infected Guests
- Migrate Operations-Centric Configuration to Security-Centric Configuration
- Add a New Host to Your NSX-V Deployment
- Use Case: Shared Compute Infrastructure and Shared Security Policies
- Use Case: Shared Security Policies on Dedicated Compute Infrastructure
- Dynamic Address Groups—Information Relay from NSX-V Manager to Panorama
-
- Supported Deployments of the VM-Series Firewall on VMware NSX-T (North-South)
- Components of the VM-Series Firewall on NSX-T (North-South)
-
- Install the Panorama Plugin for VMware NSX
- Enable Communication Between NSX-T Manager and Panorama
- Create Template Stacks and Device Groups on Panorama
- Configure the Service Definition on Panorama
- Deploy the VM-Series Firewall
- Direct Traffic to the VM-Series Firewall
- Apply Security Policy to the VM-Series Firewall on NSX-T
- Use vMotion to Move the VM-Series Firewall Between Hosts
- Extend Security Policy from NSX-V to NSX-T
-
- Components of the VM-Series Firewall on NSX-T (East-West)
- VM-Series Firewall on NSX-T (East-West) Integration
- Supported Deployments of the VM-Series Firewall on VMware NSX-T (East-West)
-
- Install the Panorama Plugin for VMware NSX
- Enable Communication Between NSX-T Manager and Panorama
- Create Template Stacks and Device Groups on Panorama
- Configure the Service Definition on Panorama
- Launch the VM-Series Firewall on NSX-T (East-West)
- Add a Service Chain
- Direct Traffic to the VM-Series Firewall
- Apply Security Policies to the VM-Series Firewall on NSX-T (East-West)
- Use vMotion to Move the VM-Series Firewall Between Hosts
-
- Install the Panorama Plugin for VMware NSX
- Enable Communication Between NSX-T Manager and Panorama
- Create Template Stacks and Device Groups on Panorama
- Configure the Service Definition on Panorama
- Launch the VM-Series Firewall on NSX-T (East-West)
- Create Dynamic Address Groups
- Create Dynamic Address Group Membership Criteria
- Generate Steering Policy
- Generate Steering Rules
- Delete a Service Definition from Panorama
- Migrate from VM-Series on NSX-T Operation to Security Centric Deployment
- Extend Security Policy from NSX-V to NSX-T
- Use In-Place Migration to Move Your VM-Series from NSX-V to NSX-T
- Use Migration Coordinator to Move Your VM-Series from NSX-V to NSX-T
-
-
- Deployments Supported on AWS
-
- Planning Worksheet for the VM-Series in the AWS VPC
- Launch the VM-Series Firewall on AWS
- Launch the VM-Series Firewall on AWS Outpost
- Create a Custom Amazon Machine Image (AMI)
- Encrypt EBS Volume for the VM-Series Firewall on AWS
- Use the VM-Series Firewall CLI to Swap the Management Interface
- Enable CloudWatch Monitoring on the VM-Series Firewall
-
- Use Case: Secure the EC2 Instances in the AWS Cloud
- Use Case: Use Dynamic Address Groups to Secure New EC2 Instances within the VPC
-
-
- What Components Does the VM-Series Auto Scaling Template for AWS (v2.0) Leverage?
- How Does the VM-Series Auto Scaling Template for AWS (v2.0 and v2.1) Enable Dynamic Scaling?
- Plan the VM-Series Auto Scaling Template for AWS (v2.0 and v2.1)
- Customize the Firewall Template Before Launch (v2.0 and v2.1)
- Launch the VM-Series Auto Scaling Template for AWS (v2.0)
- SQS Messaging Between the Application Template and Firewall Template
- Stack Update with VM-Series Auto Scaling Template for AWS (v2.0)
- Modify Administrative Account and Update Stack (v2.0)
-
- Launch the Firewall Template (v2.1)
- Launch the Application Template (v2.1)
- Create a Custom Amazon Machine Image (v2.1)
- VM-Series Auto Scaling Template Cleanup (v2.1)
- SQS Messaging Between the Application Template and Firewall Template (v2.1)
- Stack Update with VM-Series Auto Scaling Template for AWS (v2.1)
- Modify Administrative Account (v2.1)
- Change Scaling Parameters and CloudWatch Metrics (v2.1)
-
-
- Enable the Use of a SCSI Controller
- Verify PCI-ID for Ordering of Network Interfaces on the VM-Series Firewall
-
- Deployments Supported on Azure
- Deploy the VM-Series Firewall from the Azure Marketplace (Solution Template)
- Deploy the VM-Series Firewall from the Azure China Marketplace (Solution Template)
- Create a Custom VM-Series Image for Azure
- Deploy the VM-Series Firewall on Azure Stack
- Enable Azure Application Insights on the VM-Series Firewall
- Set up Active/Passive HA on Azure
- Use the ARM Template to Deploy the VM-Series Firewall
-
- About the VM-Series Firewall on Google Cloud Platform
- Supported Deployments on Google Cloud Platform
- Prepare to Set Up VM-Series Firewalls on Google Public Cloud
- Create a Custom VM-Series Firewall Image for Google Cloud Platform
-
- Deploy the VM-Series Firewall from Google Cloud Platform Marketplace
- Management Interface Swap for Google Cloud Platform Load Balancing
- Use the VM-Series Firewall CLI to Swap the Management Interface
- Enable Google Stackdriver Monitoring on the VM Series Firewall
- Enable VM Monitoring to Track VM Changes on Google Cloud Platform (GCP)
- Use Dynamic Address Groups to Secure Instances Within the VPC
- Use Custom Templates or the gcloud CLI to Deploy the VM-Series Firewall
-
- Prepare Your ACI Environment for Integration
-
-
- Create a Virtual Router and Security Zone
- Configure the Network Interfaces
- Configure a Static Default Route
- Create Address Objects for the EPGs
- Create Security Policy Rules
- Create a VLAN Pool and Domain
- Configure an Interface Policy for LLDP and LACP for East-West Traffic
- Establish the Connection Between the Firewall and ACI Fabric
- Create a VRF and Bridge Domain
- Create an L4-L7 Device
- Create a Policy-Based Redirect
- Create and Apply a Service Graph Template
-
- Create a VLAN Pool and External Routed Domain
- Configure an Interface Policy for LLDP and LACP for North-South Traffic
- Create an External Routed Network
- Configure Subnets to Advertise to the External Firewall
- Create an Outbound Contract
- Create an Inbound Web Contract
- Apply Outbound and Inbound Contracts to the EPGs
- Create a Virtual Router and Security Zone for North-South Traffic
- Configure the Network Interfaces
- Configure Route Redistribution and OSPF
- Configure NAT for External Connections
-
-
- Choose a Bootstrap Method
- VM-Series Firewall Bootstrap Workflow
- Bootstrap Package
- Bootstrap Configuration Files
- Generate the VM Auth Key on Panorama
- Create the bootstrap.xml File
- Prepare the Licenses for Bootstrapping
- Prepare the Bootstrap Package
- Bootstrap the VM-Series Firewall on AWS
- Bootstrap the VM-Series Firewall on Azure
- Bootstrap the VM-Series Firewall on Google Cloud Platform
- Verify Bootstrap Completion
- Bootstrap Errors
End-of-Life (EoL)
Register the VM-Series Firewall (Software NGFW Credits)
Register the VM-Series firewall with Software NGFW credits.
During activation, an administrator activates
a credit pool and the credits are deposited. When anyone creates
a deployment profile, an auth code is created. Complete one of the
following procedures to initiate registration.
- Use the following steps if the firewall is able to connect
to the CSP:
- Log in to the CSP with your account credentials.
- Select AssetsSoftware NFGW Credits.Locate your credit pool and view Details.
- View Current Deployment Profiles and
choose (or create) a profile. You will use the auth code from this profile for licensing any firewall you create with it. An auth code for a flexible firewall license begins with the letter D.
- Log in to the VM-Series firewall web interface.
- Verify the Palo Alto Networks update server configuration.
- Select DeviceSetupServices.
- Confirm that Update Server is set to updates.paloaltonetworks.com.
- Confirm that Verify Update Server Identity is selected.
- Select DeviceLicenses.
- Select the Activate feature using authorization code link.
- Enter the VM-Series authorization code from the deployment profile.
- Click OK to confirm the license upgrade.The firewall contacts the Palo Alto Networks update server and consumes the tokens required for your firewall based on the VM-Series model.
- Confirm that the Dashboard displays a valid serial number and that the PA-VM license displays in the DeviceLicenses tab.
- Verify your firewall is registered on the CSP:
- Select AssetsSoftware NFGW Credits
- Auth Code column, View Devices and locate the serial number for your deployment.
- In the credit pool, Credits Consumed, Firewalls Deployed, and vCPUs consumed should be incremented to reflect your deployment.
- Use
the following steps if the firewall is not able
to connect to the CSP:This workflow adds your firewall to the support database. Because the firewall can’t connect to the license server, you must manually pass the licenses from the CSP to the firewall.
- Log in to the CSP with your account credentials.
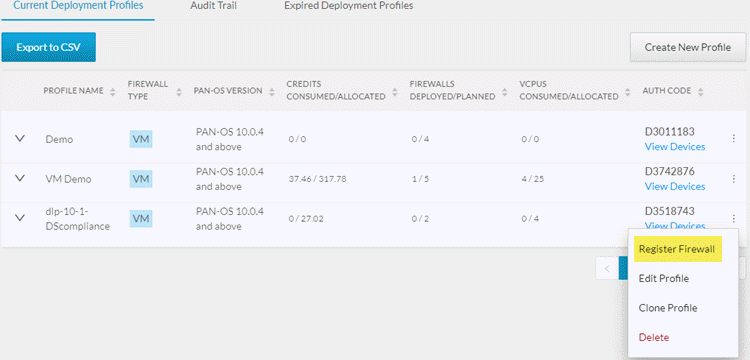
- Select the new profile and Select the vertical ellipsis
(More Options) and Register Firewall.
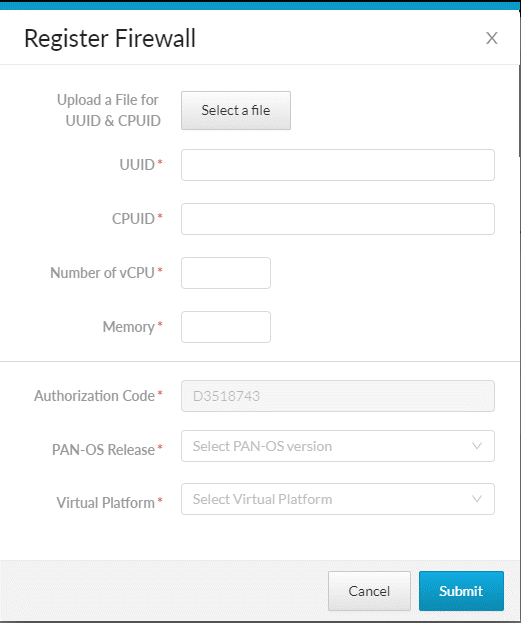
![]() This opens the device registration form. Enter the information for your firewall and Submit:
This opens the device registration form. Enter the information for your firewall and Submit:![]() This associates the firewall with the profile and its authcode and assigns a serial number.
This associates the firewall with the profile and its authcode and assigns a serial number. - Click View Devices to see associated
firewalls in Software NGFW Devices. In the License column, download each license key to a location from which you can safely transfer the files to the firewall.
- Log in to the firewall and select DeviceLicenses.License keys must be installed through the web interface. The firewall does not support license key installation through SCP or FTP.
- Click Manually Upload License.
- Confirm that the Dashboard displays a valid serial number and that the PA-VM license displays in the DeviceLicenses tab.


