Apply Security Policies to the VM-Series Firewall
Table of Contents
Apply Security Policies to the VM-Series Firewall
Now that you have created the steering rules
on Panorama and pushed them to the NSX-V Manager, you can now use
Panorama for centrally administering policies on the VM-Series firewalls.
To
manage centralized policy, attach the dynamic address group as a
source or destination address in security policy and push it to
the firewalls; the firewalls can dynamically retrieve the IP addresses
of the virtual machines that are included in each security group
to enforce compliance for traffic that originates from or is destined
to the virtual machines in the specified group.
- Log in to Panorama.
- (Operations-centric deployments only)
Create dynamic-address groups. Skip this step for security-centric deployments. If you are performing a security-centric deployment, you have already created dynamic-address groups.After creating the security redirection rules on the NSX-V Manager, the names of the security groups that are referenced in security policy will be available on Panorama.Shared dynamic address groups are not supported on the VM-Series for VMware NSX-V.
- Select .
- Select the Device Group you created for managing your VM-Series on NSX-V firewall from the Device Group drop-down.
- Click Add and enter a Name and Description for the dynamic address group.
- Select Type as Dynamic.
- Add Match Criteria to your dynamic address group.Some browser extensions may block API calls between Panorama and NSX-V which prevents Panorama from receiving match criteria. If Panorama displays no match criteria and you are using browser extensions, disable the extensions and Synchronize Dynamic Objects to populate the tags available to Panorama.
- Click Add Match Criteria.
- Select the And or Or operator
and click the plus (+) icon next to the security group name to add
it to the dynamic address group.The security groups that display in the match criteria dialog are derived from the groups you defined on the Distributed Firewall Partner Security Services or on the Service Composer on the NSX-V Manager. Only the security groups that are referenced in the security policies and from which traffic is redirected to the VM-Series firewall are available here.
![]()
- Click OK.
- Repeat these steps to create the appropriate number of dynamic address groups required for your deployment.
- Commit your changes.
- Create security policy rules.
![]()
- Select .
- Select the Device Groupthat you created for managing the VM-Series firewalls for NSX-V in Register the VM-Series Firewall as a Service on the NSX-V Manager.
![]()
- Click Add and enter a Name and a Description for the rule. In this example, the security rule allows all traffic between the WebFrontEnd servers and the Application servers.
- Select the Source Zone and Destination Zone. The zone name must be the same in both columns.
- For the Source Address and Destination
Address, select or type in an address, address group
or region. In this example, we select an address group, the Dynamic
address group you created previously.
![]()
- Select the Application to allow.
In this example, we create an Application Group that
includes a static group of specific applications that are grouped together.
- Click Add and select New Application Group.
- Click Add to select the application to include in the group. In this example, we select the following:
- Click OK to create the application group.
![]()
- Specify the action— Allow or Deny—for the traffic, and optionally attach the default security profiles for antivirus, anti-spyware, and vulnerability protection, under Profiles.
- Repeats the steps above to create the pertinent policy rules.
- Click Commit, select Commit Type as Panorama. Click OK.
- Apply the policies to the VM-Series firewalls for NSX-V.
- Click Commit, and select Commit Type Device Groups.
- Select the device group, NSX-V Device Group in this example and click OK.
- Verify that the commit is successful.
![]()
- Validate that the members of the dynamic address group
are populated on the VM-Series firewall.
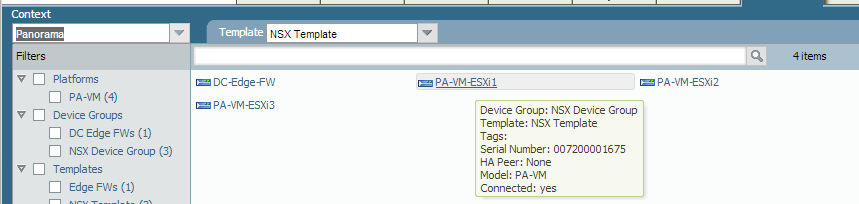
- From Panorama, switch device context to
launch the web interface of a firewall to which you pushed policies.
![]()
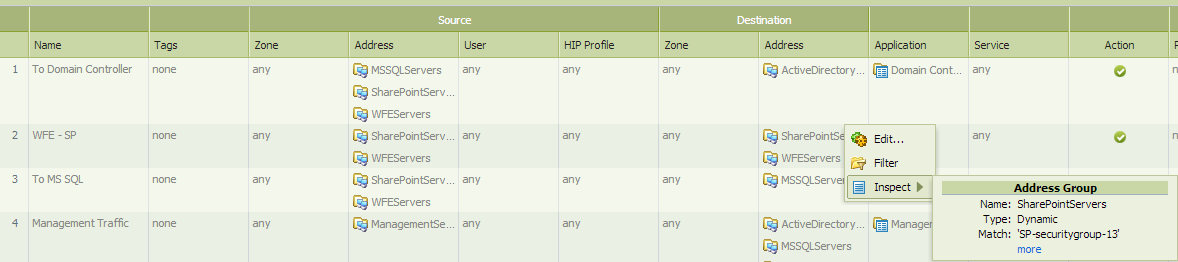
- On the VM-Series firewall, select , and select a rule.
- Select the drop-down arrow next to the address group
link, and select Inspect. You can also verify
that the match criteria is accurate.
![]()
- Click the more link and verify
that the list of registered IP addresses is displayed.
![]() Policy will be enforced for all IP addresses that belong to this address group, and are displayed here.
Policy will be enforced for all IP addresses that belong to this address group, and are displayed here.
- From Panorama, switch device context to
launch the web interface of a firewall to which you pushed policies.
- (Optional) Use template to push a base configuration
for network and device configuration such as DNS server, NTP server,
Syslog server, and login banner.Refer to the Panorama Administrator’s Guide for information on using templates.
- Create a Zone Protection profile and attach it to a zone.A zone protection profile provides flood protection and has the ability to protect against port scanning, port sweeps and packet-based attacks. It allows you to secure intra-tier and inter-tier traffic between virtual machines within your data center and traffic from the Internet that is destined to the virtual machines (workloads) in your data center.
- Select your Template.
- Select to add and configure a new profile.
- Select , click the default-zone listed and select the profile in the Zone Protection Profile drop down.
- Create a DoS Protection profile and attach it to DoS Protection policy rule.
- Select your Device Group.
- Select to
add and configure a new profile.
- A classified profile allows the creation of a threshold that applies to a single source IP. For example, you can configure a max session rate for an IP address that matched the policy, and then block that single IP address once the threshold is triggered.
- An aggregate profile allows the creation of a max session rate for all packets matching the policy. The threshold applies to new session rate for all IP addresses combined. Once the threshold is triggered it affects all traffic that matches the policy.
- Create a new DoS Protection policy rule in and
attach the new profile to it.
![]()