Orchestrate a VM-Series Firewall Deployment in AWS
Table of Contents
Orchestrate a VM-Series Firewall Deployment in AWS
Complete the following procedure to orchestrate
a VM-Series firewall deployment in AWS.
Panorama deployments
on AWS with an instance profile is not supported when deployed behind
a proxy.
- Log on to the Panorama web interface.
- Install Panorama plugin for AWS 3.0.1 or later.To upgrade the Panorama plugin for AWS to version 3.0.1, you must first upgrade the plugin to version 2.0.2. After you install the AWS plugin version 3.0.1 you cannot downgrade to version 2.0.x or below.If you have a Panorama HA configuration, repeat the installation/upgrade process on each Panorama peer.If you currently have a Panorama plugin for any cloud platform installed, installing (or uninstalling) an additional plugin requires a Panorama reboot so that you can commit changes.
- Configure IAM Roles for AWS Plugin in Panorama
- Select to Add a new deployment.
- Enter the generic details of the deployment in the General tab.
- Enter a Name and an optional Description to identify the deployment in Panorama and AWS cloud.
- Select an IAM Role from the drop-down.
The list displays IAM roles that has valid or partially valid deployment
permissions.Once an IAM role has been created and added to you deployment, you can edit information in the IAM (such as secret key and access key). However, you cannot edit the name of the IAM role. To change the name, you must delete the IAM and create another.
![]()
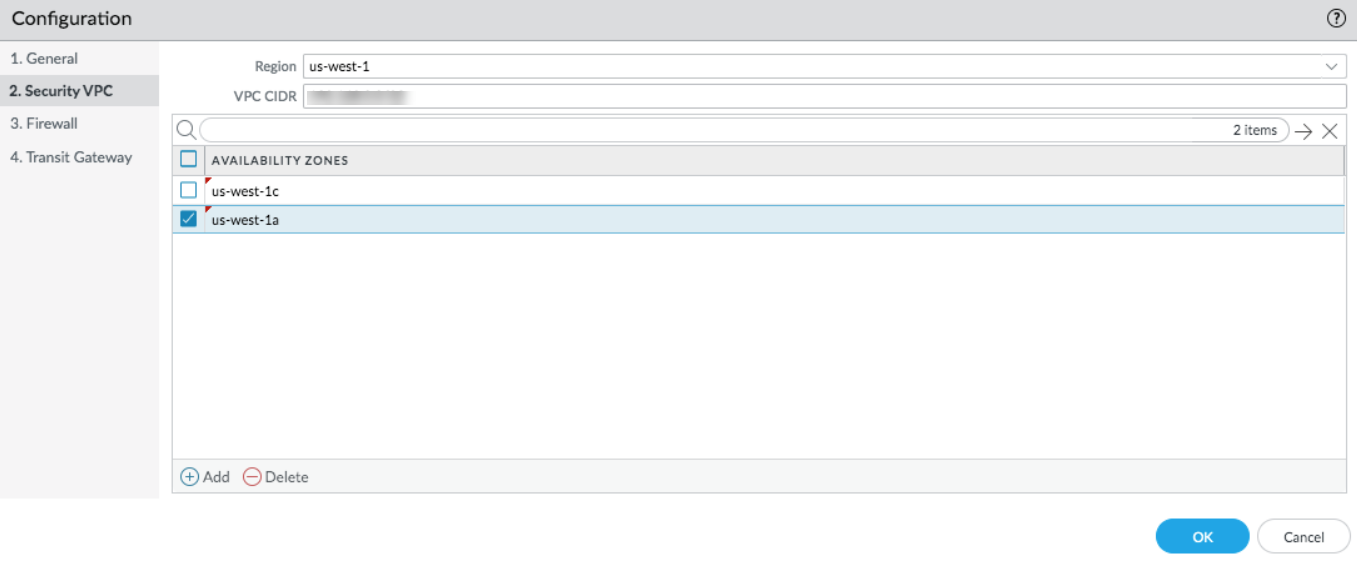
- Enter the Security VPC related information in the Security
VPC tab.
- Select the AWS Region in which you intend to launch the deployment. The list displays regions based on the selected IAM role.
- Enter a VPC CIDR value to create resources in the Security VPC. This CIDR will be managed by the AWS plugin.
- Select two or more Availability Zones from the pre-populated list and follow the same mapping in AWS. This list is populated based on the region you selected.
![]()
- Select and enter the following
details.
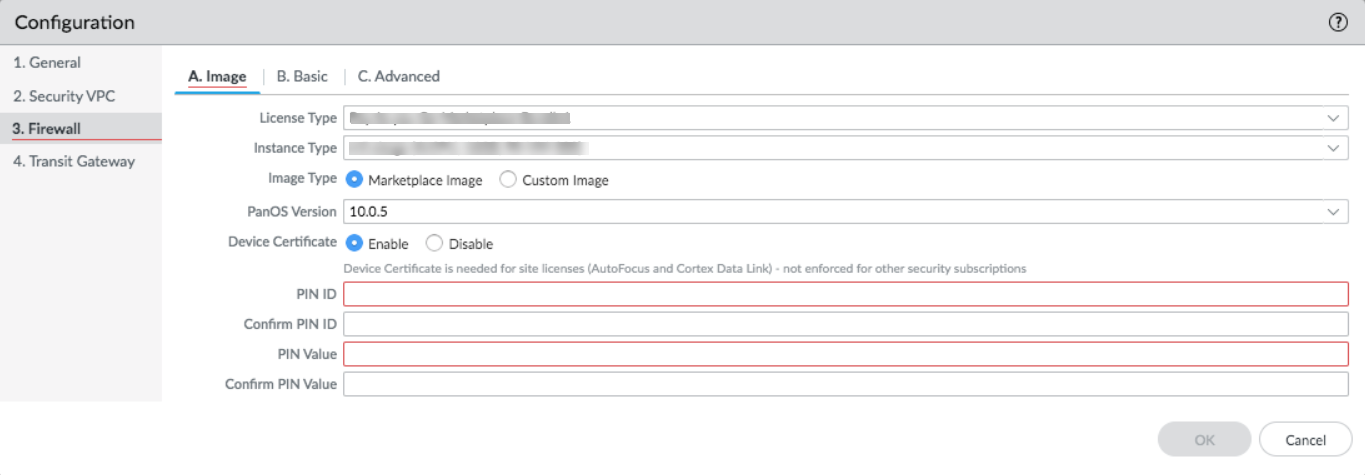
- License Type—The standard
license types Bring Your Own License (BYOL), Pay
As you Go-Marketplace-Bundle1, and Pay As
you Go-Marketplace-Bundle2 are provided as options in
the drop-down (based on the selected regions). If you select Bring
Your Own License, be prepared to enter a license authcode.Pay as you go Bundle 1 and Bundle 2 cannot be used with an AMI custom image.
- (Optional—Appears only if you choose Bring Your Own License license type) License Authcode—Enter the authcode for your BYOL. This authcode determines which instance types appear on the Instance Type drop-down.
- Instance Type—Choose supported instance types from the drop-down. This list is derived from the license authcode.
- Image Type—Select Marketplace Image or Custom Image.If you select Marketplace Image, select from the drop-down, PanOS Version 10.0.5 or later supported in the regions you selected when you configured the Security VPC.If you select Custom Image, enter the Amazon Machine Image (AMI) ID and select a PanOS Version 10.0.5 or later.
- Device Certificate—The device certificate
is generated on the Customer Support portal, and enables you to
retrieve your site license entitlements for AutoFocus or Cortex
Data Link. Select Disable if you are not
using these licenses. To configure the device certificate PIN, select Enable and
enter the following information:PIN ID—Enter the PIN ID.Confirm PIN ID—Re-enter the PIN ID.PIN Value—Enter the PIN.Confirm VM PIN Value—Re-enter the PIN.
![]()
- License Type—The standard
license types Bring Your Own License (BYOL), Pay
As you Go-Marketplace-Bundle1, and Pay As
you Go-Marketplace-Bundle2 are provided as options in
the drop-down (based on the selected regions). If you select Bring
Your Own License, be prepared to enter a license authcode.
- Select and enter the following
details.
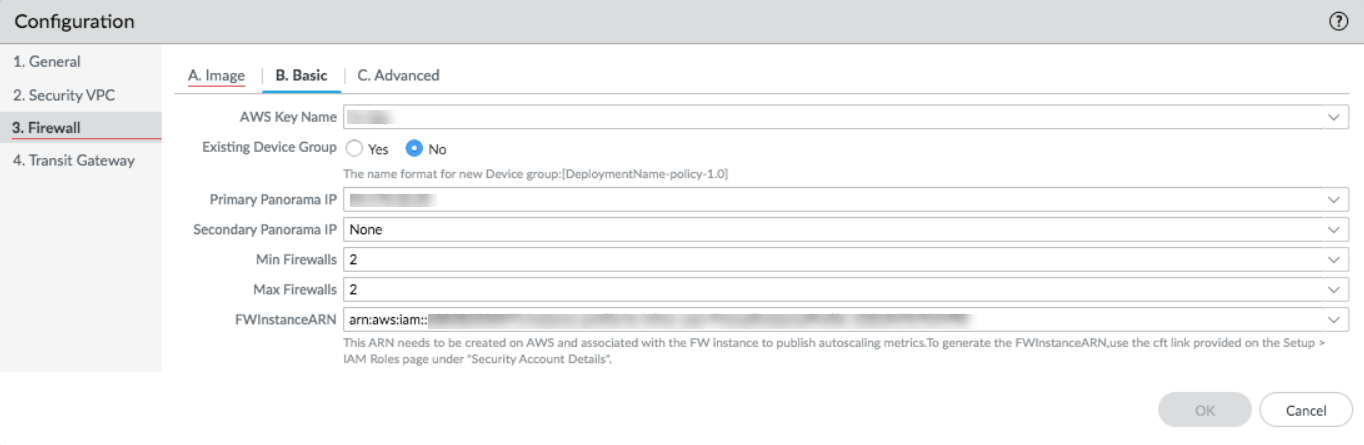
- AWS Key Name—The name of a SSH key you will use to log into the firewalls after they are deployed. This key is bootstrapped into the firewall and can be used for debugging when the firewall is up and running.
- Existing Device Group—If you select No, the plugin creates format of the device group name. If you select Yes, select an existing Device Group from the drop-down list.
- Primary Panorama IP—The IP address
of the Panorama you are using. The drop-down displays public and
private IP addresses on the management interface. Select an IP address
from the drop-down.If you deployed Panorama behind a proxy, you must manually enter the public IP of the primary Panorama under .
- Secondary Panorama IP—If you have a Panorama HA, the drop-down
displays the IP addresses on the management interface of the secondary
device. Select an IP address from the drop-down.If the secondary Panorama has a public IP address, it may not appear in the drop-down. In this case, you must manually add the IP address of the secondary Panorama.If Panorama private IP is used, routes may need to be added to the AWS route tables for plugin deployed firewall subnets and existing Panorama subnet, in order to facilitate connectivity between the newly deployed firewalls and Panorama.
- Min Firewalls—The minimum number of firewalls in an Auto Scaling Group (ASG). A value between 1 and 25.
- Max Firewalls—The maximum number of firewalls in an ASG. A value between 2 and 25.
- FirewallInstanceARN—From the drop-down, choose the assume RoleARN created on AWS cloud that is associated with the firewall instance to publish autoscaling metrics. The drop-down displays only the RoleARNs you entered on the page.
![]()
- (Optional) Select and enter the following
details.
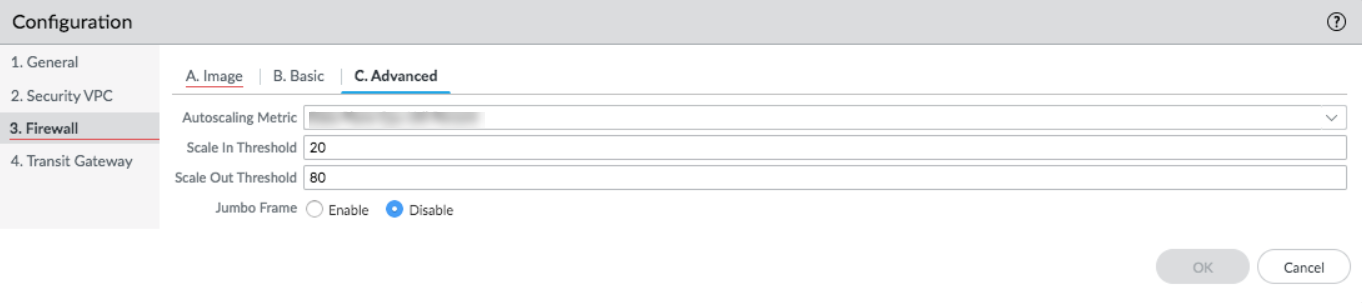
- Autoscaling Metric—Choose a metric from the drop-down: Data Plane CPU Util Percent (default), Active Sessions, Data Plane Packet Buffer Util Percent, or Session Util Percent.
- Scale In Threshold—Choose a value for the scale in threshold. The value depends on your chosen metric.
- Scale Out Threshold—Choose a value for the scale out threshold. The value depends on your chosen metric.
- Scale Out Threshold—Choose a value for the scale out threshold. The value depends on your chosen metric.
- Jumbo Frame—Disabled by default. You can only enable this option when preparing the initial deployment. Select Enable to enable jumbo frame support on the firewall.
![]()
- Select whether to connect to a Transit Gateway to
handle traffic routing across Security VPC and Application VPC.
- Choose if you want to Connect to TGW.
If you select Yes, be prepared to enter a
TGW ID to which you want to attach the Security VPC.This configuration is required for Outbound or East-West traffic flows only.
- (Optional) Select a TGW ID to
which you want to attach the Security VPC.You have to share the TGW if you want to use them across accounts. You can share it using Resource Access Manager (RAM) on AWS. Create RAM based on the account where the TGW is located.
- Select Application Account Names.
If the TGW and Security VPC are in the same account, select the
Application Account with which you want to share the TGW. The plugin
creates the RAM on the Security Account to share the TGW across
the selected Application accounts. You must accept the invitation
for RAM on the account you select here.If the TGW and Security VPC are in the same account, select an Application account with which you want to share the TGW. If the TGW is in an Application account, make sure that the TGW is shared on RAM.If the TGW is in an Application account (other than the Security account):
- Make sure the TGW is shared with the Security account.
- Use the CFT hyperlink under . From the CFT, you can create the RAM for the mentioned TGW.
- On the Security account, make sure to go to RAM in the AWS console and accept the request to share the TGW.
![]()
- Choose if you want to Connect to TGW.
If you select Yes, be prepared to enter a
TGW ID to which you want to attach the Security VPC.
- Commit to add the deployment and push to firewalls.