Device Security
Create Device Security Users
Table of Contents
Expand All
|
Collapse All
Device Security Docs
Create Device Security Users
Create Device Security users, assign user roles, and view users for Device Security.
| Where Can I Use This? | What Do I Need? |
|---|---|
|
One of the following subscriptions:
|
When users log in to the Device Security portal using single sign-on (SSO),
they go through a two-step process. In step 1, an SSO identity provider (IdP)
authenticates users by verifying their credentials. In step 2, users are authorized
and provided with a role to access Device Security.
When users log in to the Device Security portal using Palo Alto Networks SSO,
their credentials are verified against user accounts in the
Customer Service Portal. Then their user role is assigned according to
Common Services Identity & Access. User roles determine what they can see and
do in Device Security. These user roles are referred to as
"externally managed user roles."
Customers who activated Device Security before June 2025 can also create
“internally managed user roles,” which are assigned in the
Device Security portal and are described in a section under the
Device Security tab.
Because the user role can be managed in two different places, Device Security
might find that some users' external roles are different from their internal
roles. In such cases, whichever role is higher takes precedence.
In addition, Device Security provides an option to verify users against an
Active Directory (AD) authentication system through SSO. In this case, user accounts
are in Active Directory, which verifies user credentials on behalf of
Device Security. You can manage the role of a given user in two different ways:
(1) managed internally by Device Security or Palo Alto Networks
Cortex XSOAR OR (2) managed externally by Active Directory.
Device Security in Strata Cloud Manager does not support managing
user roles with a third-party Active Directory.
Strata Cloud Manager
Create Device Security users, assign user roles, and view users in
Device Security in Strata Cloud Manager.
For Device Security in Strata Cloud Manager, use Common Services to manage all
user roles. You can allow users to authenticate using the Palo Alto Networks
SSO, or using a third-party identity provider (IdP).
- Set up authentication for your Device Security users.
- Palo Alto Networks SSO Add User Access Through Common Services
- Third-party IdP SSO Manage Third-Party Identity Provider Integrations Through Common ServicesIf you activated Device Security before June 2025 and use a third-party IdP SSO, you need to reconfigure your third-party IdP through Common Services to access Device Security in Strata Cloud Manager.
Assign a Predefined Role to a Tenant User or Service Account Through Common ServicesStrata Cloud Manager uses Common Services to manage user roles. From the enterprise roles available in Common Services, Device Security supports the Superuser role and the View Only Administrator role.For customers transitioning from the Device Security portal to Device Security in Strata Cloud Manager, the Device Security user roles map to the following Strata Cloud Manager roles:- Owner -> Superuser
- Administrator -> Superuser
- Read-only -> View-only Administrator
Periodically review all users and roles with access to Device Security and remove user access through Common Services as needed.
(Legacy) IoT Security
Create Device Security users, assign user roles, and view users in the Device Security
portal.
When accessing Device Security in the (Legacy) IoT Security portal, you can
choose to authenticate users with the Palo Alto Networks SSO or with a
third-party identity provider (IdP). If you authenticate users with the
Palo Alto Networks SSO, you can manage users in Common Services or in the
Device Security portal. If you authenticate users with a third-party IdP, you
have the additional option of managing users with Active Directory.
Authenticate Users with Any SSO and Manage User Roles in the (Legacy) IoT Security Portal
User roles are set for user accounts in external SSO authentication systems — the
Palo Alto Networks SSO and customer-managed SSOs—but you can also log in to the
Device Security portal with owner privileges and set other roles for administrators
and read-only users. If the externally and internally managed roles are
different, Device Security assigns the higher of the two. Therefore, only set user
roles internally on Device Security that are higher than those set externally;
otherwise, an internal role will never be assigned. The ranking of roles from
highest to lowest is owner, administrator, read-only user.
If user accounts in an external SSO don't have any externally managed roles
defined, these users won't be able to log in to Device Security until a local user
with owner privileges sets internally managed roles for them and invites them to
log in to Device Security.
- Invite users who have an account on an external SSO but no externally managed role to access Device Security.Skip this step if users have an externally managed role that maps to a role in Device Security.
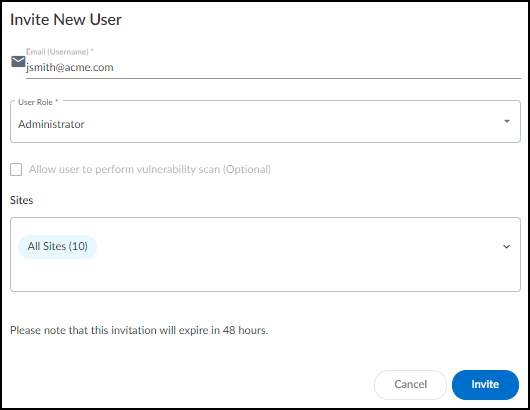
- Log in to Device Security as a user with owner privileges, select AdministrationUser Accounts and then click the Invite New User icon ( + ) above the User Accounts table.
- Enter an email address, choose a role (Owner, Administrator, or Read only), specify which sites the user can access, and then Invite.
![]() Device Security automatically generates an email with a login link and sends it to the user.The invitation is valid for 48 hours after it's sent.When the email recipient clicks a link in the email, they are directed to the login page. The user clicks the Log in with <sso-name> button to log in through SSO. After the user logs in, Device Security grants them access with the local role you specified.
Device Security automatically generates an email with a login link and sends it to the user.The invitation is valid for 48 hours after it's sent.When the email recipient clicks a link in the email, they are directed to the login page. The user clicks the Log in with <sso-name> button to log in through SSO. After the user logs in, Device Security grants them access with the local role you specified. - If you want to invite more users, repeat the previous steps for each one.
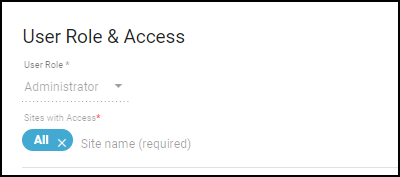
View users, their externally managed roles, role providers, and internally managed roles and which sites they can access.You can see a list of users and their roles on the Access Management page in the hub and, if you’re logged in with owner privileges, on the User Accounts page (AdministrationUser Accounts) in the Device Security portal.Externally Managed Role and Role Provider: If Device Security applies the user role that’s set on the external SSO authentication system, the role appears in the Externally Managed Role column and the SSO name appears in the Role Provider column. If Device Security has an internally managed role for a user that’s the same as or higher than their externally managed role, it applies the internally managed role. In this case, these two columns are empty.Internally Managed Role: This column lists user roles defined in Device Security. It’s only empty if there isn’t a role defined internally.After you create a user account in the Customer Support Portal and hub, the account won't appear on the AdministrationUser Accounts page in the Device Security portal until the user logs in to the Device Security portal.Assign a user with an internally managed role.- When logged in to the Device Security portal with owner privileges, click AdministrationUser Accounts and then click an entry for an administrator or read-only user in the Email (Username) column.The User Role & Access dialog opens.
![]()
- Choose a different role from the User Role drop-down. When there are different externally and internally managed roles for the same user, Device Security applies the role with higher privileges. Therefore, when setting an internal role, choose one that’s higher than the one assigned by an external SSO authentication system.
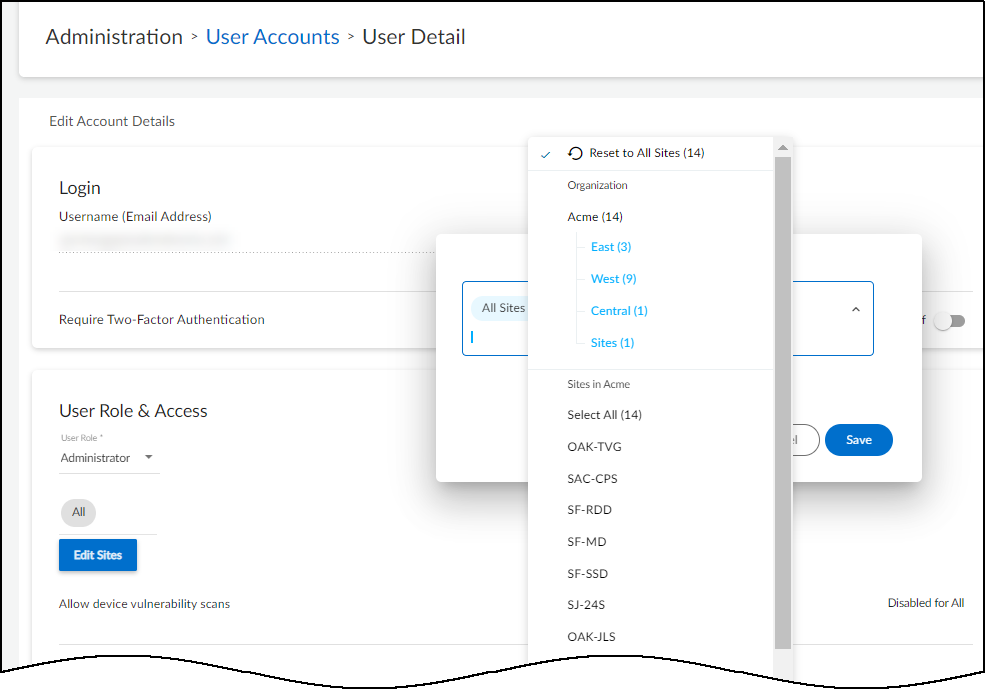
Determine which sites an administrator or read-only user can access.By default, all users have access to all sites. To give the user access to a subset of sites, click the x in the All label and then select the names of the sites or site groups to which you want to permit access.![]() For information about site groups and how to use them to control what data users can access, see Sites and Site Groups.When done, Save the configuration change.The next time the user logs in, they will only have the privileges of the internally managed role and access to devices and data for the selected sites.
For information about site groups and how to use them to control what data users can access, see Sites and Site Groups.When done, Save the configuration change.The next time the user logs in, they will only have the privileges of the internally managed role and access to devices and data for the selected sites.Authenticate Users with an Active Directory SSO and Manage User Roles in Active Directory
Authenticate Users with an Active Directory SSO and Manage User Roles in Active Directory - Prepare the authentication system.Before you configure Device Security, prepare your Active Directory to communicate with it and export the identity provider (IdP) metadata file that Device Security will need to communicate with the IdP.
- Configure your IdP with the following URLs, replacing the tenant-id variable with your own tenant ID, which is the first part of your Device Security portal URL:https://tenant-id.iot.paloaltonetworks.com/loginDepending on how you configure your IdP, either point it to the Device Security metadata URL to retrieve all the necessary data or enter the information separately.
- Assertion Consumer Service (ACS) – This is the destination to which the IdP sends authentication assertions in response to user authentication requests.https://tenant-id.iot.paloaltonetworks.com/v0.3/zauth/saml2_sso/acs
- Entity ID – This is the URL that uniquely identifies the Zingbox SP.https://tenant-id.iot.paloaltonetworks.com/v0.3/zauth/saml2_sso/metadata
- Palo Alto Networks Metadata – This file includes the ACS URL and entity ID plus other parameters such as its public Security Assertion Markup Language (SAML) 2.0 encryption key.https://tenant-id.iot.paloaltonetworks.com/v0.3/zauth/saml2_sso/metadata
To see the URLs with your specific tenant ID, follow steps 1-2 in the next section and then copy the URLs in the Service Provider (SP) Configuration Details section. - Either copy and save the URL where Device Security can import the IdP metadata file from your SSO authentication system or download the file and save it in XML format. You will later import it to the Device Security portal.
Prepare Device Security to use an externally managed SSO.- Log in to the Device Security portal as an owner, navigate to AdministrationUser Accounts, and then Manage SSO.Palo Alto Networks is the default SSO identity provider (IdP) that authenticates users accessing the Device Security portal and assigns user roles to them.
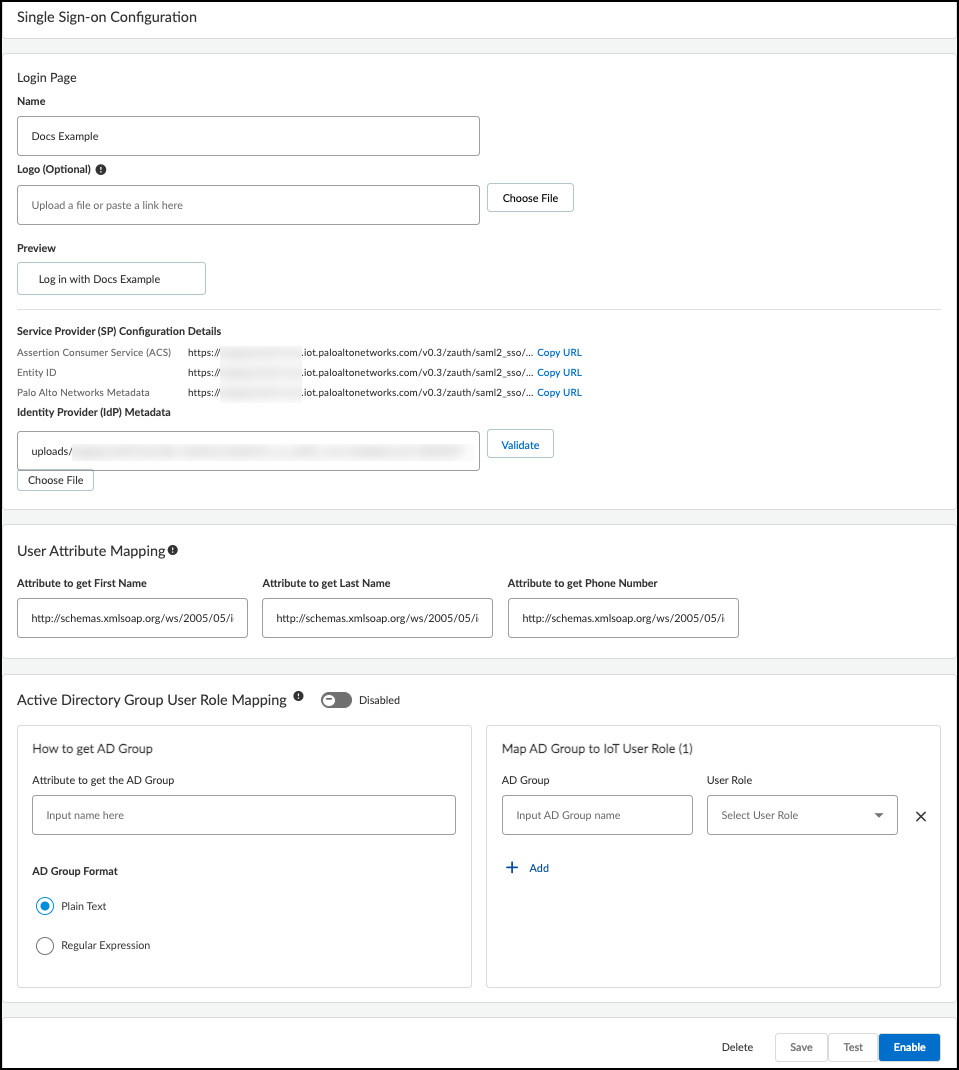
- To add a user-configured SSO, Add New SSO, and then enter the following in the Single Sign-on Configuration dialog that appears:Name: Enter a name for the SSO. It can be up to 16 characters. This name will appear on the login page as shown in the Preview below.Logo (Optional): Upload an image file to display next to the SSO name on the login page as shown in the Preview. The image file can be up to 2 MB and must be in .bmp, .jpg, or .png format.IdP Metadata: Either enter the URL of the IdP metadata file you copied and saved earlier or click Choose file, navigate to the XML file you exported from your authentication system, and select it.
- Validate the IdP metadata URL or uploaded file.Validating the IdP metadata URL activates the Save and Test buttons.
- Configure the following fields to map attributes to Device Security user roles. Map an SAML fully qualified claim name to the user attribute.Attribute to get First Name: Enter a fully qualified domain for a first name, such as http://schemas.xmlsoap.org/ws/2005/05/identity/claims/firstnameAttribute to get Last Name: Enter a fully qualified domain for a surname, such as http://schemas.xmlsoap.org/ws/2005/05/identity/claims/lastnameAttribute to get Phone Number: Enter a fully qualified domain for a phone number, such as http://schemas.xmlsoap.org/ws/2005/05/identity/claims/mobile
- Configure the following settings to identify Active Directory (AD) user groups whose users you want Active Directory to authorize. If you leave them empty, Device Security authorizes them locally.Attribute to get AD Groups: Enter the attribute in the SAML 2.0 response that identifies user groups from Active Directory.AD Group Format: Select whether the attribute is formatted as Plain Text or Regular Expression. These are how Device Security maps AD user groups to Device Security user roles.Plain Text identifies the user group with the exact value specified in Attribute to get AD Groups. For example, if AD Group Format is Plain Text and the AD Group is Hospital Administrator, then Device Security maps only users in the AD group named Hospital Administrator to the specified Device Security role.Regular Expression identifies any user group that contains the value specified in Attribute to get AD Groups. For example, if AD Group Format is Regular Expression and the AD Group is OUI=Hospital*, then Device Security maps users in any AD group whose organizational unit identifier (OUI) includes Hospital—such as OUI=Hospital Administrator and OUI=Hospital NetSec—to one or more specified Device Security roles.AD Group and User Role: Enter an Active Directory group name and then choose the Device Security user role to map it to: Owner, Administrator, or Read Only. Click + to add more AD group-to-user role mappings. You can create up to 50 mappings. A single AD group can’t map to multiple Device Security user roles, but multiple AD groups can map to the same Device Security user role.For information about the Device Security user roles, see Manage Device Security Users.
![]()
- Save the SSO configuration.
- Test the SSO configuration.Device Security opens a small window to log in using the authentication system.
- When done with the test, click Confirm.
- Enable the SSO configuration.
- After enabling the configuration, the Enable button changes to Disable and Edit.


