Download PDF
GlobalProtect
Host a Split Tunnel Configuration File on a Web Server
Table of Contents
Host a Split Tunnel Configuration File on a Web Server
Host a split tunnel configuration file on a local web server for expanded support for
domains, access routes and applications that you can update dynamically.
| Where Can I Use This? | What Do I Need? |
|---|---|
|
|
You can either define your split tunnel
configuration on the GlobalProtect gateway, or you can host it in a Split
Tunnel configuration file that you host on a web server in your environment. In
order to push the split tunnel configuration to the endpoint:
- Your split tunnel configuration file must parse as valid XML
- The web server must be reachable by all endpoints configured to fetch the split tunnel configuration file
- The server and the client must be able to mutually authenticate
If the GlobalProtect app cannot fetch the split tunnel configuration file, it falls
back to the split tunnel configuration that you have configured on the gateway.
The following table shows the split tunnel configuration limits when the
configuration is hosted on GlobalProtect vs. when it is hosted in a Split Tunnel
Configuration file in your environment:
| Split Tunnel By... | Configured on GlobalProtect Gateway | Hosted on a Web Server | |
|---|---|---|---|
|
Access Route
|
Include
| 1000 | 1000 |
|
Exclude
| 200 | 1000 | |
|
Domain
|
Include
| 200 | 1000 |
|
Exclude
| 200 | 1000 | |
|
Application
|
Include
| 200 | 200 |
|
Exclude
| 200 | 200 |
- Create and sign the split tunnel configuration file.
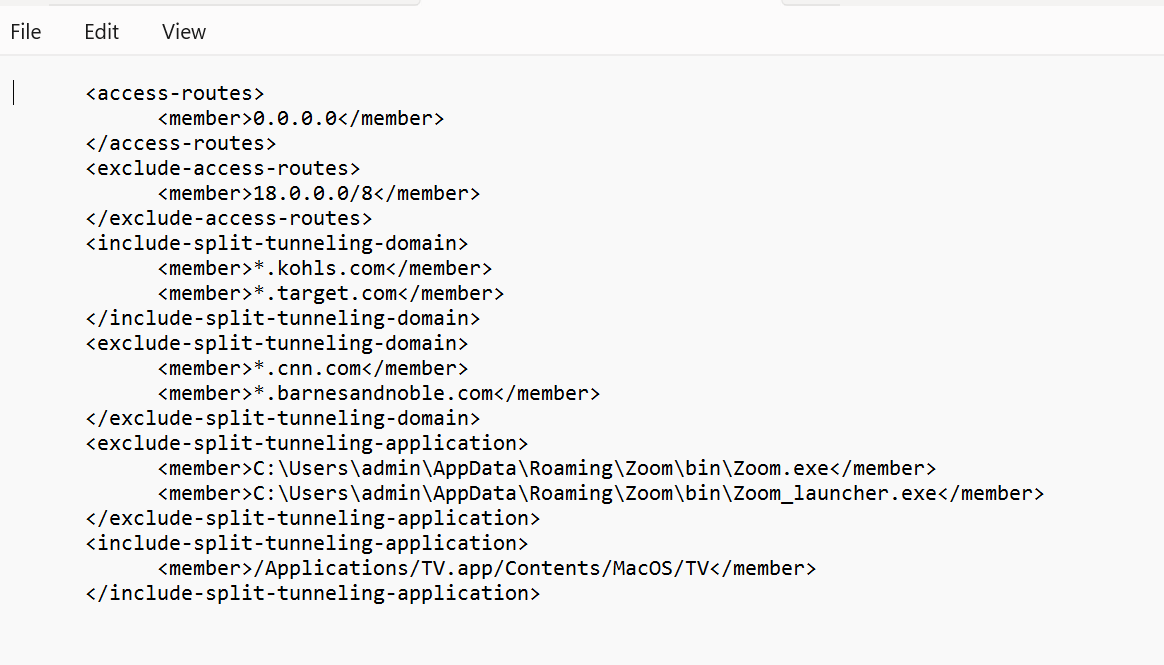
- Create your split tunnel configuration file in XML format, as in the following example.
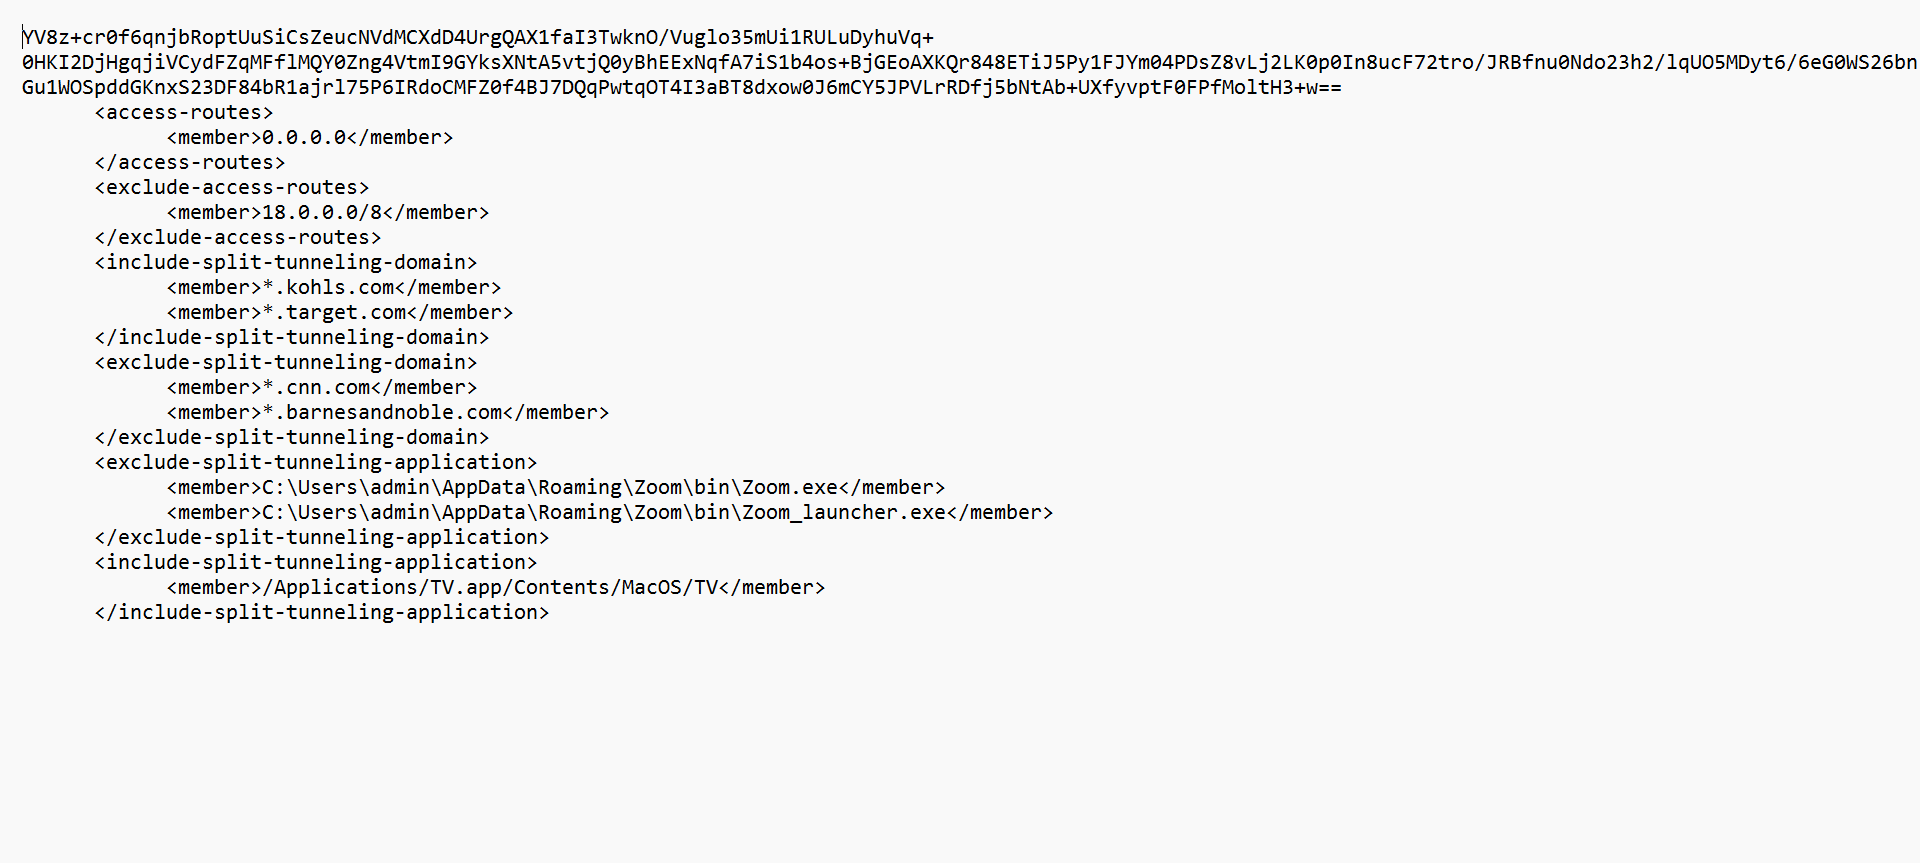
![]() Sign the configuration file.For example, if the signature file name is config_signature.sha256:openssl dgst -sha256 -sign private_key.pem -out config_signature.sha256 config.txtYou can optionally verify the signature:openssl dgst -sha256 -verify public_key.pem -signature config_signature.sha256 config.txtBase64 encoding signature file (no wrapping):openssl base64 -A -in config_signature.sha256 -out encoded_signature.txtAdd the encoded digest to the configuration file.
Sign the configuration file.For example, if the signature file name is config_signature.sha256:openssl dgst -sha256 -sign private_key.pem -out config_signature.sha256 config.txtYou can optionally verify the signature:openssl dgst -sha256 -verify public_key.pem -signature config_signature.sha256 config.txtBase64 encoding signature file (no wrapping):openssl base64 -A -in config_signature.sha256 -out encoded_signature.txtAdd the encoded digest to the configuration file.- Add the encoded digest as the first line in the configuration file. It must be on a single line.
- Add the split tunnel configuration as the second line.
- If you want the traffic to be routed through GlobalProtect by default, add an <access-routes> section with the default route 0.0.0.0/0.
The content in the file must not be terminated with a NULL character (ASCII '\0', or ^@)" ).![]() Host the split tunnel configuration file you just created on a web server that your GlobalProtect endpoints can access.Enable mutual authentication.You will need the public key certificate that you use for mutual authentication for the GlobalProtect configuration.For example, to host the split tunnel configuration file in AWS behind the network load balancers protected by the AWS network firewall, you would do the following:
Host the split tunnel configuration file you just created on a web server that your GlobalProtect endpoints can access.Enable mutual authentication.You will need the public key certificate that you use for mutual authentication for the GlobalProtect configuration.For example, to host the split tunnel configuration file in AWS behind the network load balancers protected by the AWS network firewall, you would do the following:- Provision EC2 instances to host servers.
- Create network load balancers (NLB) and configure listeners on TCP port 443.
- Create Target Groups with port 443 and associate EC2 instances to the Target Groups.
- Configure the network firewall and two stateless rule groups and associate them with the configured firewalls that you have provisioned. Configure rule 1 to drop packets to all ports and protocols from a specific IP address or subnet. Configure rule 2 to allow packets to TCP port 443.
- Configure the VPC routing tables to forward traffic from the internet to the NLB via the network firewall.
Add the public key certificate you used on your web server to the portal configuration.In the App Configurations area, paste the public key certificate in the Enhanced Split Tunnel Client Certificate Public Key field.![]() Enable split tunneling and add the URL for your split tunnel configuration file.
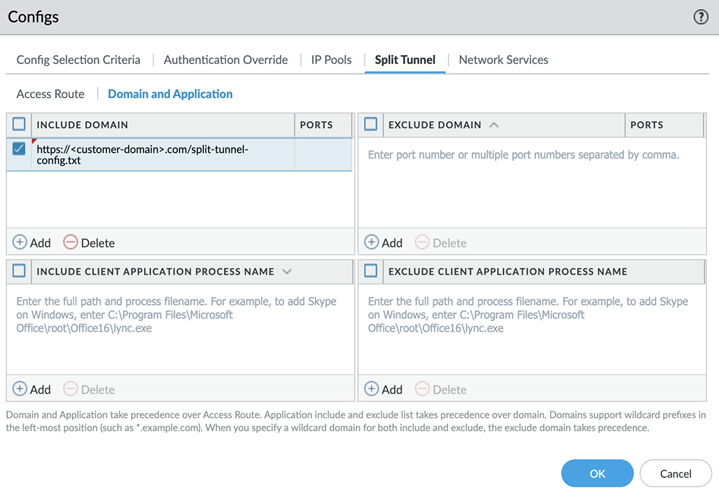
Enable split tunneling and add the URL for your split tunnel configuration file.- In the GlobalProtect Gateway Configuration dialog, select AgentTunnel Settings and enable Tunnel ModeConfigure the tunnel parameters for the GlobalProtect app.In the GlobalProtect Gateway Configuration dialog, select AgentClient Settings and select an existing client settings configuration or add a new one.Select Split Tunnel and in the Include Domain section, add the URL of your split tunnel configuration file as the first entry in the Include Domain section.Only HTTPS URLs are supported.
![]() Click OK and Commit the changes.
Click OK and Commit the changes.


