GlobalProtect
Customize the SAML/CAS ACS Landing Page
Table of Contents
Expand All
|
Collapse All
GlobalProtect Docs
-
10.1 & Later
- 10.1 & Later
- 9.1 (EoL)
-
- How Does the App Know Which Certificate to Supply?
- Set Up Cloud Identity Engine Authentication
- Configure GlobalProtect to Facilitate Multi-Factor Authentication Notifications
- Enable Delivery of VSAs to a RADIUS Server
- Enable Group Mapping
-
-
- GlobalProtect App Minimum Hardware Requirements
- Download the GlobalProtect App Software Package for Hosting on the Portal
- Host App Updates on the Portal
- Host App Updates on a Web Server
- Test the App Installation
- Download and Install the GlobalProtect Mobile App
- View and Collect GlobalProtect App Logs
-
-
- Deploy App Settings in the Windows Registry
- Deploy App Settings from Msiexec
- Deploy Scripts Using the Windows Registry
- Deploy Scripts Using Msiexec
- Deploy Connect Before Logon Settings in the Windows Registry
- Deploy GlobalProtect Credential Provider Settings in the Windows Registry
- SSO Wrapping for Third-Party Credential Providers on Windows Endpoints
- Enable SSO Wrapping for Third-Party Credentials with the Windows Registry
- Enable SSO Wrapping for Third-Party Credentials with the Windows Installer
- Deploy App Settings to Linux Endpoints
- GlobalProtect Processes to be Whitelisted on EDR Deployments
-
-
- Mobile Device Management Overview
- Set Up the MDM Integration With GlobalProtect
- Qualified MDM Vendors
-
-
- Set Up the Microsoft Intune Environment for Android Endpoints
- Deploy the GlobalProtect App on Android Endpoints Using Microsoft Intune
- Create an App Configuration on Android Endpoints Using Microsoft Intune
- Configure Lockdown Mode for Always On Connect Method on Android Endpoints Using Microsoft Intune
-
- Deploy the GlobalProtect Mobile App Using Microsoft Intune
- Configure an Always On VPN Configuration for iOS Endpoints Using Microsoft Intune
- Configure a User-Initiated Remote Access VPN Configuration for iOS Endpoints Using Microsoft Intune
- Configure a Per-App VPN Configuration for iOS Endpoints Using Microsoft Intune
-
-
-
- Create a Smart Computer Group for GlobalProtect App Deployment
- Create a Single Configuration Profile for the GlobalProtect App for macOS
- Deploy the GlobalProtect Mobile App for macOS Using Jamf Pro
-
- Enable GlobalProtect System Extensions on macOS Endpoints Using Jamf Pro
- Enable GlobalProtect Network Extensions on macOS Big Sur Endpoints Using Jamf Pro
- Add a Configuration Profile for the GlobalProtect Enforcer by Using Jamf Pro 10.26.0
- Verify Configuration Profiles Deployed by Jamf Pro
- Remove System Extensions on macOS Monterey Endpoints Using Jamf Pro
- Non-Removable System Extensions on macOS Sequoia Endpoints Using Jamf Pro
- Uninstall the GlobalProtect Mobile App Using Jamf Pro
-
- Configure HIP-Based Policy Enforcement
- Configure HIP Exceptions for Patch Management
- Collect Application and Process Data From Endpoints
- Redistribute HIP Reports
-
- Identification and Quarantine of Compromised Devices Overview and License Requirements
- View Quarantined Device Information
- Manually Add and Delete Devices From the Quarantine List
- Automatically Quarantine a Device
- Use GlobalProtect and Security Policies to Block Access to Quarantined Devices
- Redistribute Device Quarantine Information from Panorama
- Troubleshoot HIP Issues
-
-
- Enable and Verify FIPS-CC Mode on Windows Endpoints
- Enable and Verify FIPS-CC Mode on macOS Endpoints
- Enable and Verify FIPS-CC Mode Using Workspace ONE on iOS Endpoints
- Enable FIPS Mode on Linux EndPoints with Ubuntu or RHEL
- Enable and Verify FIPS-CC Mode Using Microsoft Intune on Android Endpoints
- FIPS-CC Security Functions
- Resolve FIPS-CC Mode Issues
-
-
- Remote Access VPN (Authentication Profile)
- Remote Access VPN (Certificate Profile)
- Remote Access VPN with Two-Factor Authentication
- GlobalProtect Always On VPN Configuration
- Remote Access VPN with Pre-Logon
- User-Initiated Pre-Logon Connection
- GlobalProtect Multiple Gateway Configuration
- GlobalProtect for Internal HIP Checking and User-Based Access
- Mixed Internal and External Gateway Configuration
- Captive Portal and Enforce GlobalProtect for Network Access
- GlobalProtect on Windows 365 Cloud PC
-
- About GlobalProtect Cipher Selection
- Cipher Exchange Between the GlobalProtect App and Gateway
-
- Reference: GlobalProtect App Cryptographic Functions
-
- Reference: TLS Ciphers Supported by GlobalProtect Apps on macOS Endpoints
- Reference: TLS Ciphers Supported by GlobalProtect Apps on Windows Endpoints
- Reference: TLS Ciphers Supported by GlobalProtect Apps on Android 6.0.1 Endpoints
- Reference: TLS Ciphers Supported by GlobalProtect Apps on iOS 10.2.1 Endpoints
- Reference: TLS Ciphers Supported by GlobalProtect Apps on Chromebooks
- Ciphers Used to Set Up IPsec Tunnels
- SSL APIs
-
- View a Graphical Display of GlobalProtect User Activity in PAN-OS
- View All GlobalProtect Logs on a Dedicated Page in PAN-OS
- Event Descriptions for the GlobalProtect Logs in PAN-OS
- Filter GlobalProtect Logs for Gateway Latency in PAN-OS
- Restrict Access to GlobalProtect Logs in PAN-OS
- Forward GlobalProtect Logs to an External Service in PAN-OS
- Configure Custom Reports for GlobalProtect in PAN-OS
-
6.3
- 6.3
- 6.2
- 6.1
- 6.0
- 5.1
-
- Download and Install the GlobalProtect App for Windows
- Use Connect Before Logon
- Use Single Sign-On for Smart Card Authentication
- Use the GlobalProtect App for Windows
- Report an Issue From the GlobalProtect App for Windows
- Disconnect the GlobalProtect App for Windows
- Uninstall the GlobalProtect App for Windows
- Fix a Microsoft Installer Conflict
-
- Download and Install the GlobalProtect App for macOS
- Use the GlobalProtect App for macOS
- Report an Issue From the GlobalProtect App for macOS
- Disconnect the GlobalProtect App for macOS
- Uninstall the GlobalProtect App for macOS
- Remove the GlobalProtect Enforcer Kernel Extension
- Enable the GlobalProtect App for macOS to Use Client Certificates for Authentication
-
6.1
- 6.1
- 6.0
- 5.1
-
6.3
- 6.3
- 6.2
- 6.1
- 6.0
- 5.1
Customize the SAML/CAS ACS Landing Page
This feature describes how the admins can customize the SAML/CAS anding
page
Where Can I Use This? | What Do I Need? |
---|---|
|
|
You can now customize the SAML/CAS ACS landing page displayed on the default browser
when you are using the SAML/CAS authentication method to authenticate to the
GlobalProtect app. You can configure to rebrand or debrand the SAML/CAS ACS landing
page on the default browser by using command-line interface (CLI) commands. By
default, the feature is not enabled for the app.
This feature is not available on Panorama.
Before you customize the SAML/CAS ACS landing page, you must:
- Ensure that the GlobalProtect Portal is configured.
- Ensure that the GlobalProtect Gateway is configured.
- Ensure that the default browser for SAML authentication is enabled in the portal configuration through either or both of the following methods:
- Set the Use Default Browser for SAML Authentication option to Yes in the app settings of the GlobalProtect portal configuration.
- Enable the Use Default-Browser option in the client authentication setting of the portal configuration.
To configure the GlobalProtect portal to rebrand or debrand the SAML/CAS ACS landing page on the default browser, use the following CLI commands:On the firewall hosting the portal, enter the following CLI command.<username@hostname> set global-protect auth-response-page
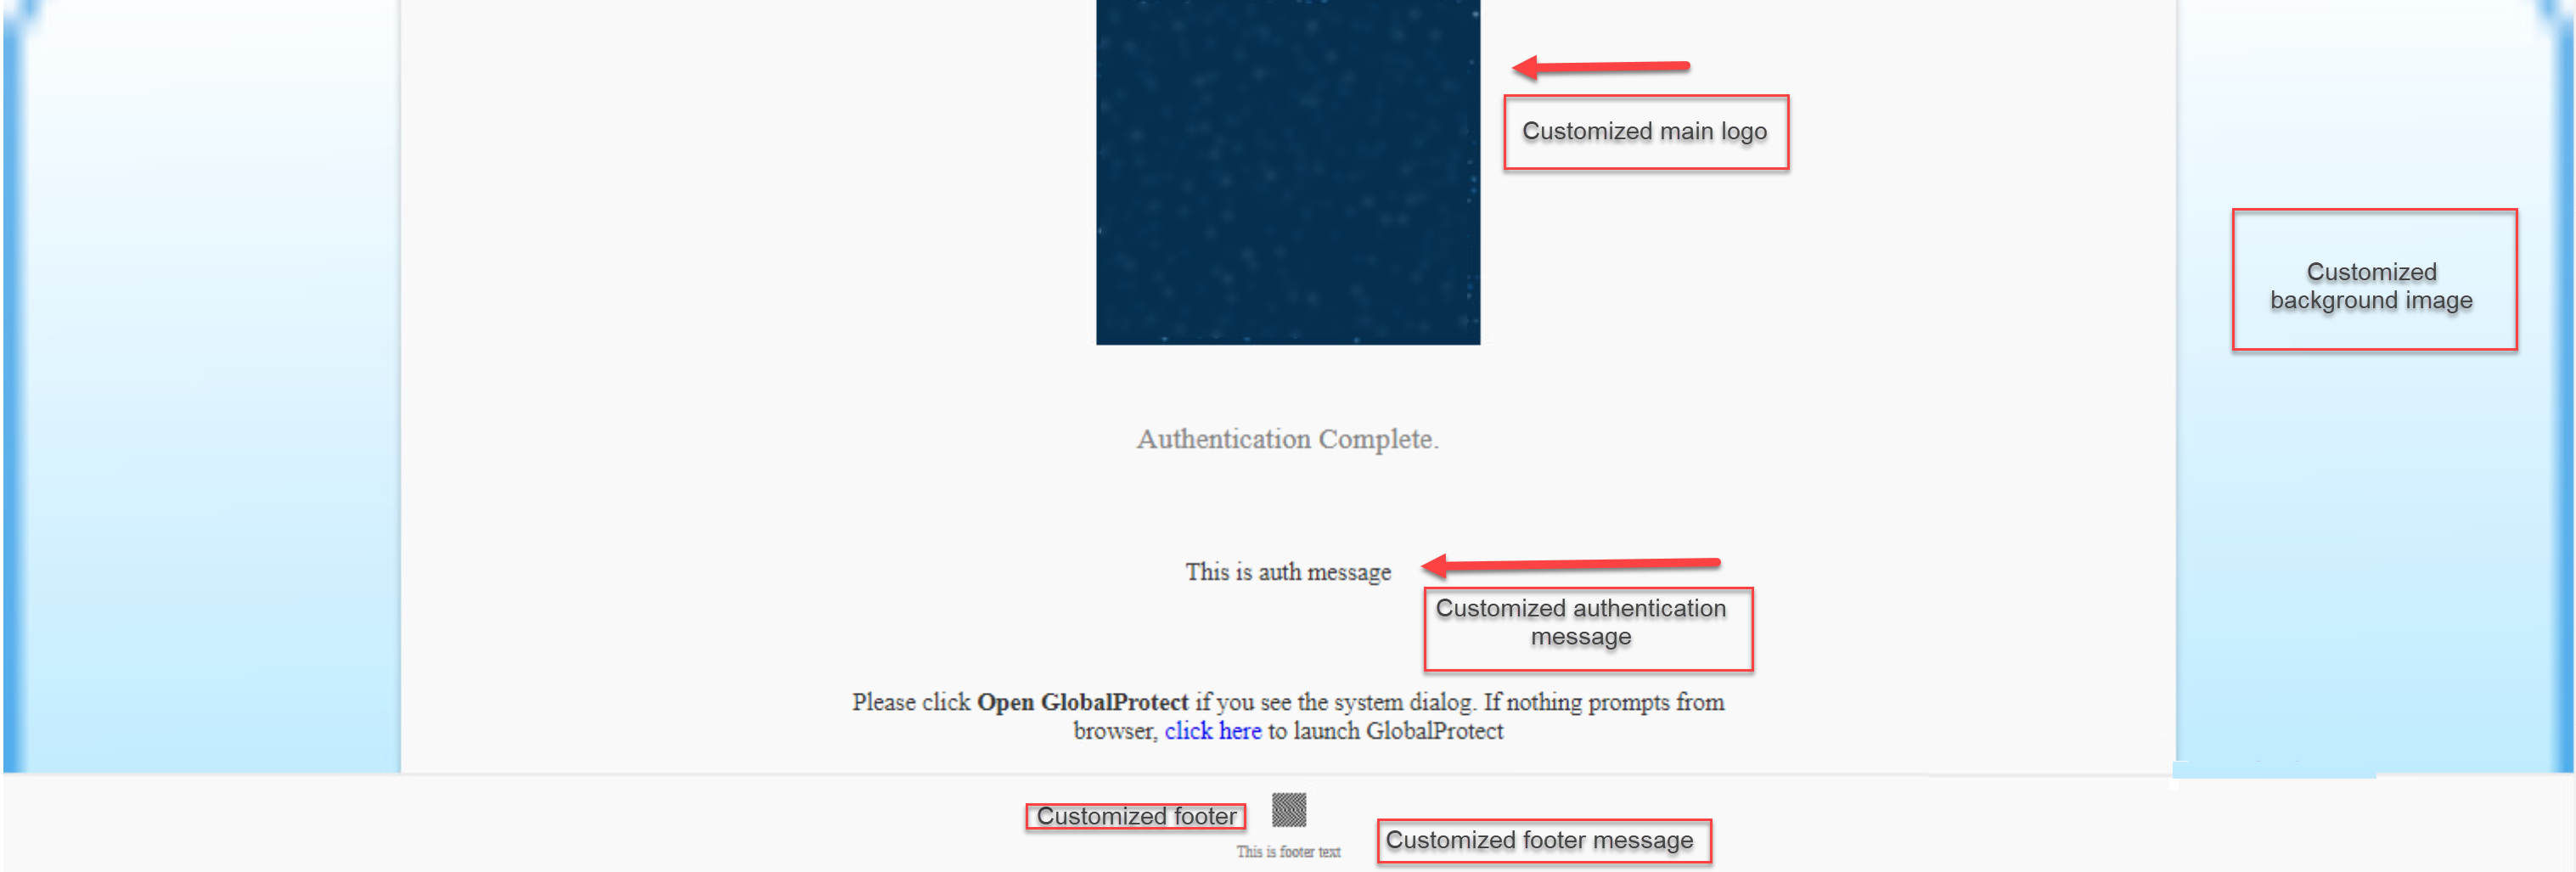
The screen displays the CLI commands for the SAML/CAS ACS page customization feature:Use the following CLI commands to customize the SAML/CAS ACS landing page:set global-protect auth-response-page type <default | none | custom>
- To continue using the default ACS page, leave the type empty or use the CLI command:
set global-protect auth-response-page type <default>
When you configure the global-protect auth-response-page type as <default> and the authentication is successful, the default ACS page is displayed with Authentication Complete message. If the Authentication fails, the screen displays the Authentication Failed message. - To remove the default logo, background image, footer logo, and footer text, use the CLI command:
set global-protect auth-response-page type <none>
- To customize the page, use the CLI command:
set global-protect auth-response-page type <custom>
Use the following CLI commands to customize the fields of the SAML/CAS ACS landing page:set global-protect auth-response-page background-image <value>
set global-protect auth-response-page main-logo <value>
set global-protect auth-response-page auth-message <value>
set global-protect auth-response-page footer-logo <value>
set global-protect auth-response-page footer-text <value>
- You can leave the values empty for all the fields except for the type <value>
- For image <value>, you must enter a valid HTTP or HTTPS URL
- For text <value>, do not enter any control characters such as \n, \r, \t, \0 or characters whose ascii value is < 0x1F
Use the following CLI command to view the current authentication response page settings:set global-protect auth-response-page <show>
Character Limits for the Customized FieldsThe following table lists the maximum character limits for the fields that you can customize and the screen displays error messages when you enter a value that exceeds the character limit.Field Character Limit Error Messages (When the Character Limit Exceeds) Background Image URL2000Should be less than or equal to 2000 charactersMain Logo URL2000Should be less than or equal to 2000 charactersFooter Logo URL2000Should be less than or equal to 2000 charactersAuthentication Message500Should be less than or equal to 500 charactersFooter Text256Should be less than or equal to 256 charactersImage Resolution and Types for the Customized FieldsThe feature supports all image types such as .png, .jpeg/.jpg, and .svg based on the browser compatibility. You must use proper image resolution (width x height) depending on the dimensions of the devices.The following table lists the image resolution that you can apply while customizing the page:Image Image Resolution Background ImageBackground image block width is 100% of the device/browser window width, and the height is calculated by the browser using the image aspect ratio.Main LogoMain logo image block width is around 50% of the device/browser window width with maximum width of 340 px, and the height is calculated by the browser using the image aspect ratio.Footer LogoFooter logo image block width is fixed to 30 px, and the height is calculated by the browser using the image aspect ratio.For the footer logo image the aspect ratio for the width: height must not be more than three times of the width (1:3). If the height ratio increases such as 1:4, the footer text may not be properly displayed on the screen.