GlobalProtect
Set Up Kerberos Authentication
Table of Contents
Set Up Kerberos Authentication
Set up Kerberos authentication for GlobalProtect users by configuring a Kerberos
infrastructure, service accounts, and server and authentication profiles.
Kerberos is a computer network authentication protocol that uses tickets to allow
nodes that communicate over a non-secure network to prove their identity to one
another in a secure manner. Kerberos SSO maintains a seamless logon experience by
providing accurate User-ID information without user interaction. Networks that
support Kerberos SSO require end users to log in only during initial network access.
After the initial login, end users can access any Kerberos-enabled service in the
network (such as webmail) without having to log in again until the SSO session
expires (the SSO session duration is established by the Kerberos administrator).
This authentication method helps identify users for user and HIP policy
enforcement.
Kerberos authentication is supported
on Windows (7, 8, and 10) and macOS (10.10 and later releases) endpoints.
Kerberos authentication for macOS endpoints requires a minimum GlobalProtect
app version of 4.1.0.
Kerberos authentication is not supported in FIPS-CC mode.
If you enable both Kerberos SSO and an Set Up External Authentication (such as RADIUS), GlobalProtect
attempts SSO first. You can configure GlobalProtect to fall back to an external
authentication service when SSO fails or you can configure GlobalProtect to use only
Kerberos SSO for authentication.
In this implementation, the GlobalProtect portal and gateway act as Kerberos service
principals and the GlobalProtect app acts as a user principal that authenticates end
users with a Kerberos service ticket from the Key Distribution Center (KDC).
The following items must be in place for the GlobalProtect app for macOS endpoints to
support Kerberos SSO:
- A Kerberos infrastructure, which includes a KDC with an authentication server (AS) and a ticket-granting service (TGS).The KDC must be reachable from the endpoints on which the GlobalProtect app is running. In most instances, the KDC is reachable only from inside the enterprise network, which means the GlobalProtect app can use Kerberos authentication only when the endpoint is internal. However, if the KDC is reachable from outside the enterprise network (from the Internet), the GlobalProtect app can use Kerberos authentication when the endpoint is external.If the user certificate store contains at least one certificate that is issued by the same CA as the certificate used for pre-logon tunnel establishment, you can also use Kerberos authentication with pre-logon to enable the GlobalProtect app to use Kerberos authentication when the endpoint is external.When an end user attempts to access protected network resources using Kerberos authentication, the AS grants the user a Ticket to Get Tickets (TGT), which is a service request used to generate service tickets from the TGS. The service ticket is then used to authenticate the end user and establish a service session.
- A Kerberos service account for each GlobalProtect portal and gateway.Service accounts are required for creating Kerberos keytabs, which are files that contain the principal name and password of each GlobalProtect portal or gateway.
- Create a Kerberos keytab file.
- Log in to the KDC using your Kerberos service account credentials.Open a command prompt and then enter the following command:
ktpass /princ <principal_name> /pass <password> /crypto <algorithm> /ptype KRB5_NT_PRINCIPAL /out <file_name>.keytab
The <principal_name> and <password> are the principal name and password of the GlobalProtect portal or gateway. The <algorithm> must match the algorithm in the service ticket issued by the TGS, which is determined by the Kerberos administrator. If the GlobalProtect portal or gateway is running in FIPS or CC mode, the algorithm must be aes128-cts-hmac-sha1-96 or aes256-cts-hmac-sha1-96. If the portal or gateway is not running in FIPS or CC mode, you can also use des3-cbc-sha1 or arcfour-hmac.Create a server profile for Kerberos authentication.The server profile identifies the external authentication service and instructs the firewall on how to connect to that authentication service and access the authentication credentials for your users.- Select , and then Add a Kerberos server profile.Enter a Profile Name, such as GP-User-Auth.If this profile is for a firewall with multiple virtual systems capability, select a virtual system or Shared as the Location where the profile is available.Click Add in the Servers area, and then enter the following information for connecting to the authentication server:
- Server Name
- IP address or FQDN of the Kerberos Server
- Port
Click OK to save the server profile.(Optional) Create an authentication profile.The authentication profile specifies the server profile that the portal or gateways use when they authenticate users. On a portal or gateway, you can assign one or more authentication profiles in one or more client authentication profile. For information on how an authentication profile within a client authentication profile supports granular user authentication, see Configure a GlobalProtect Gateway and Set Up Access to the GlobalProtect Portal.To enable users to connect and change their expired passwords without administrative intervention, consider using Remote Access VPN with Pre-Logon.- Select , and then Add a new profile.
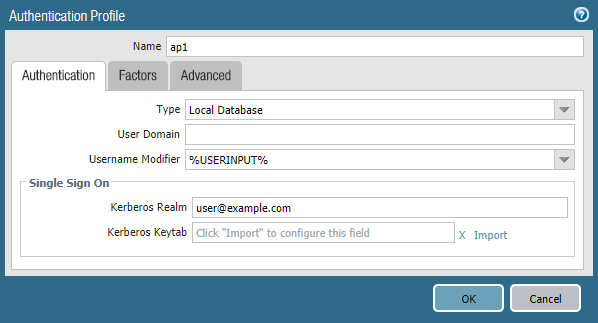
![]() Enter a Name for the profile, and then select Kerberos as the authentication Type.Select the Kerberos authentication Server Profile that you created in step 1.Specify the User Domain and Username Modifier. The endpoint combines these values to modify the domain/username string that a user enters during login. The endpoint uses the modified string for authentication and the User Domain value for User-ID group mapping. Modifying user inputs is useful when the authentication service requires domain/username strings in a particular format but you do not want to rely on users entering the domain correctly. You can select from the following options:
Enter a Name for the profile, and then select Kerberos as the authentication Type.Select the Kerberos authentication Server Profile that you created in step 1.Specify the User Domain and Username Modifier. The endpoint combines these values to modify the domain/username string that a user enters during login. The endpoint uses the modified string for authentication and the User Domain value for User-ID group mapping. Modifying user inputs is useful when the authentication service requires domain/username strings in a particular format but you do not want to rely on users entering the domain correctly. You can select from the following options:- To send the unmodified user input, leave the User Domain blank (default) and set the Username Modifier to the variable %USERINPUT% (default).
- To prepend a domain to the user input, enter a User Domain and set the Username Modifier to %USERDOMAIN%\%USERINPUT%.
- To append a domain to the user input, enter a User Domain and set the Username Modifier to %USERINPUT%@%USERDOMAIN%.
If the Username Modifier includes the %USERDOMAIN% variable, the User Domain value replaces any domain string that the user enters. If the User Domain is blank, the device removes any user-entered domain string.Configure Kerberos single sign-on (SSO) if your network supports it.- Enter the Kerberos Realm (up to 127 characters) to specify the hostname portion of the user login name. For example, the user account name user@EXAMPLE.LOCAL has the realm EXAMPLE.LOCAL.
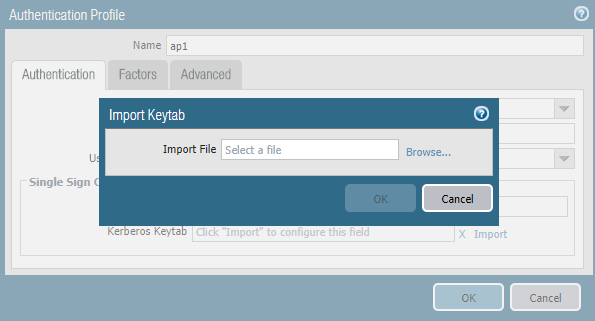
- Import a Kerberos Keytab file. When prompted, Browse for the keytab file, and then click OK.
![]() On the Advanced tab, Add an Allow List to select the users and user groups that are allowed to authenticate with this profile. The all option allows every user to authenticate with this profile. By default, the list has no entries, which means no users can authenticate.During authentication, the endpoint first attempts to establish SSO using the keytab. If it is successful, and the user attempting access is in the Allow List, authentication succeeds immediately. Otherwise, the authentication process falls back to manual (username/password) authentication using the specified authentication Type. The Type does not have to be Kerberos. To change this behavior so users can authenticate using only Kerberos, set Use Default Authentication on Kerberos Authentication Failure to No in the GlobalProtect portal agent configuration.Click OK.Assign the authentication profile a gateway.
On the Advanced tab, Add an Allow List to select the users and user groups that are allowed to authenticate with this profile. The all option allows every user to authenticate with this profile. By default, the list has no entries, which means no users can authenticate.During authentication, the endpoint first attempts to establish SSO using the keytab. If it is successful, and the user attempting access is in the Allow List, authentication succeeds immediately. Otherwise, the authentication process falls back to manual (username/password) authentication using the specified authentication Type. The Type does not have to be Kerberos. To change this behavior so users can authenticate using only Kerberos, set Use Default Authentication on Kerberos Authentication Failure to No in the GlobalProtect portal agent configuration.Click OK.Assign the authentication profile a gateway.- Select to modify an existing gateway or Add a new one.
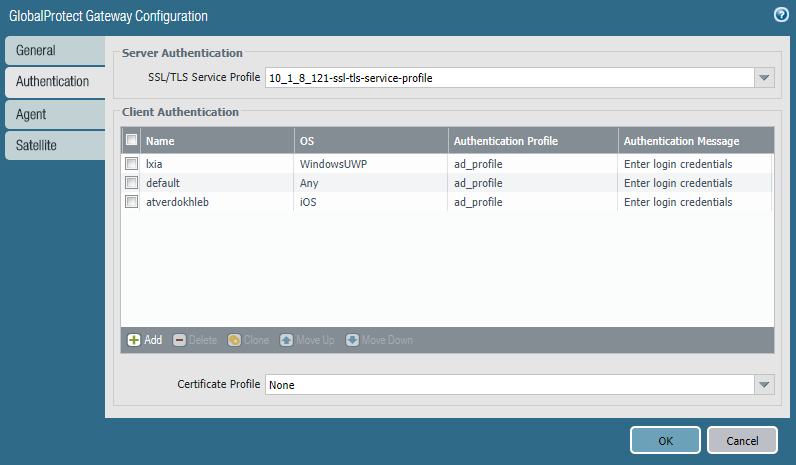
![]() Select an existing SSL/TLS Service Profile for securing the gateway, or Add a new service profile ().Add a Client Authentication configuration (), and then configure the following settings:
Select an existing SSL/TLS Service Profile for securing the gateway, or Add a new service profile ().Add a Client Authentication configuration (), and then configure the following settings:- Name—Name of the client authentication configuration.
- OS—Operating systems on which the gateway can be accessed.
- Authentication Profile—Authentication profile to which your Kerberos keytab file was imported.
- (Optional) Username Label—Custom username label for GlobalProtect gateway login.
- (Optional) Password Label—Custom password label for GlobalProtect gateway login.
- (Optional) Authentication Message—Message that is displayed when end users authenticate to the gateway.
Click OK to save your changes.Assign the authentication profile to the GlobalProtect portal.- Select .Select an existing portal or Add a new one.
![]() Select an existing SSL/TLS Service Profile for securing the portal, or Add a new service profile ().Add a Client Authentication configuration (), and then configure the following settings:
Select an existing SSL/TLS Service Profile for securing the portal, or Add a new service profile ().Add a Client Authentication configuration (), and then configure the following settings:- Name—Name of the client authentication configuration.
- OS—Operating systems on which the portal can be accessed.
- Authentication Profile—Authentication profile to which your Kerberos keytab file is imported.
- (Optional) Username Label—Custom username label for GlobalProtect portal login.
- (Optional) Password Label—Custom password label for GlobalProtect portal login.
- (Optional) Authentication Message—Message that is displayed when end users log in to the portal.
Click OK to save your changes.Commit the configuration.Click Commit.