Verify the User-ID Configuration
Table of Contents
Verify the User-ID Configuration
After you configure user and group mapping,
enable User-ID in your Security policy, and configure Authentication
policy, you should verify that User-ID works properly.
- Access the firewall CLI.Verify that group mapping is working.From the CLI, enter the following operational command:
> show user group-mapping statisticsVerify that user mapping is working.If you are using the PAN-OS integrated User-ID agent, you can verify this from the CLI using the following command:> show user ip-user-mapping-mp all IP Vsys From User Timeout (sec) ------------------------------------------------------ 192.168.201.1 vsys1 UIA acme\george 210 192.168.201.11 vsys1 UIA acme\duane 210 192.168.201.50 vsys1 UIA acme\betsy 210 192.168.201.10 vsys1 UIA acme\administrator 210 192.168.201.100 vsys1 AD acme\administrator 748 Total: 5 users *: WMI probe succeededTest your Security policy rule.- From a machine in the zone where User-ID is enabled, attempt to access sites and applications to test the rules you defined in your policy and ensure that traffic is allowed and denied as expected.
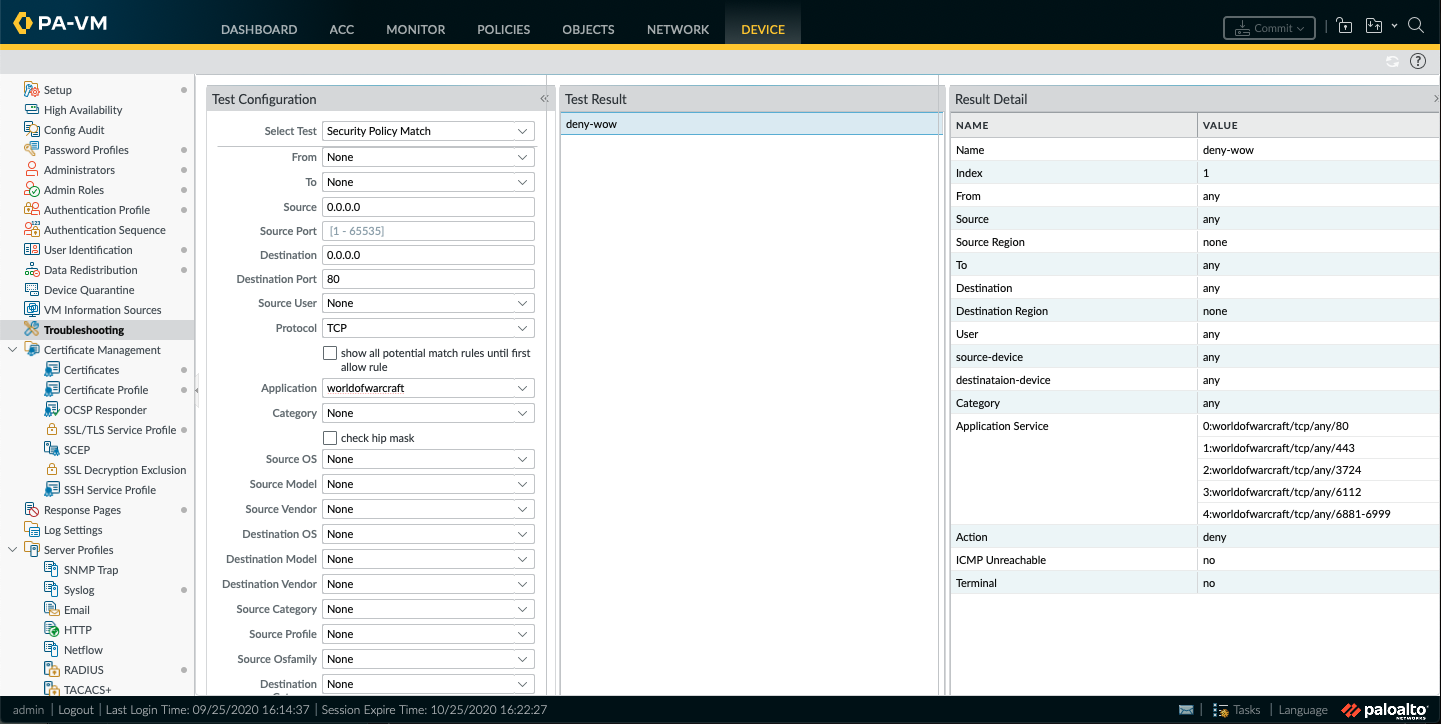
- You can also troubleshoot the running configuration to determine whether the policy is configured correctly. For example, suppose you have a rule that blocks users from playing World of Warcraft; you could test the policy as follows:
- Select , and select Security Policy Match from the Select Test drop-down.Enter 0.0.0.0 as the Source and Destination IP addresses. This executes the policy match test against any source and destination IP addresses.Enter the Destination Port.Enter the Protocol.Execute the security policy match test.
![]() Test your Authentication policy and Authentication Portal configuration.
Test your Authentication policy and Authentication Portal configuration.- From the same zone, go to a machine that is not a member of your directory, such as a Mac OS system, and try to ping to a system external to the zone. The ping should work without requiring authentication.From the same machine, open a browser and navigate to a web site in a destination zone that matches an Authentication rule you defined. The Authentication Portal web form should display and prompt you for login credentials.Log in using the correct credentials and confirm that you are redirected to the requested page.You can also test your Authentication policy using the test authentication-policy-match operational command as follows:
> test authentication-policy-match from corporate to internet source 192.168.201.10 destination 8.8.8.8
Matched rule: 'authentication portal' action: web-form
Verify that the log files display usernames.Select a logs page (such as ) and verify that the Source User column displays usernames.Verify that reports display usernames.- Select .Select a report type that includes usernames. For example, the Denied Applications report, Source User column, should display a list of the users who attempted to access the applications.