Next-Generation Firewall
Configure NAT64 for IPv6-Initiated Communication
Table of Contents
Expand All
|
Collapse All
Next-Generation Firewall Docs
-
-
-
-
-
-
-
- PAN-OS 12.1
- PAN-OS 11.2
- PAN-OS 11.1
- PAN-OS 11.0 (EoL)
- PAN-OS 10.2
- PAN-OS 10.1
- PAN-OS 10.0 (EoL)
- PAN-OS 9.1 (EoL)
- PAN-OS 9.0 (EoL)
- PAN-OS 8.1 (EoL)
-
- PAN-OS 12.1
- PAN-OS 11.2
- PAN-OS 11.1
- PAN-OS 10.2
- PAN-OS 10.1
Configure NAT64 for IPv6-Initiated Communication
Configure NAT64 for IPv6-initiated communication when your IPv6 host needs to
communicate with an IPv4 server.
| Where Can I Use This? | What Do I Need? |
|---|---|
|
One of these licenses for Strata Cloud Manager managed NGFWs:
|
This configuration task and its addresses correspond to the figures in IPv6-Initiated
Communication.
- Enable IPv6 to operate on the firewall.
- Select DeviceSetupSession and edit the Session Settings.Select Enable IPv6 Firewalling.Click OK.Configure the interface with IPv6 addressing.
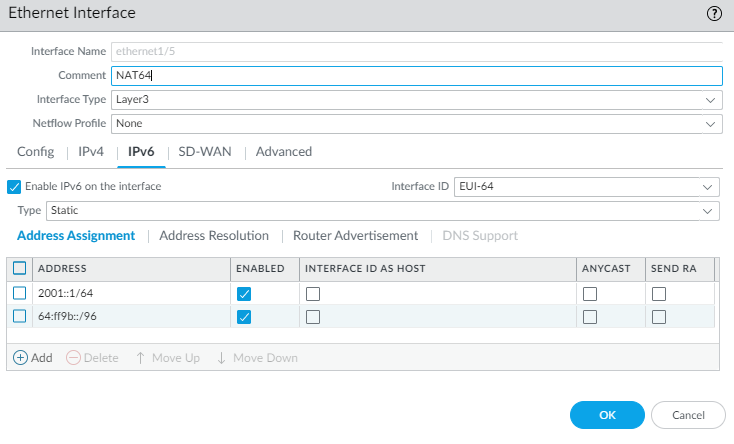
- Select NetworkInterfaces and select the interface that performs NAT.Select the IPv6 tab.Select Enable IPv6 address on interface.Add your private IPv6 prefix.Add the well-known prefix 64:ff9b::/96.Click OK.
![]() Create an address object for the IPv6 destination address (pre-translation).
Create an address object for the IPv6 destination address (pre-translation).- Select ObjectsAddresses and click Add.Enter a Name for the object, for example, nat64-IPv4 Server.For Type, select IP Netmask and enter the IPv6 prefix with a netmask that is compliant with RFC 6052 (/32, /40, /48, /56, /64, or /96). This is either the Well-Known Prefix or your Network-Specific Prefix that is configured on the DNS64 Server.For this example, enter 64:FF9B::/96.The source and destination must have the same netmask (prefix length).(You don’t enter a full destination address because, based on the prefix length, the firewall extracts the encoded IPv4 address from the original destination IPv6 address in the incoming packet. In this example, the prefix in the incoming packet is encoded with C633:6401 in hexadecimal, which is the IPv4 destination address 198.51.100.1.)Click OK.(Optional) Create an address object for the IPv6 source address (pre-translation).
- Select ObjectsAddresses and click Add.Enter a Name for the object.For Type, select IP Netmask and enter the address of the IPv6 host, in this example, 2001:DB8::5/96.Click OK.(Optional) Create an address object for the IPv4 source address (translated).
- Select ObjectsAddresses and click Add.Enter a Name for the object.For Type, select IP Netmask and enter the IPv4 address of the firewall’s egress interface, in this example, 192.0.2.1.Click OK.Create the NAT64 rule.
- Select PoliciesNAT and click Add.On the General tab, enter a Name for the NAT64 rule, for example, nat64_ipv6_init.(Optional) Enter a Description.For NAT Type, select nat64.Specify the original source and destination information.
- For the Original Packet, Add the Source Zone, likely a trusted zone.Select the Destination Zone, in this example, the Untrust zone.(Optional) Select a Destination Interface or the default (any).For Source Address, select Anyor Add the address object you created for the IPv6 host.For Destination Address, Add the address object you created for the IPv6 destination address, in this example, nat64-IPv4 Server.(Optional) For Service, select any.Specify the translated packet information.
- For the Translated Packet, in Source Address Translation, for regular DIPP, for Translation Type, select Dynamic IP and Port. For persistent DIPP in PAN-OS 11.0 and earlier releases, select Dynamic IP and Port. For persistent DIPP in releases after PAN-OS 11.0, select Persistent Dynamic IP and Port.
![]()
![]() For Address Type, do one of the following:
For Address Type, do one of the following:- Select Translated Address and Add the address object you created for the IPv4 source address.
- Select Interface Address, in which case the translated source address is the IP address and netmask of the firewall’s egress interface. For this choice, select an Interface and optionally an IP Address if the interface has more than one IP address.
Leave Destination Address Translation unselected. (The firewall extracts the IPv4 address from the IPv6 prefix in the incoming packet, based on the prefix length specified in the original destination of the NAT64 rule.)Click OK to save the NAT64 policy rule.Configure a tunnel interface to emulate a loopback interface with a netmask other than 128.- Select NetworkInterfacesTunnel and Add a tunnel.For Interface Name, enter a numeric suffix, such as .2.On the Config tab, select the Virtual Router where you are configuring NAT64.For Security Zone, select the destination zone associated with the IPv4 server destination (Untrust zone).On the IPv6 tab, select Enable IPv6 on the interface.Click Add and for the Address, select New Address.Enter a Name for the address.(Optional) Enter a Description for the tunnel address.For Type, select IP Netmask and enter your IPv6 prefix and prefix length, in this example, 64:FF9B::/96.Click OK.Select Enable address on interface and click OK.Click OK.Click OK to save the tunnel.Create a security policy to allow NAT traffic from the trust zone.
- Select PoliciesSecurity and Add a rule Name.Select Source and Add a Source Zone; select Trust.For Source Address, select Any.Select Destination and Add a Destination Zone; select Untrust.For Application, select Any.For Actions, select Allow.Click OK.Commit your changes.Click Commit.(To enable persistent DIPP in PAN-OS 11.1.0 and earlier releases only) Enable persistent NAT for DIPP.
- Access the CLI.>set system setting persistent-dipp enable yes>request restart systemIf you have HA configured, repeat this step on the other HA peer.Troubleshoot or view a NAT64 session.
> show session id <session-id>


