Next-Generation Firewall
Map Users to Groups
Table of Contents
Map Users to Groups
Defining policy rules based on user group membership rather than individual users simplifies
administration because you don't have to update the rules whenever group membership
changes. The number of distinct user groups that each firewall or Panorama can
reference across all policy rules varies by model. For more information, refer to the Compatibility Matrix.
For User-ID to successfully map users and for the firewall
to enforce the policy, all users must be a member of at least one group that the
firewall can map and configured in a group-based policy. To confirm if a user is a
member of a group, use the show user group list command.
Use
the following procedure to enable the firewall to connect to your
LDAP directory and retrieve Group
Mapping information. You can then Enable
User- and Group-Based Policy.
The
following are best practices for group mapping in an Active Directory
(AD) environment:
- If you have a single domain, you need only one group mapping configuration with an LDAP server profile that connects the firewall to the domain controller with the best connectivity. You can add up to four domain controllers to the LDAP server profile for redundancy. You can't increase redundancy beyond four domain controllers for a single domain by adding multiple group mapping configurations for that domain.
- If you have multiple domains or multiple forests, you must create a group mapping configuration with an LDAP server profile that connects the firewall to a domain server in each domain or forest. Take steps to ensure unique usernames in separate forests.
- If you have Universal Groups, create an LDAP server profile to connect to the root domain of the Global Catalog server on port 3268 or 3269 for SSL, then create another LDAP server profile to connect to the root domain controllers on port 389. This helps ensure that users and group information is available for all domains and subdomains.
- Before using group mapping, configure a Primary Username for user-based Security policy rules, since this attribute will identify users in the policy configuration, logs, and reports.
- Add an LDAP server profile.The profile defines how the firewall connects to the directory servers from which it collects group mapping information.If you create multiple group mapping configurations that use the same base Distinguished Name (DN) or LDAP server, the group mapping configurations can't contain overlapping groups (for example, the Include list for one group mapping configuration can't contain a group that is also in a different group mapping configuration).
- Select and Add a server profile.Enter a Profile Name to identify the server profile.Add the LDAP servers. You can add up to four servers to the profile but they must be the same Type. For each server, enter a Name (to identify the server), LDAP Server IP address or FQDN, and server Port (default 389).Select the server Type.Based on your selection (such as active-directory), the firewall automatically populates the correct LDAP attributes in the group mapping settings. However, if you customized your LDAP schema, you might need to modify the default settings.For the Base DN, enter the Distinguished Name (DN) of the LDAP tree location where you want the firewall to start searching for user and group information.For the Bind DN, Password, and Confirm Password, enter the authentication credentials for binding to the LDAP tree.The Bind DN can be a fully qualified LDAP name (such as cn=administrator,cn=users,dc=acme,dc=local) or a user principal name (such as administrator@acme.local).Enter the Bind Timeout and Search Timeout in seconds (default is 30 for both).Click OK to save the server profile.Configure the server settings in a group mapping configuration.
- Select .Add the group mapping configuration.Enter a unique Name to identify the group mapping configuration.Select the LDAP Server Profile you just created.(Optional) Specify the Update Interval (in seconds). Enter a value (range is 60—86400, default is 3600) based on how often the firewall checks the LDAP source for updates to the group mapping configuration. If the LDAP source contains many groups, a value that is too low may not allow enough time to map all the groups.(Optional) By default, the User Domain field is blank: the firewall automatically detects the domain names for Active Directory (AD) servers. If you enter a value, it overrides any domain names that the firewall retrieves from the LDAP source. For most configurations, if you need to enter a value, enter the NetBIOS domain name (for example, example not example.com).If you use Global Catalog, entering a value replaces the domain name for all users and groups from this server, including those from other domains.(Optional) To filter the groups that the firewall tracks for group mapping, in the Group Objects section, enter a Search Filter (LDAP query) and Object Class (group definition).(Optional) To filter the users who the firewall tracks for group mapping, in the User Objects section, enter a Search Filter (LDAP query), and Object Class (user definition).Make sure the group mapping configuration is Enabled (default is enabled).(Optional) Define User and Group Attributes to collect for user and group mapping. This step is necessary if you want to map users based on directory attributes other than the domain.
- If your User-ID sources only send the username and the username is unique across the organization, select and Edit the Setup section to Allow matching usernames without domains to allow the firewall to check if unique usernames collected from the LDAP server during group mapping match the users associated with a policy and avoid overwriting the domain in your source profile.Before enabling this option, configure group mapping for the LDAP group containing the User-ID source (such as GlobalProtect or Authentication Portal) that collects the mappings. After you commit the changes, the User-ID source populates the usernames without domains. Only usernames collected during group mapping can be matched without a domain. If your User-ID sources send user information in multiple formats and you enable this option, verify that the attributes collected by the firewall have a unique prefix. To ensure users are identified correctly if you enable this option, all attributes for group mapping should be unique. If the username isn't unique, the firewall logs an error in the Debug logs.Select and enter the Directory Attribute you want to collect for user identification. Specify a Primary Username to identify the user on the firewall and to represent the user in reports and logs that will override any other format the firewall receives from the User-ID source.When you select the Server Profile Type, the firewall autopopulates the values for the user and group attributes. Based on the user information that your User-ID sources send, you may need to configure the correct attributes:
- User Principal Name (UPN): userPrincipalName
- NetBios Name: sAMAccountName
- Email ID: Directory attribute for that email
- Multiple formats: Retrieve the user mapping attributes from the user directory before enabling your User-ID sources.
Attribute Active Directory Novell eDirectory or Sun ONE Directory Server Primary Username sAMAccountName uid E-Mail mail mail Alternate Username 1 userPrincipalName None. Group Name name cn Group Member member member (Optional) Specify an E-Mail address format and up to three Alternate Username formats.Select and specify the Group Name, Group Member, and E-Mail address formats.You must commit before the firewall collects the directory attributes from the LDAP server.Limit which groups will be available in policy rules.Required only if you want to limit policy rules to specific groups. The combined maximum for the Group Include List and Custom Group list is 640 entries per group mapping configuration. Each entry can be a single group or a list of groups. By default, if you don’t specify groups, all groups are available in policy rules.Any custom groups you create will also be available in the Allow List of authentication profiles (Configure an Authentication Profile and Sequence).- Add existing groups from the directory service:
- Select Group Include List.
- Select the Available Groups you want to appear in policy rules and add () them to the Included Groups.
![]()
If you want to base policy rules on user attributes that don’t match existing user groups, create custom groups based on LDAP filters:- Select Custom Group and Add the group.
- Enter a group Name that is unique in the group mapping configuration for the current firewall or virtual system.If the Name has the same value as the Distinguished Name (DN) of an existing AD group domain, the firewall uses the custom group in all references to that name (such as in policy rules and logs).
- Specify an LDAP Filter of up to 2,048 UTF-8 characters and click OK.The firewall doesn’t validate LDAP filters, so it’s up to you to ensure they are accurate.To minimize the performance impact on the LDAP directory server, use only indexed attributes in the filter.
Click OK to save your changes.You must commit before custom groups will be available in policy rules and objects.Commit your changes.You must commit before you can use custom groups in policy rules and objects and before the firewall can collect the attributes from the LDAP server.After configuring the firewall to retrieve group mapping information from an LDAP server, but before configuring policy rules based on the groups it retrieves, the best practice is to either wait for the firewall to refresh its group mappings cache or refresh the cache manually. To verify which groups you can currently use in policy rules, access the firewall CLI and run the show user group command. To determine when the firewall will next refresh the group mappings cache, run the show user group-mapping statistics command and check the Next Action. To manually refresh the cache, run the debug user-id refresh group-mapping all command.Verify that the user and group mapping has correctly identified users.- Select to confirm the firewall has fetched all of the groups.To verify that all of the user attributes have been correctly captured, use the following CLI command:
show user user-attributes user all
The normalized format for the User Principal Name (UPN), primary username, email attributes, and any configured alternate usernames display for all users:admin@PA-VM-8.1> show user user-attributes user all
Primary: nam\sam-user Email: sam-user@nam.com
Alt User Names:1) nam.com\sam-user
2) nam\sam-user-upn
3) sam-user-upn@nam.local
4) sam-user@nam.com
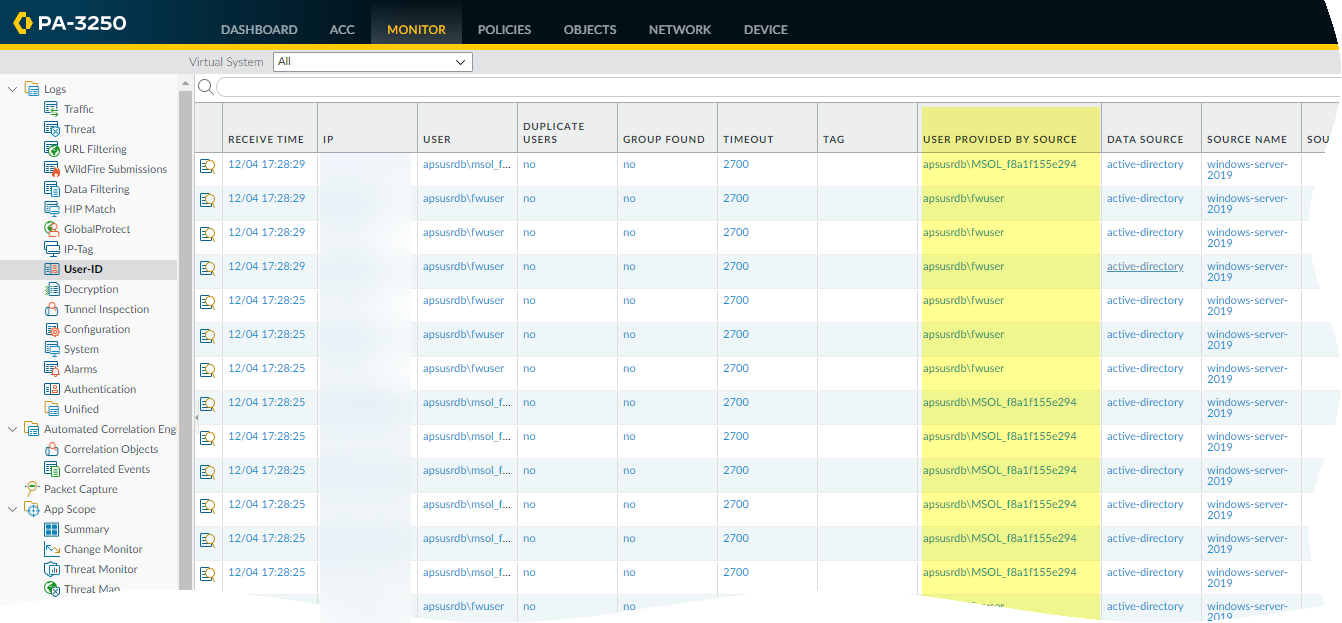
Verify that the usernames are correctly displayed in the Source User column under .![]() Verify that the users are mapped to the correct usernames in the User Provided by Source column under .
Verify that the users are mapped to the correct usernames in the User Provided by Source column under .![]()