Next-Generation Firewall
Configure OSPFv2 on an Advanced Routing Engine
Table of Contents
Configure OSPFv2 on an Advanced Routing Engine
Configure OSPFv2 on an advanced routing engine.
| Where Can I Use This? | What Do I Need? |
|---|---|
|
The Advanced Routing Engine supports OSPFv2, which supports only IPv4 addressing. Before you
configure OSPFv2, you should understand OSPF concepts.
Consider the OSPF Routing Profiles and filters that you can apply to OSPF and
thereby save configuration time and maintain consistency. You can create profiles
and filters in advance or as you configure OSPFv2.
- configure-a-logical-router.html#tabs-id83b76f3d-1148-43e8-b784-502628a974ab_id83b76f3d-1148-43e8-b784-502628a974ab.Enable OSPFv2 and configure general settings.
- Select and select a logical router.Select OSPF and Enable it.
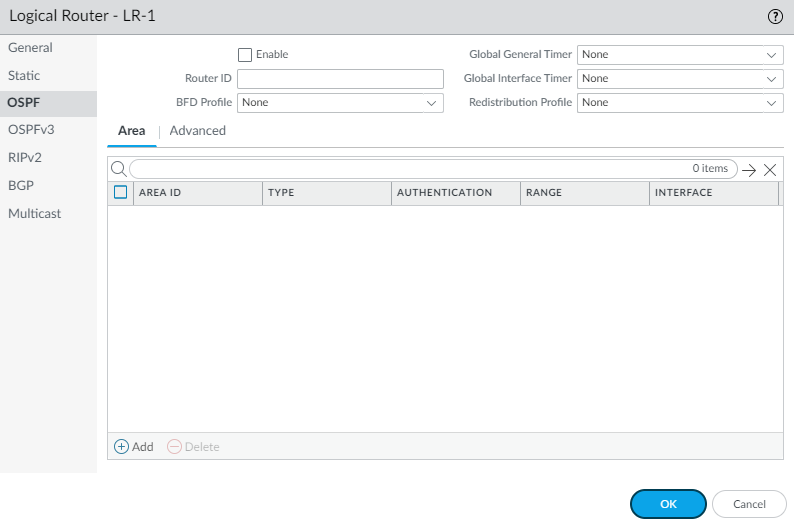
![]() Enter the Router ID in the format of an IPv4 address.If you want to apply BFD to OSPF, select a BFD Profile you created, or select the default profile, or create a new BFD Profile. Default is None (Disable BFD).Select an OSPF Global General Timer profile or create a new one.Select an OSPF Global Interface Timer profile or create a new one.Select an OSPF Redistribution Profile or create a new one to redistribute IPv4 static routes, connected routes, RIPv2 routes, IPv4 BGP routes, or the IPv4 default route to OSPF.Create an OSPF area and specify characteristics based on the type of area.
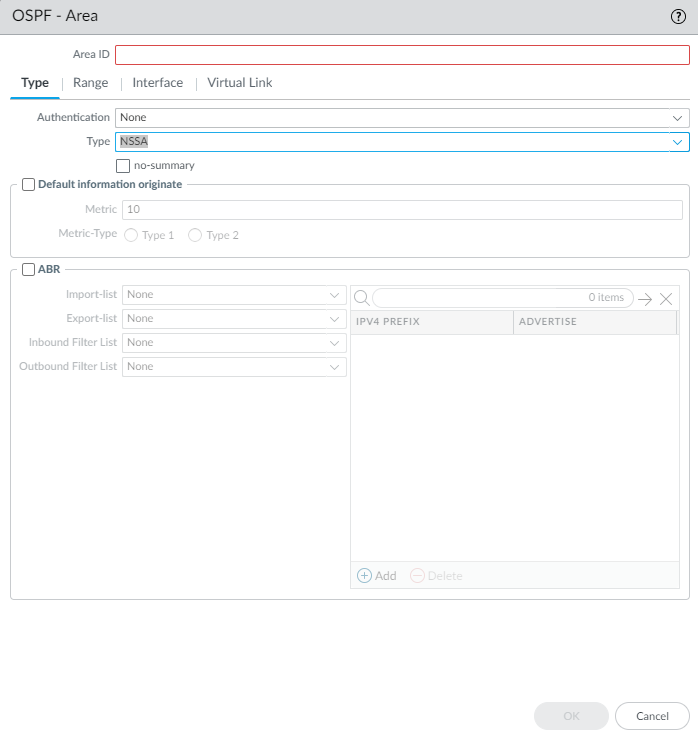
Enter the Router ID in the format of an IPv4 address.If you want to apply BFD to OSPF, select a BFD Profile you created, or select the default profile, or create a new BFD Profile. Default is None (Disable BFD).Select an OSPF Global General Timer profile or create a new one.Select an OSPF Global Interface Timer profile or create a new one.Select an OSPF Redistribution Profile or create a new one to redistribute IPv4 static routes, connected routes, RIPv2 routes, IPv4 BGP routes, or the IPv4 default route to OSPF.Create an OSPF area and specify characteristics based on the type of area.- Select Area and Add an area identified by its Area ID in x.x.x.x format. This is the identifier that each neighbor must accept to be part of the same area.Select the Type tab and for Authentication, select an Authentication profile or create a new Authentication profile.Select the Type of area:
- Normal—There are no restrictions; the area can carry all types of routes (intra-area routes, inter-area routes, and external routes).
- Stub—There is no outlet from the area. To reach a destination outside of the area, traffic must go through an Area Border Router (ABR), which connects to other areas.
- NSSA (Not-So-Stubby-Area)—NSSAs implement stub or totally stubby functionality, yet contain an autonomous system boundary router (ASBR). Type 7 LSAs generated by the ASBR are converted to Type 5 by ABRs and flooded to the rest of the OSPF domain. (The next graphic shows NSSA selected.)
(Stub and NSSA areas only) Select no-summary to prevent the area from receiving Type 3 Summary LSAs and thereby reduce traffic in the area.(NSSA area only) Select Default information originate to cause OSPF to originate a default route.- Enter a Metric for the default route; range is 1 to 16,777,214; default is 10.
- Select the Metric-Type: Type 1 or Type 2. Type E1 cost is the sum of the external cost plus the internal cost to reach that route. Type E2 is only the external cost of that route. This can be useful when you want to load-balance the same external route, for example.
![]() Select ABR to filter prefixes going in or out of the area, and then configure the following filters:
Select ABR to filter prefixes going in or out of the area, and then configure the following filters:- Select an Import-list or create a new Access List to filter network routes coming from another router into the area in LSAs, based on IPv4 source address, thus allowing or preventing the routes from being added to the global RIB (leave the destination address of the access list empty).
- Select an Export-list or create a new Access List to filter network routes that originated in the area, to allow or prevent the routes from being advertised to other areas.
- Select an Inbound Filter List or create a new Prefix List to filter network prefixes coming into the area.
- Select an Outbound Filter List or create a new Prefix List to filter network prefixes that originated in the area, to prevent the routes from being advertised to other areas.
- If the Type of area is NSSA and ABR is selected, Add an IPv4 Prefix to summarize a group of external subnets into a single Type-7 LSA, which is then translated to a Type-5 LSA and advertised to the backbone when you select Advertise.
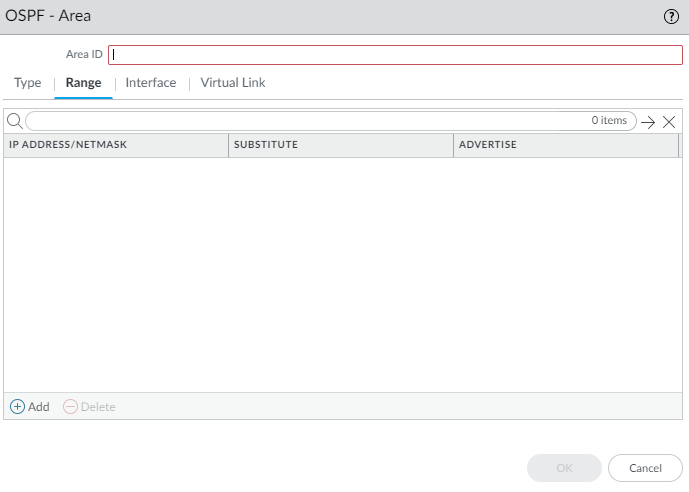
Specify the network range for the area.- Select Range and Add an IP Address/Netmask, which summarizes routes for the area. The result is that a Type-3 Summary LSA with routing information matching this range is advertised into the backbone area if that area contains at least one intra-area network (that is, described with router or network LSA) from this range.Look at the learned routes in the LSDB for the area and use this Range to summarize routes, thereby reducing LSA traffic.Enter a Substitute IP address/netmask so that a Type-3 Summary LSA with this IP address/netmask is announced into the backbone area if the area contains at least one intra-area network from the IP Address/Netmask specified in the prior step.Use the Substitute IP address/netmask as a way to translate a private address to a public address. A Substitute address has no effect if Advertise is disabled.Select Advertise to send link-state advertisements (LSAs) that match the subnet; default is enabled.
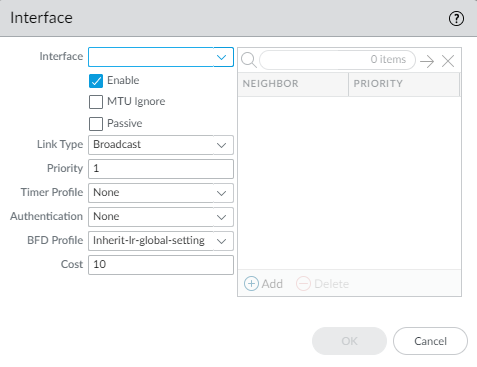
![]() Configure each interface to be included in the area.
Configure each interface to be included in the area.- Add an Interface by selecting one and Enable it.Select MTU Ignore to ignore maximum transmission unit (MTU) mismatches when trying to establish an adjacency (default is disabled; MTU match checking occurs). RFC 2328 defines the interface MTU as “The size in bytes of the largest IP datagram that can be sent out the associated interface, without fragmentation.”Select Passive to allow the network of the interface to be advertised, but no neighbor relationship is established on that interface; this is useful for leaf interfaces.
![]() Select the Link Type:
Select the Link Type:- Broadcast—All neighbors that are accessible through the interface are discovered automatically by multicasting OSPF Hello messages, such as over an Ethernet interface.
- p2p (point-to-point)—Automatically discover the neighbor.
- p2mp (point-to-multipoint)—Neighbors must be defined manually: Add the Neighbor IP address for all neighbors that are reachable through this interface and the Priority of each neighbor to be elected the designated router (DR) or backup DR; range is 0 to 255; default is 1.
Enter the OSPF Priority for the interface to be elected as a designated router (DR) or backup DR (BDR); range is 0 to 255; default is 1. If zero is configured, the router will not be elected as DR or BDR.Select a Timer Profile to apply to the interface or create a new OSPF Interface Timer profile. This OSPF Interface Timer profile overrides the Global Interface Timer applied to OSPF.Select an Authentication Profile to apply to the interface or create a new OSPF Interface Authentication profile. This Authentication Profile overrides the Authentication Profile applied to the Area (on the Type tab).By default, the interface will inherit the BFD profile you applied to the logical router for OSPF (Inherit-lr-global-setting). Alternatively, select the default profile, select a different BFD Profile, create a new BFD Profile, or select None (Disable BFD) to disable BFD for the interface.Enter an OSPF Cost for the interface, which influences route selection; range is 1 to 65,5535; default is 10. During route selection, a route with a lower cumulative cost (the added costs of each interface used) is preferred over a route with a higher cumulative cost.Click OK.If the ABR does not have a physical link to the backbone area, configure a virtual link to a neighbor ABR within the same area that has a physical link to the backbone area.- Select Virtual Link.Add a virtual link by Name.Enable the virtual link.
![]() Select the transit Area where the neighbor ABR that has the physical link to the backbone area is located.Enter the Router ID of the neighbor ABR on the remote end of the virtual link.Select a Timer Profile or create a new Timer Profile to apply to the virtual link. This OSPF Interface Timer profile overrides the Global Interface Timer applied to OSPF and the OSPF Interface Timer profile applied to the interface.Select an Authentication profile or create a new Authentication Profile to apply to the virtual link. This Authentication Profile overrides the Authentication Profile applied to the Area (on the Type tab) and the Authentication Profile applied to the interface.Click OK.Click OK to save the area.Configure OSPF Graceful Restart and RFC 1583 compatibility for OSPFv2.
Select the transit Area where the neighbor ABR that has the physical link to the backbone area is located.Enter the Router ID of the neighbor ABR on the remote end of the virtual link.Select a Timer Profile or create a new Timer Profile to apply to the virtual link. This OSPF Interface Timer profile overrides the Global Interface Timer applied to OSPF and the OSPF Interface Timer profile applied to the interface.Select an Authentication profile or create a new Authentication Profile to apply to the virtual link. This Authentication Profile overrides the Authentication Profile applied to the Area (on the Type tab) and the Authentication Profile applied to the interface.Click OK.Click OK to save the area.Configure OSPF Graceful Restart and RFC 1583 compatibility for OSPFv2.- Select and select the logical router.Select .Select rfc-1583 compatibility to enforce compatibility with RFC 1583, which allows one best route to an autonomous system boundary router (ASBR) in the OSPF routing table. Default is disabled, which means the OSPF routing table can maintain multiple intra-AS paths in the routing table, thereby preventing routing loops.
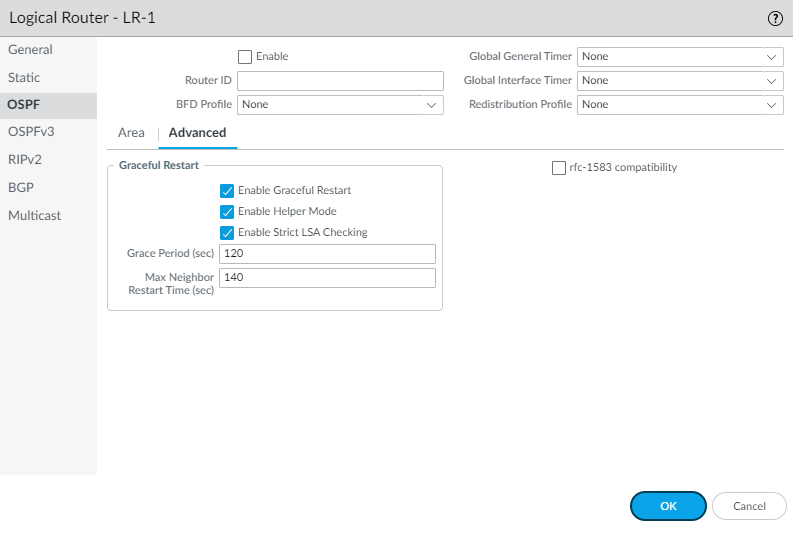
![]() Enable Graceful Restart to enable OSPF Graceful Restart for the logical router. Default is enabled.Enable Helper Mode to enable the logical router to function in Graceful Restart helper mode. Default is enabled.Enable Strict LSA Checking to cause the helper router to stop performing helper mode and causes the graceful restart process to stop if a link-state advertisement indicates a network topology change. Default is enabled.Specify the Grace Period (sec)—the number of seconds within which the logical router will perform a graceful restart if the firewall goes down or becomes unavailable; range is 5 to 1,800; default is 120.Specify the Max Neighbor Restart Time (sec); range is 5 to 1,800; default is 140.Click OK.Configure intra-area filtering to determine which OSPFv2 routes are placed in the global RIB.You might learn OSPFv2 routes and redistribute them, but not want them in the global RIB; you might want to allow only specific OSPFv2 routes to the global RIB.
Enable Graceful Restart to enable OSPF Graceful Restart for the logical router. Default is enabled.Enable Helper Mode to enable the logical router to function in Graceful Restart helper mode. Default is enabled.Enable Strict LSA Checking to cause the helper router to stop performing helper mode and causes the graceful restart process to stop if a link-state advertisement indicates a network topology change. Default is enabled.Specify the Grace Period (sec)—the number of seconds within which the logical router will perform a graceful restart if the firewall goes down or becomes unavailable; range is 5 to 1,800; default is 120.Specify the Max Neighbor Restart Time (sec); range is 5 to 1,800; default is 140.Click OK.Configure intra-area filtering to determine which OSPFv2 routes are placed in the global RIB.You might learn OSPFv2 routes and redistribute them, but not want them in the global RIB; you might want to allow only specific OSPFv2 routes to the global RIB.- Select and select a logical router.Select RIB Filter.To filter IPv4 OSPFv2 routes for the global RIB, in the OSPFv2 Route-Map, select a Redistribution route map you created or create a new Redistribution Route Map in which the Source Protocol is OSPF and the Destination Protocol is RIB.
![]() Click OK.(Optional) Change the default administrative distances for OSPF intra area, inter area, and external routes within a logical router.Commit.View advanced routing information for OSPFv2 and the link-state database (LSDB). The PAN-OS CLI Quick Start lists the commands in the CLI Cheat Sheet: Networking.
Click OK.(Optional) Change the default administrative distances for OSPF intra area, inter area, and external routes within a logical router.Commit.View advanced routing information for OSPFv2 and the link-state database (LSDB). The PAN-OS CLI Quick Start lists the commands in the CLI Cheat Sheet: Networking.