Enable SCP Uploads for an Administrator
Table of Contents
Expand All
|
Collapse All
Next-Generation Firewall Docs
-
PAN-OS 11.1 & Later
- PAN-OS 11.1 & Later
- PAN-OS 11.0 (EoL)
- PAN-OS 10.2
- PAN-OS 10.1
- PAN-OS 10.0 (EoL)
- PAN-OS 9.1 (EoL)
- Cloud Management of NGFWs
-
- Management Interfaces
-
- Launch the Web Interface
- Use the Administrator Login Activity Indicators to Detect Account Misuse
- Manage and Monitor Administrative Tasks
- Commit, Validate, and Preview Firewall Configuration Changes
- Commit Selective Configuration Changes
- Export Configuration Table Data
- Use Global Find to Search the Firewall or Panorama Management Server
- Manage Locks for Restricting Configuration Changes
-
-
- Define Access to the Web Interface Tabs
- Provide Granular Access to the Monitor Tab
- Provide Granular Access to the Policy Tab
- Provide Granular Access to the Objects Tab
- Provide Granular Access to the Network Tab
- Provide Granular Access to the Device Tab
- Define User Privacy Settings in the Admin Role Profile
- Restrict Administrator Access to Commit and Validate Functions
- Provide Granular Access to Global Settings
- Provide Granular Access to the Panorama Tab
- Provide Granular Access to Operations Settings
- Panorama Web Interface Access Privileges
-
- Reset the Firewall to Factory Default Settings
-
- Plan Your Authentication Deployment
- Pre-Logon for SAML Authentication
- Configure SAML Authentication
- Configure Kerberos Single Sign-On
- Configure Kerberos Server Authentication
- Configure TACACS+ Authentication
- Configure TACACS Accounting
- Configure RADIUS Authentication
- Configure LDAP Authentication
- Configure Local Database Authentication
- Configure an Authentication Profile and Sequence
- Test Authentication Server Connectivity
- Troubleshoot Authentication Issues
-
- Keys and Certificates
- Default Trusted Certificate Authorities (CAs)
- Certificate Deployment
- Configure the Master Key
- Export a Certificate and Private Key
- Configure a Certificate Profile
- Configure an SSL/TLS Service Profile
- Configure an SSH Service Profile
- Replace the Certificate for Inbound Management Traffic
- Configure the Key Size for SSL Forward Proxy Server Certificates
-
- HA Overview
-
- Prerequisites for Active/Active HA
- Configure Active/Active HA
-
- Use Case: Configure Active/Active HA with Route-Based Redundancy
- Use Case: Configure Active/Active HA with Floating IP Addresses
- Use Case: Configure Active/Active HA with ARP Load-Sharing
- Use Case: Configure Active/Active HA with Floating IP Address Bound to Active-Primary Firewall
- Use Case: Configure Active/Active HA with Source DIPP NAT Using Floating IP Addresses
- Use Case: Configure Separate Source NAT IP Address Pools for Active/Active HA Firewalls
- Use Case: Configure Active/Active HA for ARP Load-Sharing with Destination NAT
- Use Case: Configure Active/Active HA for ARP Load-Sharing with Destination NAT in Layer 3
- HA Clustering Overview
- HA Clustering Best Practices and Provisioning
- Configure HA Clustering
- Refresh HA1 SSH Keys and Configure Key Options
- HA Firewall States
- Reference: HA Synchronization
-
- Use the Dashboard
- Monitor Applications and Threats
- Monitor Block List
-
- Report Types
- View Reports
- Configure the Expiration Period and Run Time for Reports
- Disable Predefined Reports
- Custom Reports
- Generate Custom Reports
- Generate the SaaS Application Usage Report
- Manage PDF Summary Reports
- Generate User/Group Activity Reports
- Manage Report Groups
- Schedule Reports for Email Delivery
- Manage Report Storage Capacity
- View Policy Rule Usage
- Use External Services for Monitoring
- Configure Log Forwarding
- Configure Email Alerts
-
- Configure Syslog Monitoring
-
- Traffic Log Fields
- Threat Log Fields
- URL Filtering Log Fields
- Data Filtering Log Fields
- HIP Match Log Fields
- GlobalProtect Log Fields
- IP-Tag Log Fields
- User-ID Log Fields
- Decryption Log Fields
- Tunnel Inspection Log Fields
- SCTP Log Fields
- Authentication Log Fields
- Config Log Fields
- System Log Fields
- Correlated Events Log Fields
- GTP Log Fields
- Audit Log Fields
- Syslog Severity
- Custom Log/Event Format
- Escape Sequences
- Forward Logs to an HTTP/S Destination
- Firewall Interface Identifiers in SNMP Managers and NetFlow Collectors
- Monitor Transceivers
-
- User-ID Overview
- Enable User-ID
- Map Users to Groups
- Enable User- and Group-Based Policy
- Enable Policy for Users with Multiple Accounts
- Verify the User-ID Configuration
-
- App-ID Overview
- App-ID and HTTP/2 Inspection
- Manage Custom or Unknown Applications
- Safely Enable Applications on Default Ports
- Applications with Implicit Support
-
- Prepare to Deploy App-ID Cloud Engine
- Enable or Disable the App-ID Cloud Engine
- App-ID Cloud Engine Processing and Policy Usage
- New App Viewer (Policy Optimizer)
- Add Apps to an Application Filter with Policy Optimizer
- Add Apps to an Application Group with Policy Optimizer
- Add Apps Directly to a Rule with Policy Optimizer
- Replace an RMA Firewall (ACE)
- Impact of License Expiration or Disabling ACE
- Commit Failure Due to Cloud Content Rollback
- Troubleshoot App-ID Cloud Engine
- Application Level Gateways
- Disable the SIP Application-level Gateway (ALG)
- Maintain Custom Timeouts for Data Center Applications
-
- Decryption Overview
-
- Keys and Certificates for Decryption Policies
- SSL Forward Proxy
- SSL Forward Proxy Decryption Profile
- SSL Inbound Inspection
- SSL Inbound Inspection Decryption Profile
- SSL Protocol Settings Decryption Profile
- SSH Proxy
- SSH Proxy Decryption Profile
- Profile for No Decryption
- SSL Decryption for Elliptical Curve Cryptography (ECC) Certificates
- Perfect Forward Secrecy (PFS) Support for SSL Decryption
- SSL Decryption and Subject Alternative Names (SANs)
- TLSv1.3 Decryption
- High Availability Not Supported for Decrypted Sessions
- Decryption Mirroring
- Configure SSL Forward Proxy
- Configure SSL Inbound Inspection
- Configure SSH Proxy
- Configure Server Certificate Verification for Undecrypted Traffic
- Post-Quantum Cryptography Detection and Control
- Enable Users to Opt Out of SSL Decryption
- Temporarily Disable SSL Decryption
- Configure Decryption Port Mirroring
- Verify Decryption
- Activate Free Licenses for Decryption Features
-
- Policy Types
- Policy Objects
- Track Rules Within a Rulebase
- Enforce Policy Rule Description, Tag, and Audit Comment
- Move or Clone a Policy Rule or Object to a Different Virtual System
-
- External Dynamic List
- Built-in External Dynamic Lists
- Configure the Firewall to Access an External Dynamic List
- Retrieve an External Dynamic List from the Web Server
- View External Dynamic List Entries
- Exclude Entries from an External Dynamic List
- Enforce Policy on an External Dynamic List
- Find External Dynamic Lists That Failed Authentication
- Disable Authentication for an External Dynamic List
- Register IP Addresses and Tags Dynamically
- Use Dynamic User Groups in Policy
- Use Auto-Tagging to Automate Security Actions
- CLI Commands for Dynamic IP Addresses and Tags
- Application Override Policy
- Test Policy Rules
-
- Network Segmentation Using Zones
- How Do Zones Protect the Network?
-
PAN-OS 11.1 & Later
- PAN-OS 11.1 & Later
- PAN-OS 11.0 (EoL)
- PAN-OS 10.2
- PAN-OS 10.1
-
- Tap Interfaces
-
- Layer 2 and Layer 3 Packets over a Virtual Wire
- Port Speeds of Virtual Wire Interfaces
- LLDP over a Virtual Wire
- Aggregated Interfaces for a Virtual Wire
- Virtual Wire Support of High Availability
- Zone Protection for a Virtual Wire Interface
- VLAN-Tagged Traffic
- Virtual Wire Subinterfaces
- Configure Virtual Wires
- Configure a PPPoE Client on a Subinterface
- Configure an IPv6 PPPoE Client
- Configure an Aggregate Interface Group
- Configure Bonjour Reflector for Network Segmentation
- Use Interface Management Profiles to Restrict Access
-
- DHCP Overview
- Firewall as a DHCP Server and Client
- Firewall as a DHCPv6 Client
- DHCP Messages
- Dynamic IPv6 Addressing on the Management Interface
- Configure an Interface as a DHCP Server
- Configure an Interface as a DHCPv4 Client
- Configure an Interface as a DHCPv6 Client with Prefix Delegation
- Configure the Management Interface as a DHCP Client
- Configure the Management Interface for Dynamic IPv6 Address Assignment
- Configure an Interface as a DHCP Relay Agent
-
- DNS Overview
- DNS Proxy Object
- DNS Server Profile
- Multi-Tenant DNS Deployments
- Configure a DNS Proxy Object
- Configure a DNS Server Profile
- Use Case 1: Firewall Requires DNS Resolution
- Use Case 2: ISP Tenant Uses DNS Proxy to Handle DNS Resolution for Security Policies, Reporting, and Services within its Virtual System
- Use Case 3: Firewall Acts as DNS Proxy Between Client and Server
- DNS Proxy Rule and FQDN Matching
-
- NAT Rule Capacities
- Dynamic IP and Port NAT Oversubscription
- Dataplane NAT Memory Statistics
-
- Translate Internal Client IP Addresses to Your Public IP Address (Source DIPP NAT)
- Create a Source NAT Rule with Persistent DIPP
- PAN-OS
- Strata Cloud Manager
- Enable Clients on the Internal Network to Access your Public Servers (Destination U-Turn NAT)
- Enable Bi-Directional Address Translation for Your Public-Facing Servers (Static Source NAT)
- Configure Destination NAT with DNS Rewrite
- Configure Destination NAT Using Dynamic IP Addresses
- Modify the Oversubscription Rate for DIPP NAT
- Reserve Dynamic IP NAT Addresses
- Disable NAT for a Specific Host or Interface
-
- Network Packet Broker Overview
- How Network Packet Broker Works
- Prepare to Deploy Network Packet Broker
- Configure Transparent Bridge Security Chains
- Configure Routed Layer 3 Security Chains
- Network Packet Broker HA Support
- User Interface Changes for Network Packet Broker
- Limitations of Network Packet Broker
- Troubleshoot Network Packet Broker
-
- Enable Advanced Routing
- Logical Router Overview
- Configure a Logical Router
- Create a Static Route
- Configure BGP on an Advanced Routing Engine
- Create BGP Routing Profiles
- Create Filters for the Advanced Routing Engine
- Configure OSPFv2 on an Advanced Routing Engine
- Create OSPF Routing Profiles
- Configure OSPFv3 on an Advanced Routing Engine
- Create OSPFv3 Routing Profiles
- Configure RIPv2 on an Advanced Routing Engine
- Create RIPv2 Routing Profiles
- Create BFD Profiles
- Configure IPv4 Multicast
- Configure MSDP
- Create Multicast Routing Profiles
- Create an IPv4 MRoute
-
-
PAN-OS 11.2
- PAN-OS 11.2
- PAN-OS 11.1
- PAN-OS 11.0 (EoL)
- PAN-OS 10.2
- PAN-OS 10.1
- PAN-OS 10.0 (EoL)
- PAN-OS 9.1 (EoL)
- PAN-OS 9.0 (EoL)
- PAN-OS 8.1 (EoL)
- Cloud Management and AIOps for NGFW
Enable SCP Uploads for an Administrator
Enable Secure Protocol Copy (SCP) uploads for a firewall Superuser
administrator.
Enable the use of Secure Copy Protocol (SCP) for Superuser administrators on Palo
Alto Networks Next-Generation Firewalls to upload supported files, such as PAN-OS
software updates, dynamic content updates, and configuration files, from a local
device to a Palo Alto Networks firewall. This allows you to automate supported file
uploads using the CLI rather than uploading using the firewall web interface.
A system log generates when you successfully use SCP to upload files to your firewall
or if an SCP upload fails for any reason.
Palo Alto Networks supports SCP uploads of PAN-OS software versions, PAN-OS software
changes, dynamic content updates, PAN-OS plugin versions, configuration files, and
license key files.
- (Optional) Configure a firewall administrator with Superuser privileges for SCP functionality.In this example, a Superuser firewall administrator named scp_admin was created.
- Enable SCP functionality for a Superuser admin.The admin initiating SCP must have Superuser privileges.In this example, SCP functionality is enabled for the dedicated Superuser scp_admin created in the previous step.
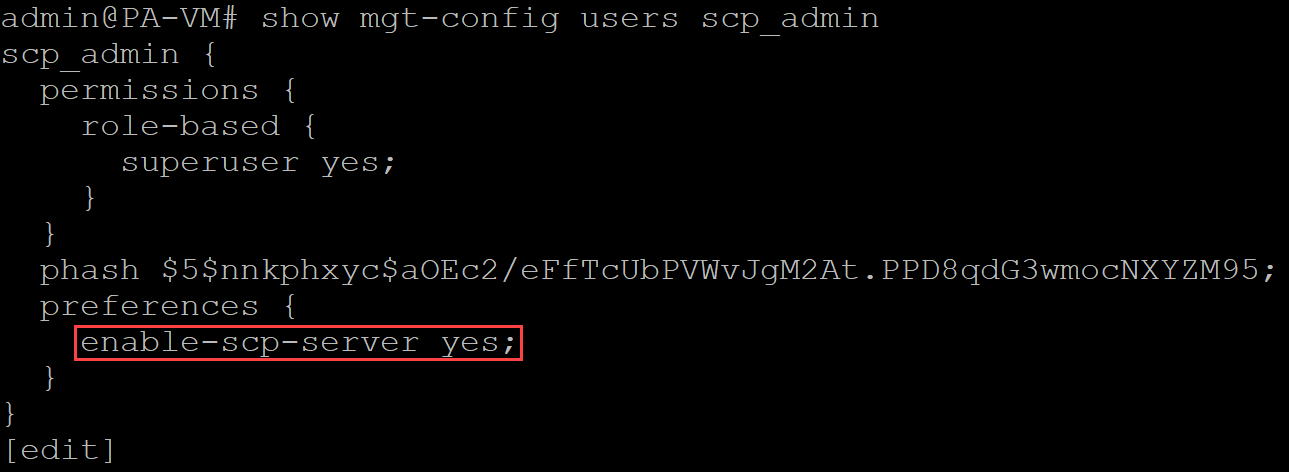
- Enter configuration mode.admin>configure
- Enable SCP functionality for a Superuser admin.admin#set mgt-config users <admin_name> preferences enable-scp-server yes
- Verify that SCP functionality was successfully enabled for the Superuser admin.admin#show mgt-config users <admin_name>In the permissions, verify that enable-scp-server displays yes.
- Commit.admin# commit
- Perform an SCP upload to your firewall.This step assumes you already have the file you want to upload to your firewall available on your local device.This example demonstrates how to upload an Application & Threats content update to your firewall. The predefined target directories for SCP uploads are:
- PAN-OS Software Versions—/scp/software/
- PAN-OS Software Patches—/scp/patch/
- Application & Threats Content Updates—/scp/content/
- WildFire Content Updates—/scp/wildfire/
- Antivirus Content Updates—/scp/anti-virus/
- PAN-OS Plugin Versions—/scp/plugin/
- XML Configuration Files—/scp/config/All PAN-OS configuration files must have the .xml extension appended to the file name for SCP uploads to succeed.
- License Key Files—/scp/license/
- Open a CLI terminal and use the cd command to navigate to the folder or directory where the file you want to SCP is located.After navigating to the correct folder or directory, enter ls to view the folder or directory contents.In this example, you can see the panupv2-all-contents-8765-8342 file we will upload to the firewall.
- Upload a file to the firewall using the SCP-enabled Superuser admin.SCP applications like WinSCP and FileZilla are not supported. You must run the SCP command from the device command line.
- Operating System running OpenSSH 8 or earlierscp <file_name> <scp_superuser>@<firewall_IP>:/scp/<file_type>/<file_name>Example of the SCP command to upload the Application & Threats content update using the scp_admin.scp panupv2-all-contents-8765-8342 scp_admin@<firewall_IP>:/scp/content/panupv2-all-contents-8765-8342
- Operating System running OpenSSH 9 or laterStarting from OpenSSH 9.0, the scp program defaults to the SFTP protocol for file transfers. This default behavior is incompatible with PAN-OS SCP support, resulting in the following error message in system logs: Invalid number of arguments for SCP command.Add the -O option to the SCP command to force the system to use the legacy SCP protocol instead of the default SFTP protocol.scp -O <file_name> <scp_superuser>@<firewall_IP>:/scp/<file_type>/<file_name>Example of the SCP command to upload the Application & Threats content update using the scp_admin.scp -O panupv2-all-contents-8765-8342 scp_admin@<firewall_IP>:/scp/content/panupv2-all-contents-8765-8342
- Enter yes when prompted to verify the authenticity of the firewall.You're not prompted to verify authenticity if you have already connected to the firewall using SSH from this device and can skip this step.
- Enter the SCP admin Password when prompted and click Enter to continue.
- The SCP upload progress displays.The SCP upload is complete when the progress status displays 100% and the CLI command prompt is becomes available.
- Review the system logs to verify the SCP upload was successful.You can verify that the SCP upload was successful by reviewing the generated system log and confirm that the uploaded file is available. In this example, we review the system log for the SCP upload of Application & Threats content update version 8765-8342.
- Select MonitorLogsSystem and filter for SCP uploads.Filter for SCP uploads using the following query:( description contains 'SCP' )
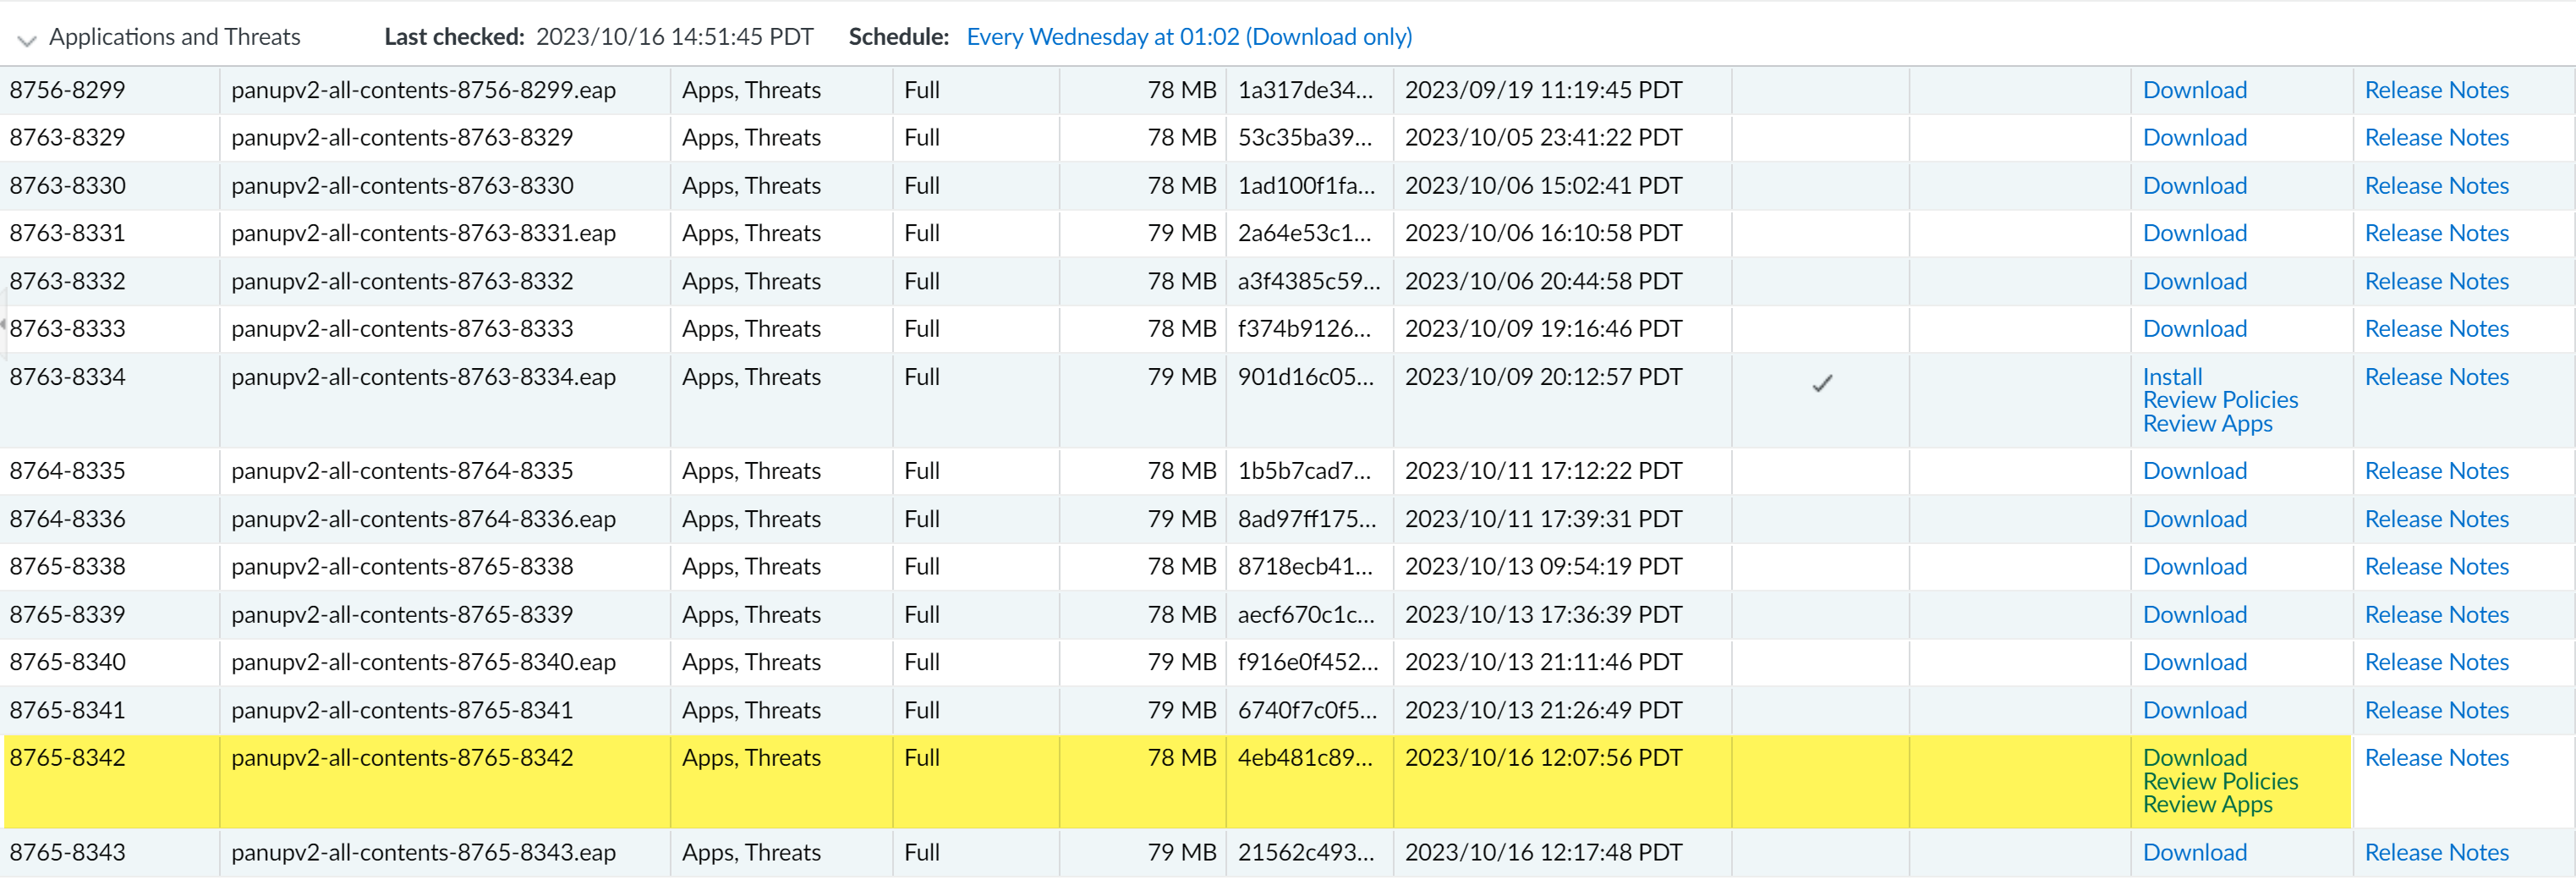
Code copied to clipboardUnable to copy due to lack of browser support.
- Select DeviceDynamic Updates and confirm the uploaded content update is available to Download.