Next-Generation Firewall
Configure 5G for a Cellular Interface
Table of Contents
Configure 5G for a Cellular Interface
Learn how to configure a cellular interface for 5G.
You can enable 4G/5G capability using the PA-415-5G, which contains an integrated 5G
module. This configuration provides an interface for a primary internet connection
or for redundancy as a link through the cellular interface.
The 5G module requires PAN-OS version 11.1 or later
versions. Beginning with PAN-OS 11.1.3, the PA-450R-5G firewall supports 4G/5G.
Beginning with PAN-OS 11.1.5, the PA-410R-5G firewall supports 4G/5G. Beginning with
PAN-OS 11.2.3, the PA-455-5G firewall supports 4G/5G.
Configuring a 5G cellular interface provides data connectivity using the 5G mobile
network. If the 5G network is unavailable, the firewall automatically switches to
the 4G or 3G network.
On initialization, the modem is active and the radio option isn't enabled by default.
If one or more SIM cards are available and you enable the radio option, the firewall
attempts to establish a packet session using the SIM card that you configure in the
APN profile for the primary SIM slot.
If there is no
custom APN profile, the firewall uses the auto APN
profile.
To Upgrade 5G Firmware,
download the firmware updates from the Customer Support Portal and install them on
the firewall.
The 5G cellular interface supports the following capabilities:
- Routing (including BGP, BFD, and static routes)The 5G cellular interface supports load balancing with weighted round-robin. The legacy routing stack does not support BGP on the dynamic IP interface; as an alternative, use the loopback interface.
- IPv4
- IPv6 (PAN-OS 11.2.3 and later releases) (PAN-OS 11.1.5 and later releases)
- Layer 3 interfaces
- Layer 2 encapsulation
- Tunneling and VPN (including IKE, IPSec, and GRE)The 5G cellular interface supports GRE using the loopback interface. Beginning with PAN-OS 12.1, the cellular interface supports a GRE tunnel.
- SD-WAN (PAN-OS 11.2.3 and later releases, SD-WAN plugin 3.3.1 and later releases)
- NAT
- NPTv6 (PAN-OS 11.1.5 and later releases)
- PBF The 5G cellular interface does not support symmetric return.
- Zones and Zone Protection profiles
- DoS Protection policy
- Tunnel inspection
- Service routes using loopback interfaces
- HA active/passive (session sync and session continuity are not supported)
The 5G cellular interface does not support the following capabilities:
- ECMP
- Multi-vsys
- HA active/active
- Jumbo frame
- OSPF
- Multicast or ACL offloading
- Configure dynamic NAT Security policy rules using dynamic IP addresses to allow the 5G traffic.Configure a cellular interface.
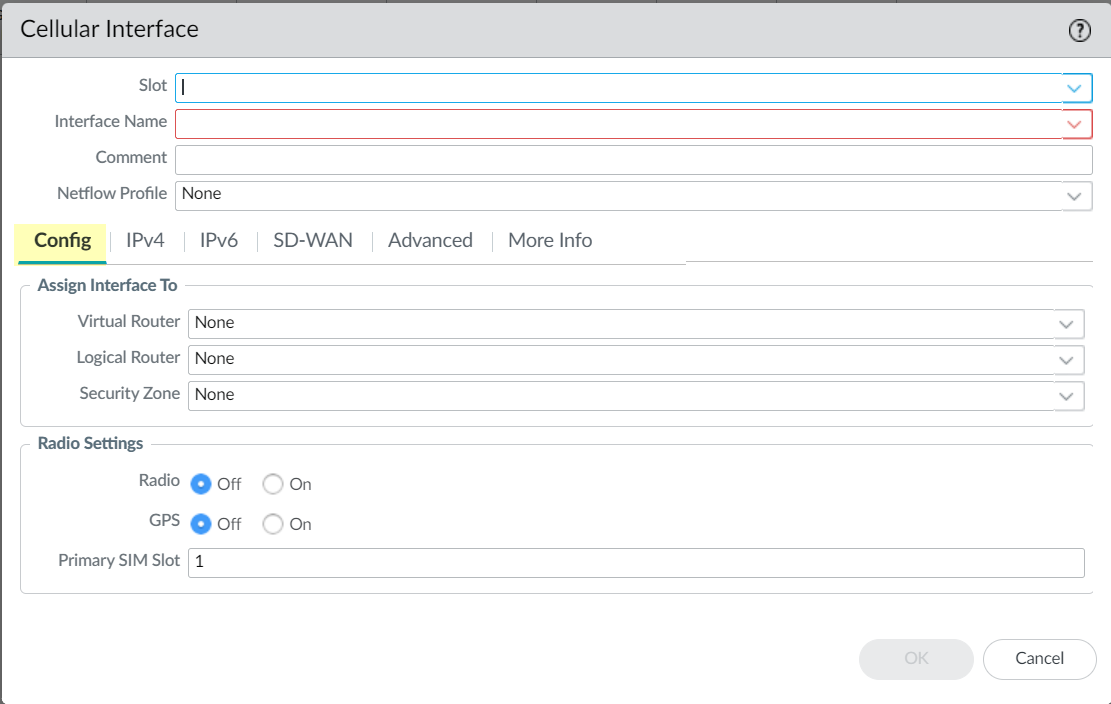
- Select .For Panorama, select . Select the template you want to use, then select . You can add a configuration for a device using a template and then apply that template to other devices.(Panorama only) Select the Slot.Select Slot 1 for a non-chassis model.Select the Interface Name you want to use.(Optional) Enter a Comment to describe the interface.Select a Netflow Profile or create a New Netflow Profile.Configure the 5G connection.
![]()
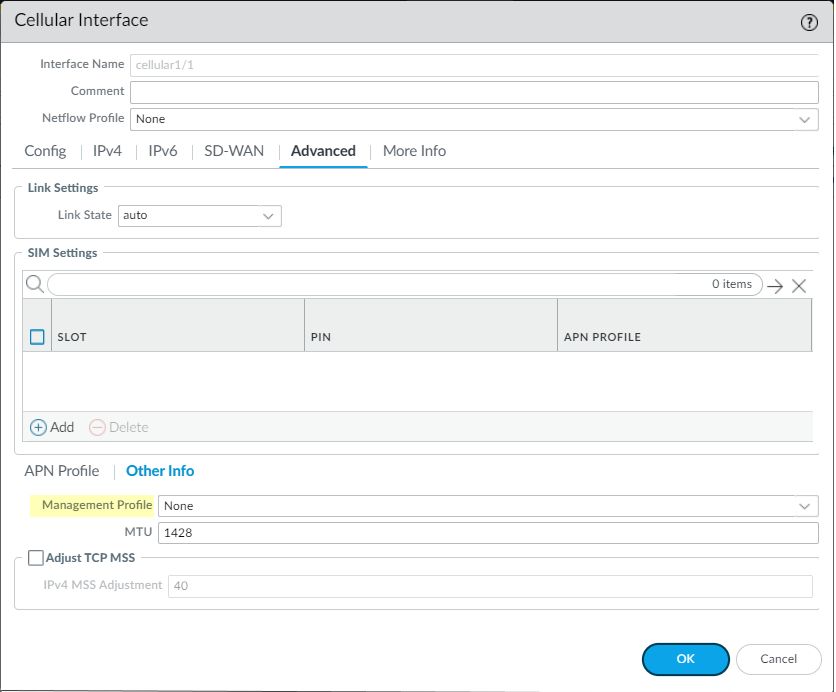
- On the Config tab, if Advanced Routing is enabled, select the Logical Router where you want to assign the interface or create a New Logical Router. (If Advanced Routing is disabled, select the Virtual Router where you want to assign the interface or create a New Virtual Router.)Select the Security Zone or create a New Zone.Select the modem Radio setting.This option allows you to reset the radio settings during troubleshooting.To enable the GPS option, you must enable the Radio option as well as the GPS option.
- Off—(Default value) Disables the radio setting and the cellular interface.
- On—Enables the radio setting and the cellular interface.
Select the GPS setting.- Off—(Default value) Disables the GPS setting.
- On—Enables the GPS setting.
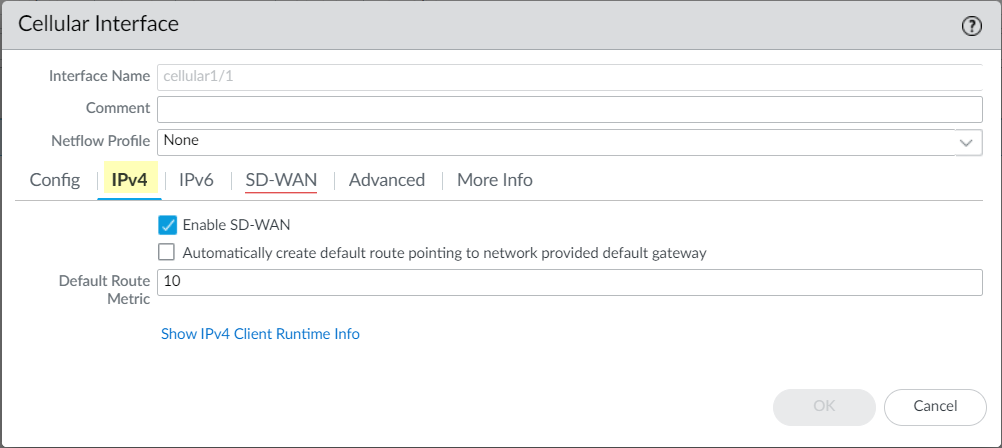
Select the Primary SIM Slot.By default, the firewall uses the card in slot 1 (SIM1) to attempt connectivity with the network. If you configure a second SIM slot, the firewall automatically attempts connectivity with the network using the secondary SIM if connectivity using the primary SIM is not successful. You can optionally configure the second slot (SIM2) as the Primary SIM Slot.Configure the IPv4 settings.![]()
- (Optional) (PAN-OS 11.2.3 and later releases, SD-WAN plugin 3.3.1 and later releases) On the IPv4 tab, select Enable SD-WAN to enable SD-WAN on the cellular interface. SD-WAN enabled cellular interfaces are added as the DIA SD-WAN VIF members automatically; and the tunnels are created and added to the SD-WAN tunnel VIF automatically. The tunnels are created between the 5G branch or 5G hub device to the peer device with the interface name ending with “cellular”.When you enable SD-WAN in the cellular interface, then all the SD-WAN features will be supported in your cellular interface.
- Full mesh topology is not supported when you enable SD-WAN in the cellular interface.
- We recommend you to configure 5G firewalls as a branch device if you enable SD-WAN on the cellular interface. However, you can configure the 5G firewalls as a hub device if SD-WAN is enabled over the Ethernet interface.
- There is no standard available for the gateway pings between the internet service providers. Because of which the native ICMP ping to a gateway is not allowed for cellular interfaces. Due to this reason, we recommend you to configure a SaaS profile instead of an ICMP profile.
(PAN-OS 11.2.4 and later 11.2 releases, SD-WAN plugin 3.3.2 and later 3.3 releases) SD-WAN plugin provides Prisma Access hub support in which 4G/5G capable PAN-OS firewalls connecting to Prisma Access compute nodes (CNs) achieve cloud-based security in an SD-WAN hub-and-spoke topology. In this topology, the SD-WAN hubs are Prisma Access CNs (IPSec Termination Nodes) and the SD-WAN branches are 4G/5G capable PAN-OS firewalls. A maximum of four hubs (any combination of PAN-OS hubs participating in DIA AnyPath and Prisma Access hubs) are supported. SD-WAN automatically creates IKE and IPSec tunnels that connect the branch to the hub. Review the system requirements for SD-WAN and Prisma Access.The following firewalls support SD-WAN configuration in the cellular interface:- PA-410R-5G
- PA-415-5G
- PA-450R-5G
- PA-455-5G
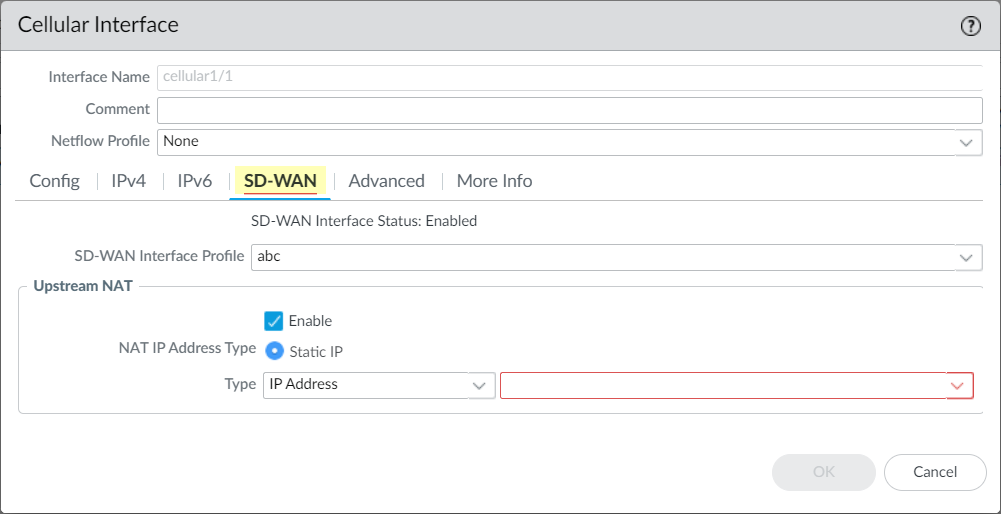
On the IPv4 tab, select whether you want to Automatically create default route pointing to network provided default gateway.This option is enabled by default and creates a default route to the default gateway provided by the network.Specify the Default Route Metric.The default is 10; the range is 1 to 65535. If you enable SD-WAN, then you must configure the value for default route metric above 5.(PAN-OS 11.2.3 and later releases) (PAN-OS 11.1.5 and later releases)- On the IPv6 tab, Enable IPv6 on the interface.When IPv6 is enabled on the interface, the APN profile must use a packet data protocol (PDP) type of IPv6 or both (IPv4 and IPv6).Enter the 64-bit extended unique identifier (EUI-64) in hexadecimal format (for example, 00:32:07:FE:4A:12:4C:33). If you leave this field blank, the firewall uses the EUI-64 generated from the MAC address of the physical interface.Select Automatically create default route pointing to network provided default gateway.This option is enabled by default and creates a default route to the default gateway provided by the network.Enter the Default Route Metric; default is 10; range is 1 to 65535.(Optional) (PAN-OS 11.2.3 and later releases, SD-WAN plugin 3.3.1 and later releases) Configure the SD-WAN settings.
![]() You can configure the SD-WAN settings only when you enable SD-WAN in the IPv4 tab.If you’re adding a branch that is behind a device performing NAT for the branch, you must specify the IP address or FQDN of the public-facing interface on that upstream NAT-performing device. Thus, the Auto VPN configuration uses that public IP address as the tunnel endpoint for the branch. It's the IP address that the branch office’s IKE and IPSec flows must be able to reach. (You must have already configured a physical Ethernet interface for SD-WAN.)
You can configure the SD-WAN settings only when you enable SD-WAN in the IPv4 tab.If you’re adding a branch that is behind a device performing NAT for the branch, you must specify the IP address or FQDN of the public-facing interface on that upstream NAT-performing device. Thus, the Auto VPN configuration uses that public IP address as the tunnel endpoint for the branch. It's the IP address that the branch office’s IKE and IPSec flows must be able to reach. (You must have already configured a physical Ethernet interface for SD-WAN.)- Select an already configured SD-WAN interface profile or create a new SD-WAN interface profile.On the Upstream NAT, enable Upstream NAT.If you select the NAT IP Address Type to be Static IP, select IP Address or FQDN and enter the IPv4 address without a subnet mask (for example, 192.168.3.4) or the FQDN of the upstream device, respectively.On the Advanced tab, select the Link State.
- auto—The interface is available only if there is a peer connection.
- up—The interface is available.
- down—The interface isn't available.
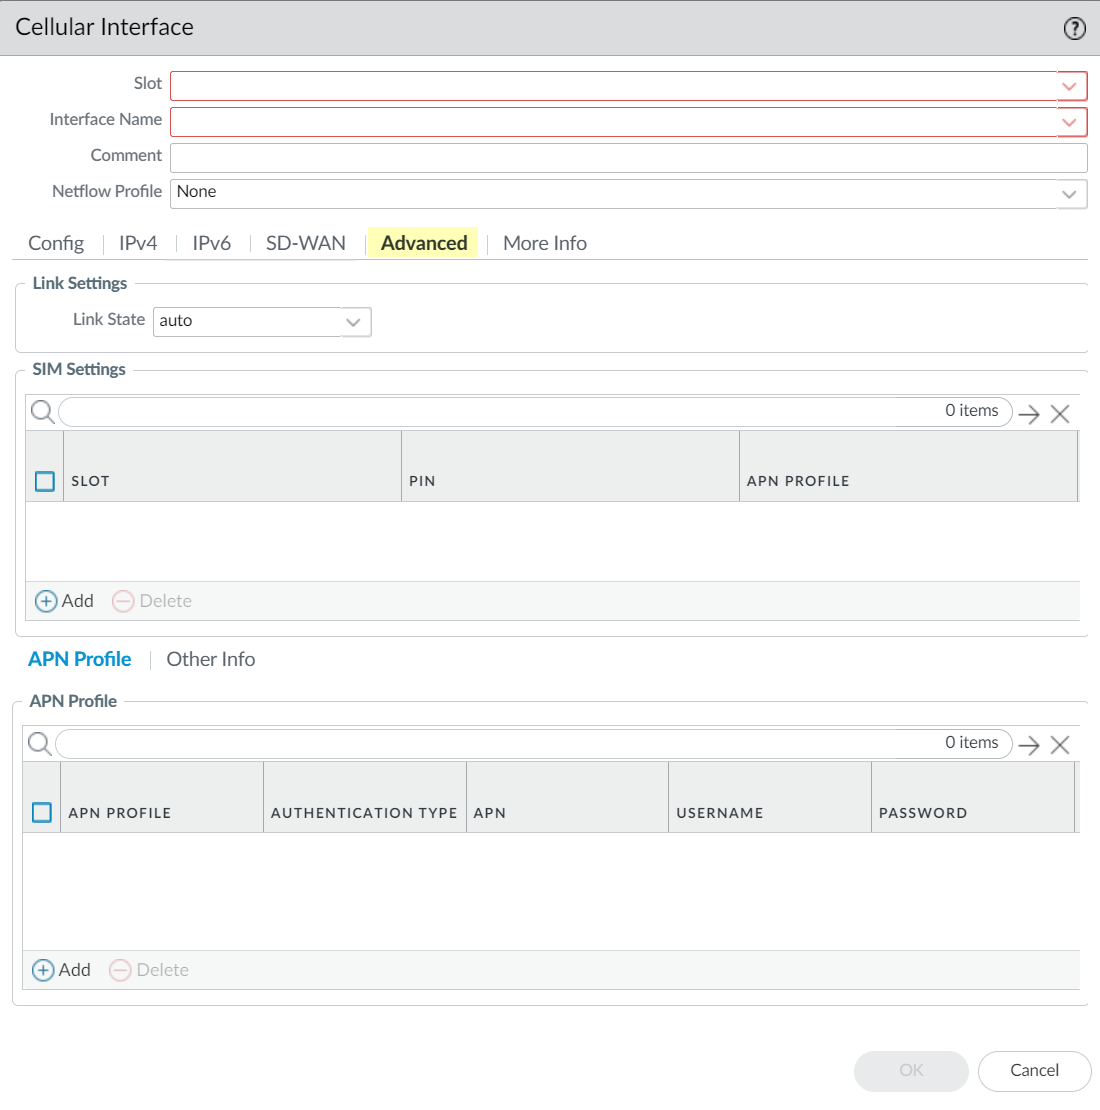
![]() Configure the SIM settings.
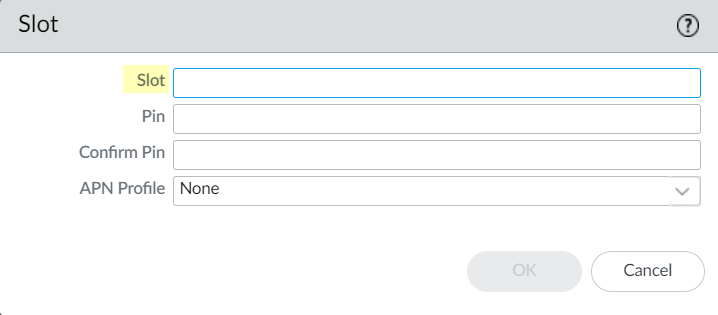
Configure the SIM settings.- Add the SIM Settings.Specify the Slot.Only one SIM slot can be active at a time. By default, SIM1 is the active SIM slot. The modem uses this SIM to search for network connectivity. If the firewall can't establish a session within 5 minutes, it attempts to establish the session using the alternate SIM slot.
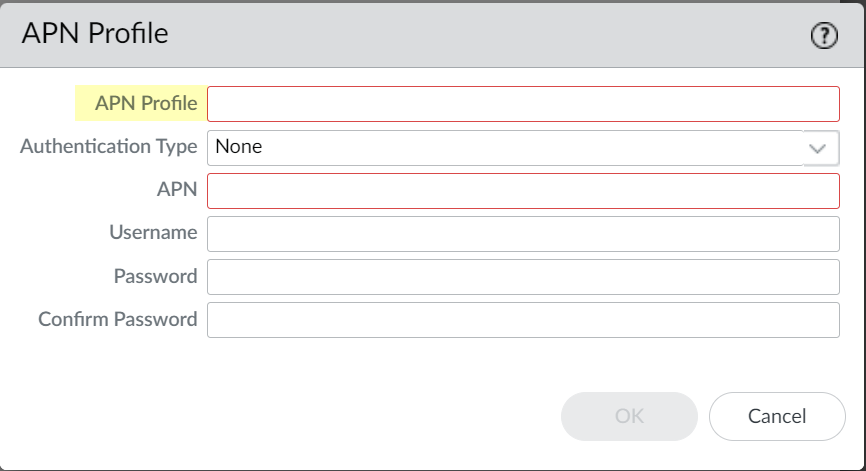
![]() To require a PIN to prevent unauthorized use of the SIM slots, enter a Pin, then Confirm Pin.You can also require a PIN to access the SIM; for more information, see step 17.Select the APN Profile.Specify the APN profile that you want the SIM card to use by default. The SIM slot uses this APN profile unless you override it with a custom APN profile. If you don't specify an APN profile, the firewall uses the default auto APN profile. If you need to specify a custom APN profile, you can do so in step 9.aClick OK.Define the APN Profile.You must configure the APN profile correctly to enable internet access. The APN profile defines the network or networks that the device is permitted to access and determines whether the device receives a dynamic or static IP address. To allow access to data services, some mobile virtual network operators (MVNOs) require a separate APN profile in addition to the APN profile for the network carrier. Based on the carrier, you may also need to enable additional security measures to restrict the APN to authenticated users.
To require a PIN to prevent unauthorized use of the SIM slots, enter a Pin, then Confirm Pin.You can also require a PIN to access the SIM; for more information, see step 17.Select the APN Profile.Specify the APN profile that you want the SIM card to use by default. The SIM slot uses this APN profile unless you override it with a custom APN profile. If you don't specify an APN profile, the firewall uses the default auto APN profile. If you need to specify a custom APN profile, you can do so in step 9.aClick OK.Define the APN Profile.You must configure the APN profile correctly to enable internet access. The APN profile defines the network or networks that the device is permitted to access and determines whether the device receives a dynamic or static IP address. To allow access to data services, some mobile virtual network operators (MVNOs) require a separate APN profile in addition to the APN profile for the network carrier. Based on the carrier, you may also need to enable additional security measures to restrict the APN to authenticated users.- Add the default APN Profile.If necessary, override the default APN profile for the specified slot by selecting an APN profile.
![]()
![]() Select the Authentication Type for the connection to the APN.
Select the Authentication Type for the connection to the APN.- None—(Default) The firewall does not require authentication for the connection to the APN.
- CHAP—Use Challenge Handshake Authentication Protocol (CHAP) to connect to the APN.
- PAP—Use Password Authentication Protocol (PAP) to connect to the APN.
- auto—Allow the firewall to automatically detect the authentication type based on the service provider. If the connection to the initial authentication type isn't successful, the firewall attempts the connection with the alternate authentication type.
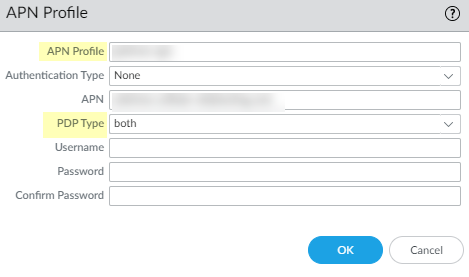
Enter the APN.Select the packet data protocol type (PDP Type) that the APN profile allows: IPv4 (default setting), IPv6, or both.Enter the Username.Enter the Password then Confirm Password.Click OK.Configure additional information, such as maximum transmission units (MTU), based on your network requirements.- Select the Other Info tab.Select a Management Profile.
![]() Specify the MTU in bytes.The default value is 1428 bytes; the range is 576 to 1500 bytes.If you want to adjust the packet size due to latency, you can Adjust TCP MSS to configure the Maximum Segment Size and specify the IPv4 MSS Adjustment value.The default is 40; the range is 40 to 300.Click OK.Commit your changes.You must commit your changes, ensure the interface is enabled, and that connectivity is successful before the following information is available on the firewall or Panorama.Use widgets to monitor your cellular interface.
Specify the MTU in bytes.The default value is 1428 bytes; the range is 576 to 1500 bytes.If you want to adjust the packet size due to latency, you can Adjust TCP MSS to configure the Maximum Segment Size and specify the IPv4 MSS Adjustment value.The default is 40; the range is 40 to 300.Click OK.Commit your changes.You must commit your changes, ensure the interface is enabled, and that connectivity is successful before the following information is available on the firewall or Panorama.Use widgets to monitor your cellular interface.- Select .View information about the cellular interface, such as the signal strength. To view more information, hover over the icon.
![]() Select .The cellular interface, along with your other configured interfaces, displays in the widget. To view more information, hover over the icon.
Select .The cellular interface, along with your other configured interfaces, displays in the widget. To view more information, hover over the icon.![]() Verify your configuration's operational information is correct.To view the statistics and operational information using Panorama, first select the device, then select the information you want to view.
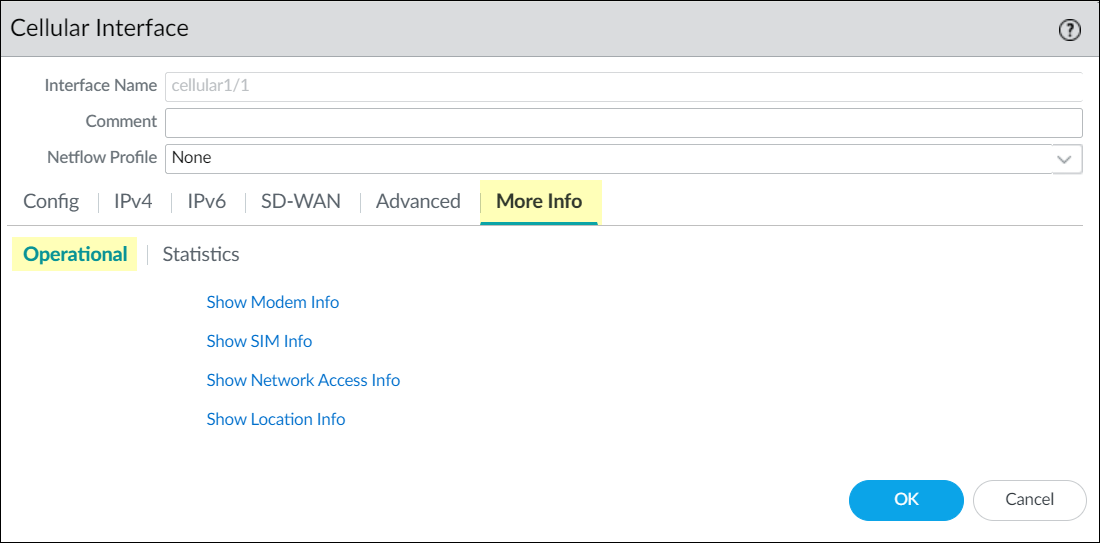
Verify your configuration's operational information is correct.To view the statistics and operational information using Panorama, first select the device, then select the information you want to view.- Select the cellular interface you configured then click .
![]() Select Show Modem Info to verify the modem information (such as IMEI and FSN).Select Show SIM Info to verify the SIM information, such as the number of SIM cards and their IMSI numbers.Select Show Network Access Info to verify the network access information (for example, frequency band and cell ID).Select Show Location Info to verify the GPS information, such as status, latitude, and longitude.You must enable GPS to view this information.View information about activity on the cellular interface.
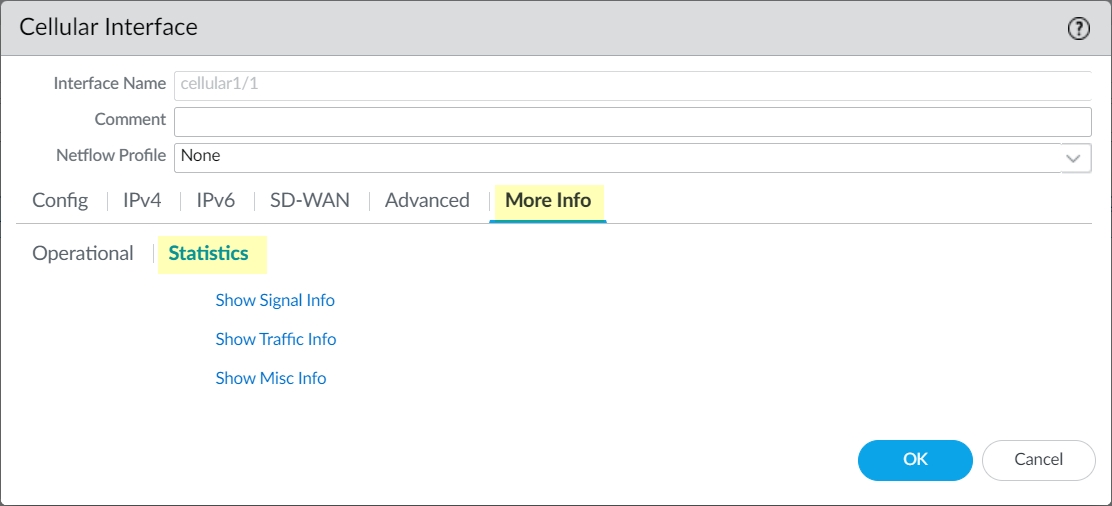
Select Show Modem Info to verify the modem information (such as IMEI and FSN).Select Show SIM Info to verify the SIM information, such as the number of SIM cards and their IMSI numbers.Select Show Network Access Info to verify the network access information (for example, frequency band and cell ID).Select Show Location Info to verify the GPS information, such as status, latitude, and longitude.You must enable GPS to view this information.View information about activity on the cellular interface.- Select the cellular interface you configured; then click .
![]() Select Show Signal Info to view the signal information (such as RSSI and RSRP).Select Show Traffic Info to view the traffic information, such as bytes, drops, errors, and overflows for receiving and transmitting.Select Show Misc Info to view other information including the number of modem and radio resets, switchovers, and network disconnects.Monitor information about the current session on the cellular interface.
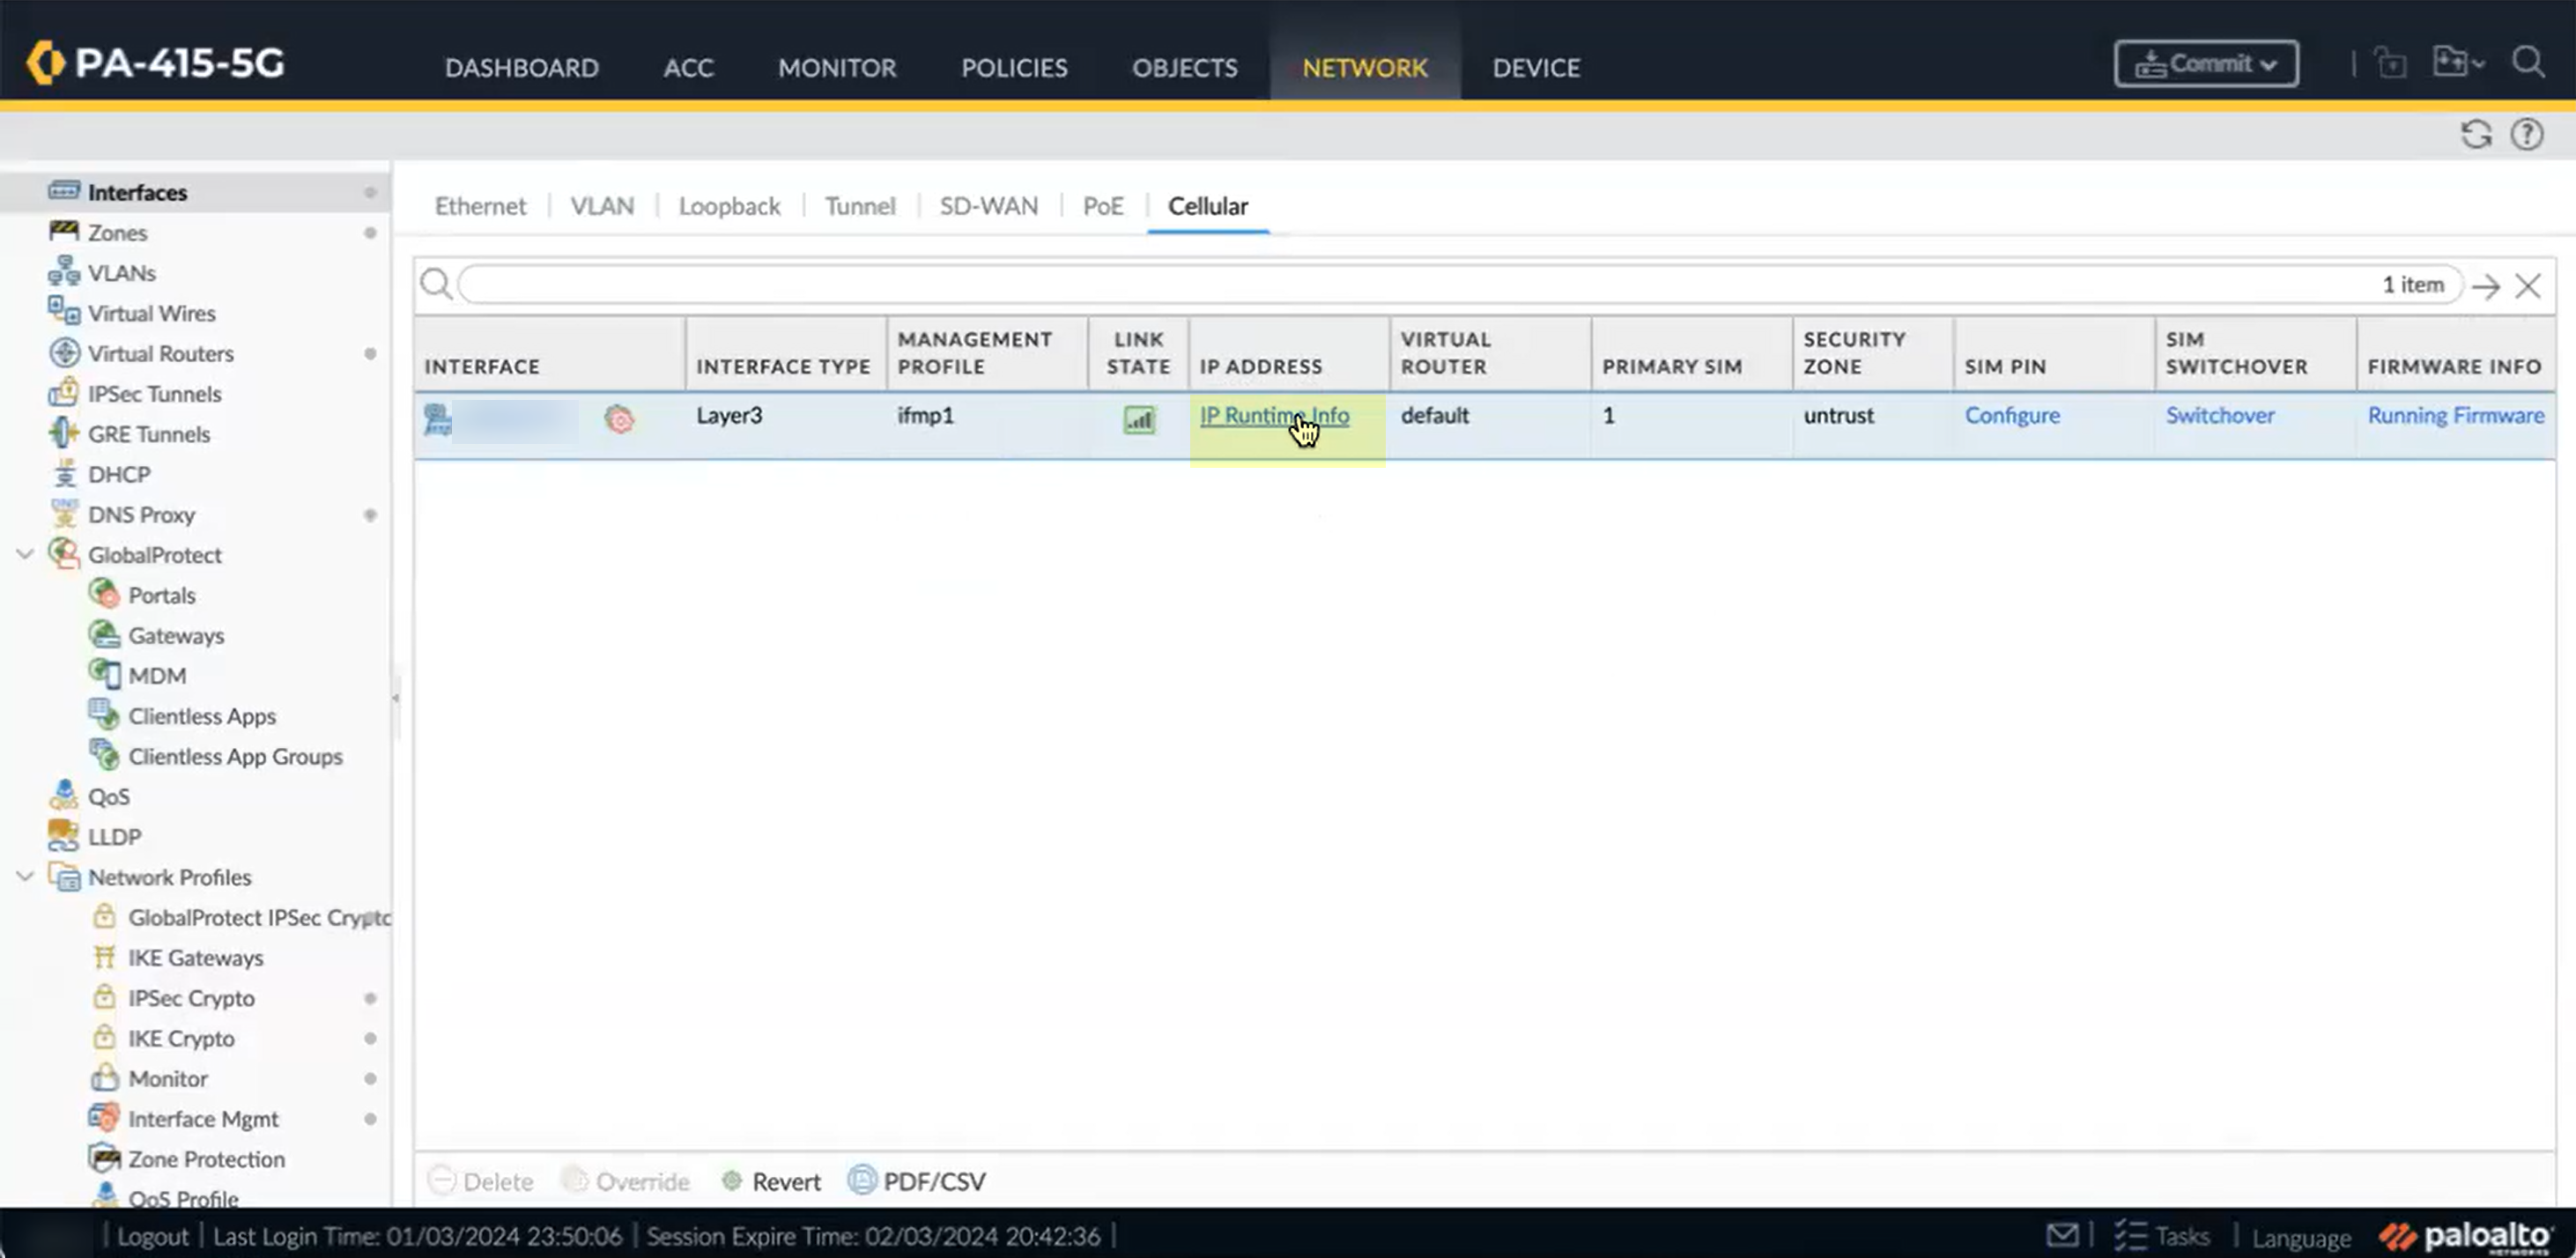
Select Show Signal Info to view the signal information (such as RSSI and RSRP).Select Show Traffic Info to view the traffic information, such as bytes, drops, errors, and overflows for receiving and transmitting.Select Show Misc Info to view other information including the number of modem and radio resets, switchovers, and network disconnects.Monitor information about the current session on the cellular interface.- Select the IP runtime info for the cellular interface.
![]() View the Data Session Details such as IP address, gateway info, and primary and secondary DNS interfaces.(Panorama only) If you use Panorama, you can view the cellular interface by selecting Summary.
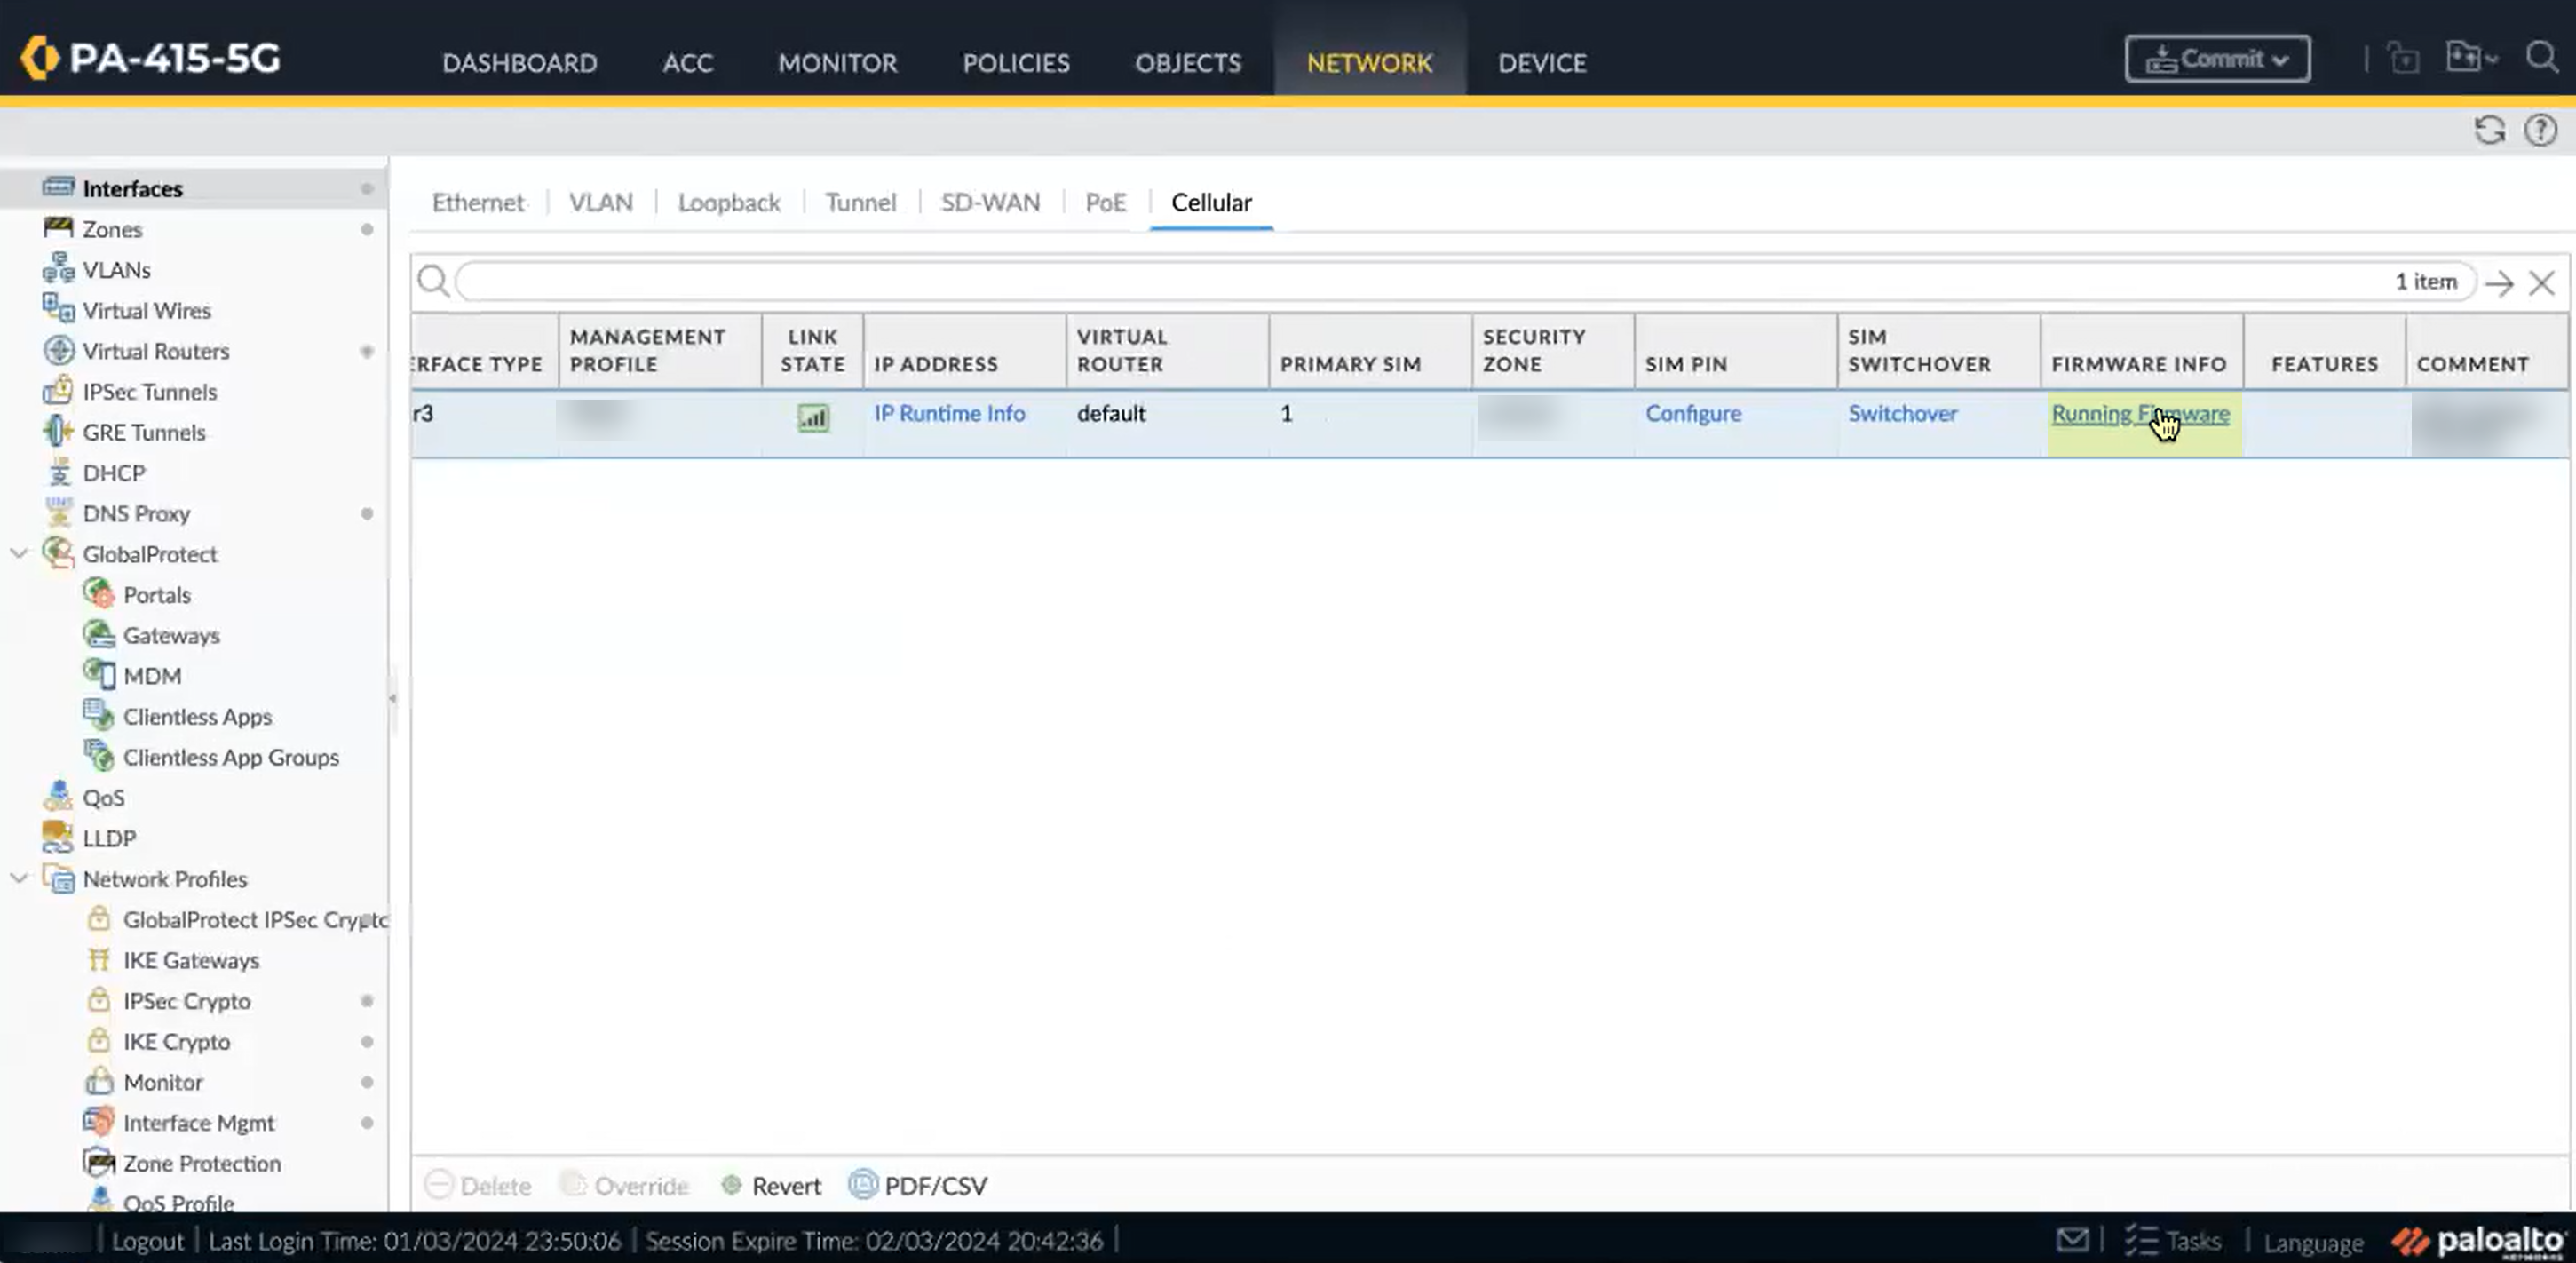
View the Data Session Details such as IP address, gateway info, and primary and secondary DNS interfaces.(Panorama only) If you use Panorama, you can view the cellular interface by selecting Summary.![]() View the firmware information for the interface.
View the firmware information for the interface.- Select the Running Firmware for the cellular interface.
![]() View the Firmware Details including current version, primary rate interface (PRI) version, and a list of PRIs with their respective firmware versions, PRI versions, and carriers.(Recommended) For additional security, enable a PIN for your SIM card.The SIM PIN prevents unauthorized use of SIM cards. If you enable a SIM PIN, the SIM requires you to enter the PIN code to unlock the SIM for the modem to access the cellular network and start data sessions.After three unsuccessful attempts to unlock the SIM, the SIM is inaccessible until you enter a Personal Unblock Key (PUK). When the active SIM is inaccessible, an automatic switchover to a secondary SIM, if present, occurs. For more information, see step 18.
View the Firmware Details including current version, primary rate interface (PRI) version, and a list of PRIs with their respective firmware versions, PRI versions, and carriers.(Recommended) For additional security, enable a PIN for your SIM card.The SIM PIN prevents unauthorized use of SIM cards. If you enable a SIM PIN, the SIM requires you to enter the PIN code to unlock the SIM for the modem to access the cellular network and start data sessions.After three unsuccessful attempts to unlock the SIM, the SIM is inaccessible until you enter a Personal Unblock Key (PUK). When the active SIM is inaccessible, an automatic switchover to a secondary SIM, if present, occurs. For more information, see step 18.- Configure a SIM PIN.
![]() Ensure that you Enable the PIN as the SIM PIN Operation.Select the SIM Slot that contains the SIM card where you want to enable the PIN.Enter the PIN and click Configure.If you enabled the SIM PIN, manage SIM PIN operations.You must enable a SIM PIN before you can configure a new PIN, disable the PIN, or unblock the PIN.
Ensure that you Enable the PIN as the SIM PIN Operation.Select the SIM Slot that contains the SIM card where you want to enable the PIN.Enter the PIN and click Configure.If you enabled the SIM PIN, manage SIM PIN operations.You must enable a SIM PIN before you can configure a new PIN, disable the PIN, or unblock the PIN.- To disable the SIM PIN, select Disable as the SIM PIN Operation, confirm the SIM Slot, enter the PIN, and click Configure.
- To configure a new PIN, select Change as the SIM PIN Operation, confirm the SIM Slot, enter the PIN and the New PIN, and click Configure.
- To unblock a PIN, select Unblock as the SIM PIN Operation, confirm the SIM Slot, enter the New PIN and the Personal Unblock Key (PUK), and click Configure.
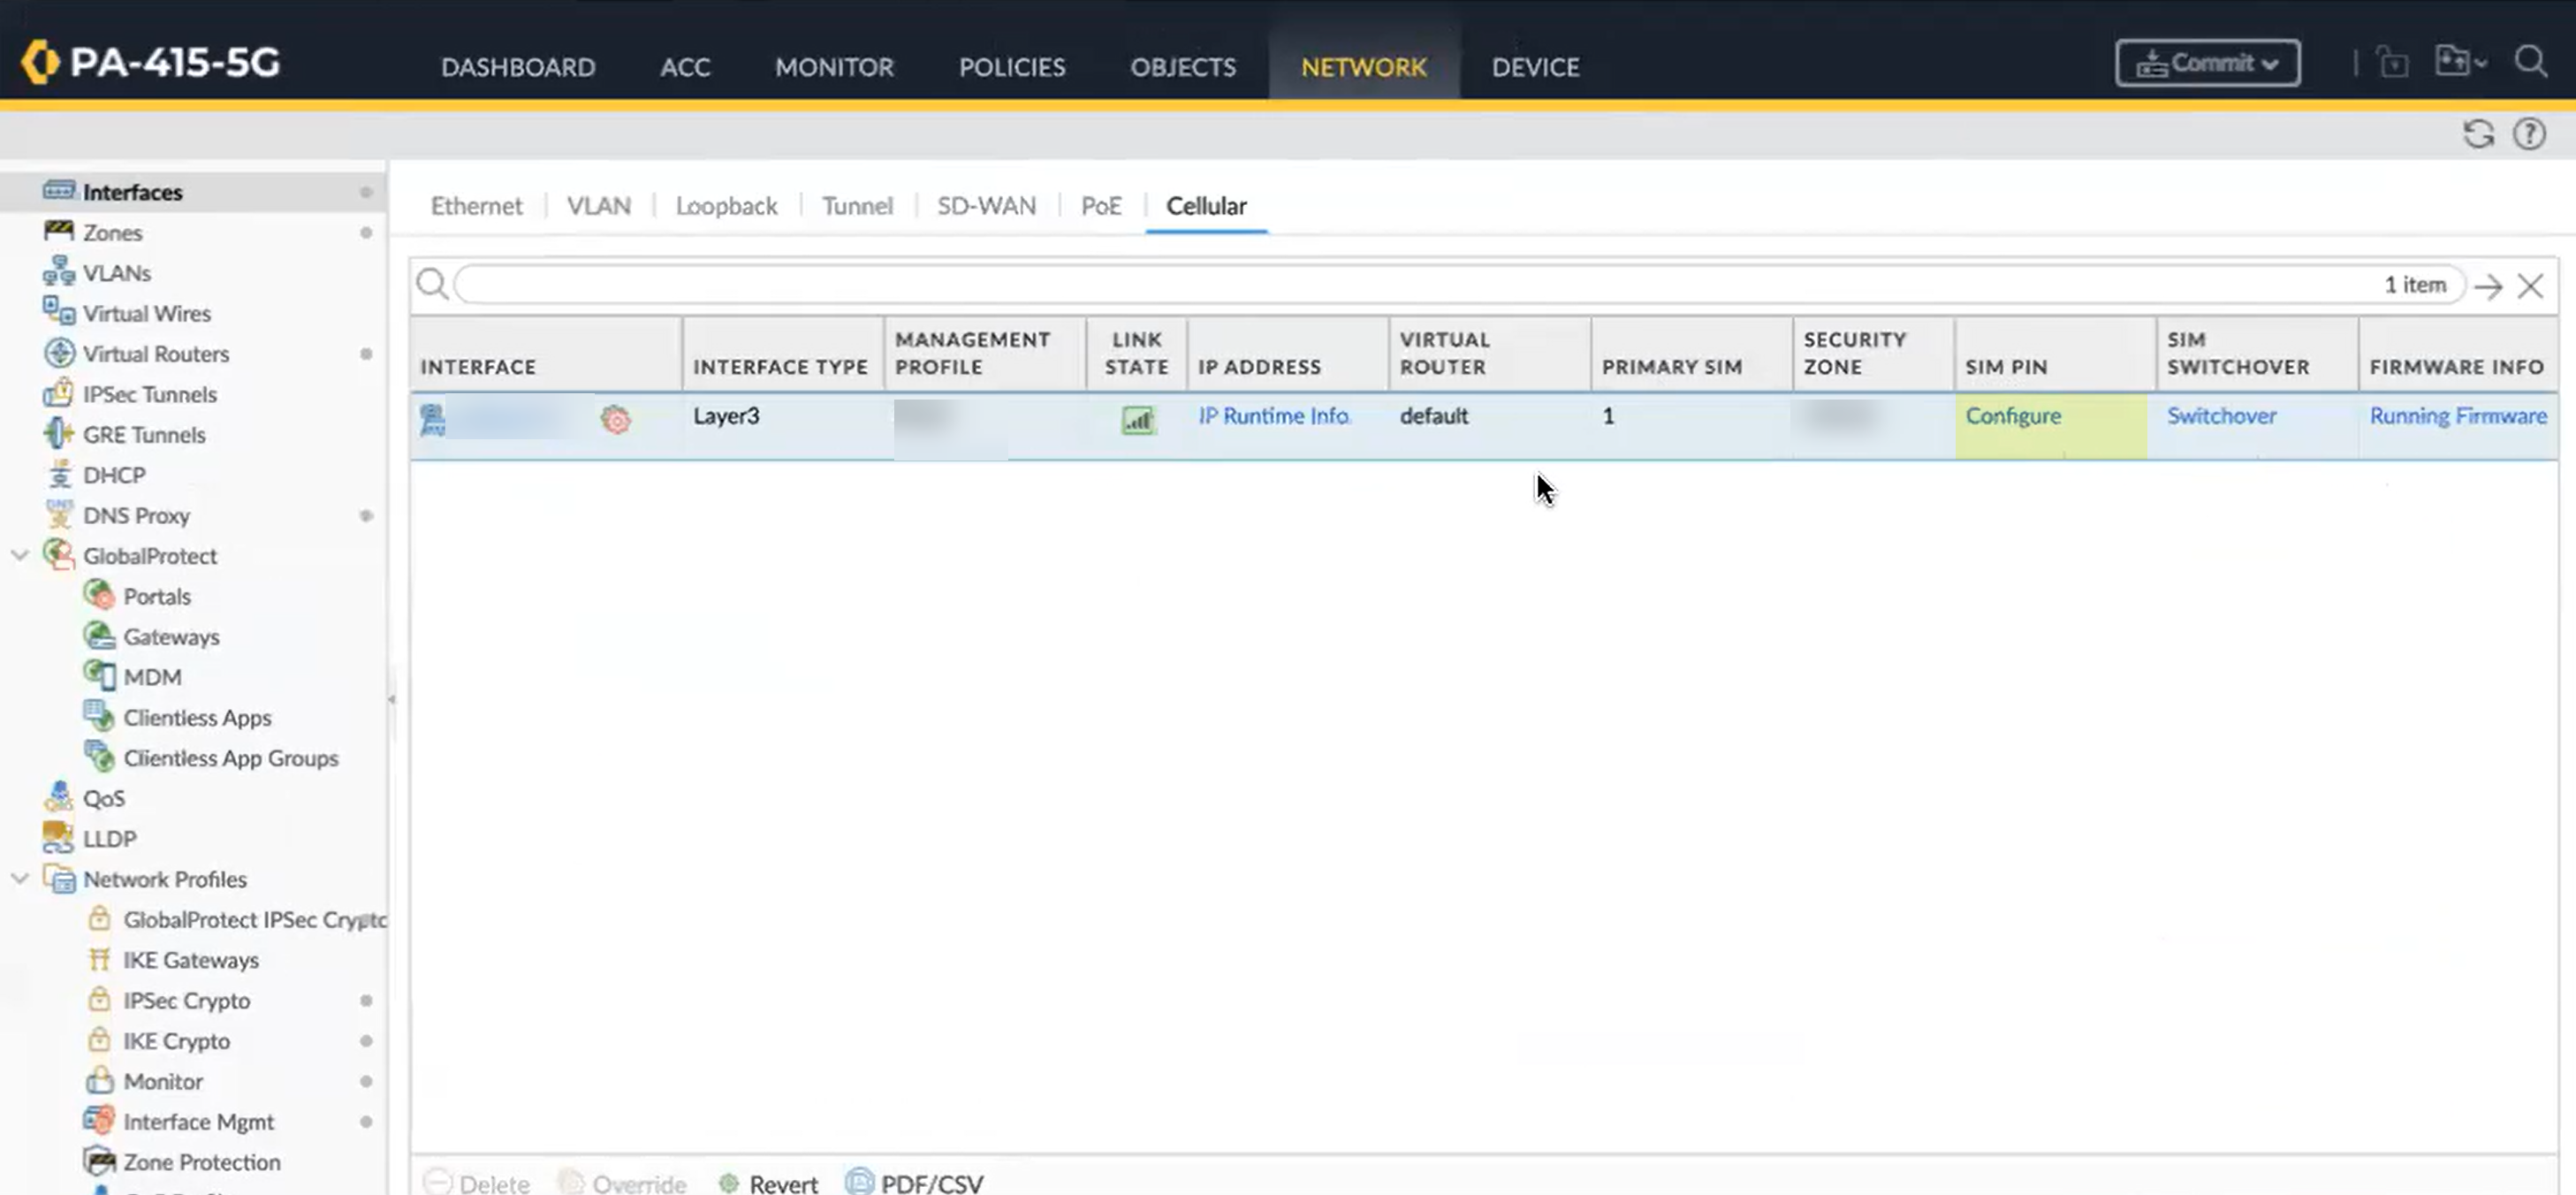
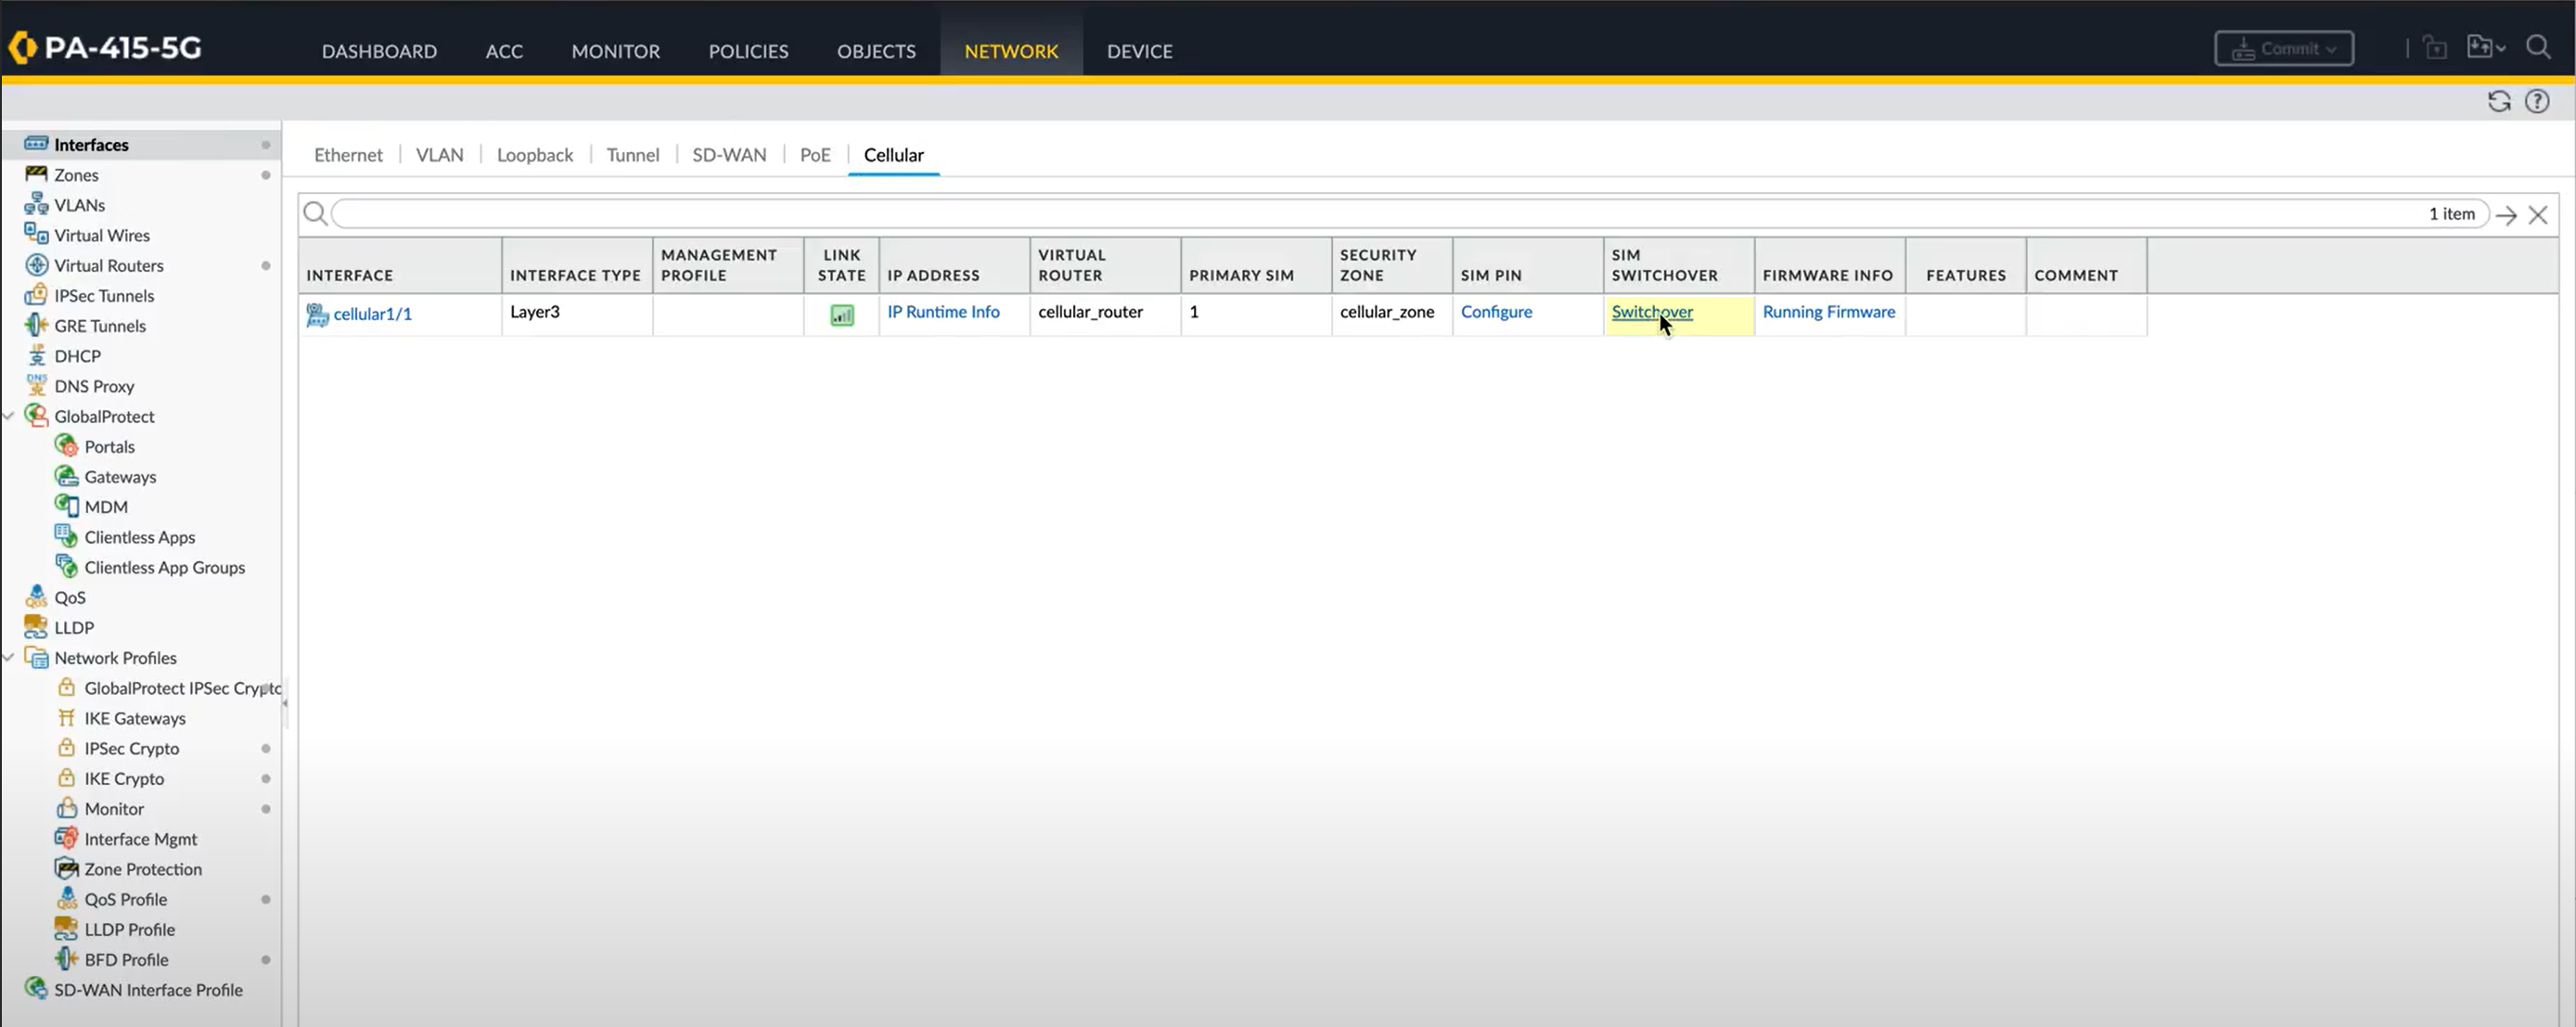
To switch from the active SIM card to a different SIM card, complete the following steps.- Select .Click Switchover.
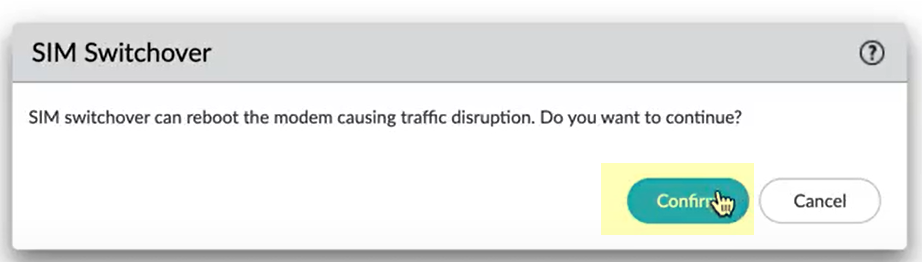
![]() Confirm that you want to switch the current SIM card.
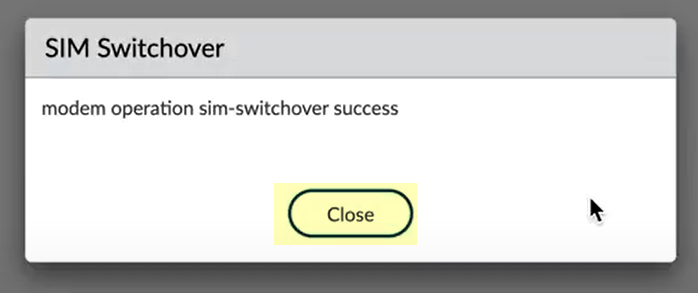
Confirm that you want to switch the current SIM card.![]() Close the notification window that displays to confirm the SIM card change.
Close the notification window that displays to confirm the SIM card change.![]() After the SIM card change completes (around 40 to 60 seconds), verify the change using the Dashboard widget (see step 12.c).
After the SIM card change completes (around 40 to 60 seconds), verify the change using the Dashboard widget (see step 12.c).