Next-Generation Firewall
Configure MFA Between Okta and the Firewall
Table of Contents
Configure MFA Between Okta and the Firewall
Multi-factor authentication allows you to
protect company assets by using multiple factors to verify the identity
of users before allowing them to access network resources.
To
enable multi-factor authentication (MFA) between the firewall and
the Okta identity management service:
Configure Okta
Log in to the Okta Admin Portal to create
your user accounts, define your Okta MFA policy, and obtain the
token information required to configure MFA with Okta on the firewall.
- Create your Okta Admin user account.
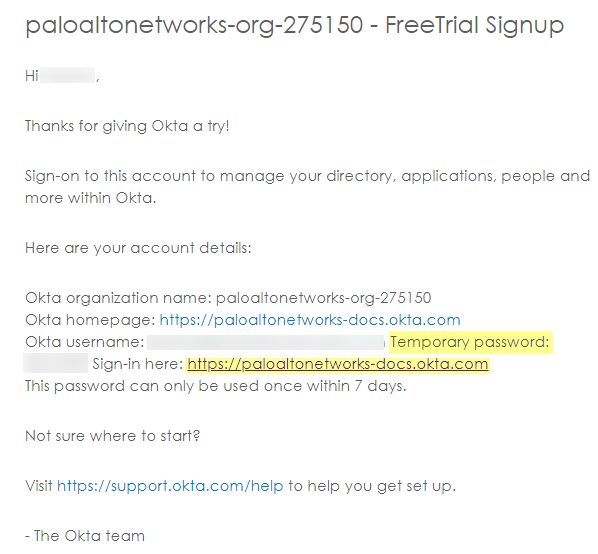
- Submit your email address and name, then click Get Started.Click the link in the confirmation email and use the included temporary password to log in to the Okta Admin Portal.
![]() Create a new password that includes at least 8 characters, one lowercase letter, one uppercase letter, a number, and does not include any part of your username.Select a password reminder question and enter the answer.Select a security image, then Create My Account.Configure your Okta service.If you log in and are not redirected to the Okta Admin Portal, select Admin at the upper right.
Create a new password that includes at least 8 characters, one lowercase letter, one uppercase letter, a number, and does not include any part of your username.Select a password reminder question and enter the answer.Select a security image, then Create My Account.Configure your Okta service.If you log in and are not redirected to the Okta Admin Portal, select Admin at the upper right.![]()
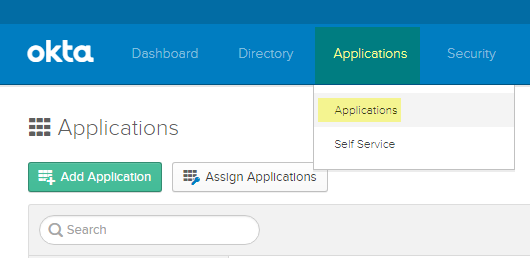
- From the Okta Dashboard, log in with your Okta Admin credentials, then select .
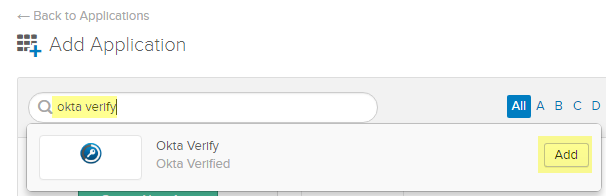
![]() Select Add Application.Search for Okta Verify.Select Add, then Done.
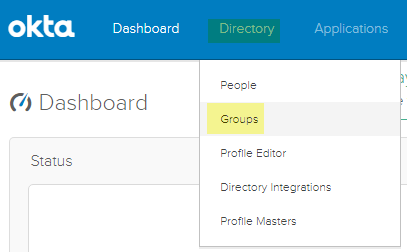
Select Add Application.Search for Okta Verify.Select Add, then Done.![]() Create one or more user groups to categorize your users (for example, by device, by policy, or by department) and assign the Okta Verify application.
Create one or more user groups to categorize your users (for example, by device, by policy, or by department) and assign the Okta Verify application.- Select .
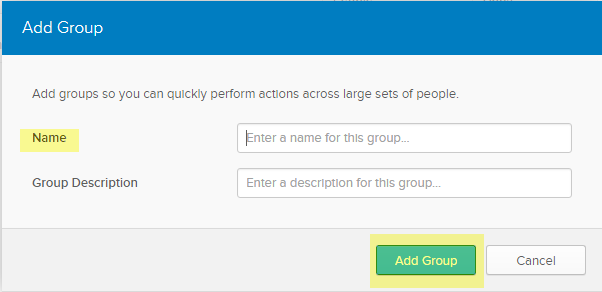
![]() Click Add Group.
Click Add Group.![]() Enter a group Name and optionally a Group Description, then Add Group.
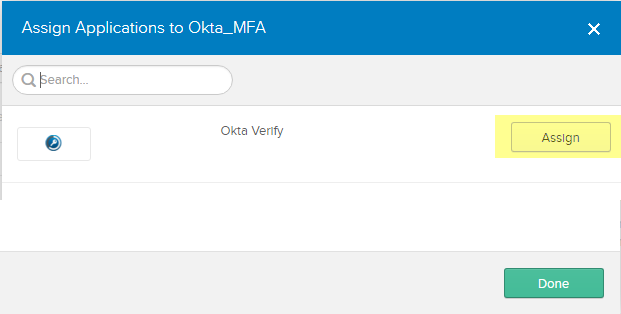
Enter a group Name and optionally a Group Description, then Add Group.![]() The default group Everyone includes all users configured for your organization during the first step in Configure Okta.Select the group you created, then select Manage Apps.Assign the Okta Verify application you added in Step 2.
The default group Everyone includes all users configured for your organization during the first step in Configure Okta.Select the group you created, then select Manage Apps.Assign the Okta Verify application you added in Step 2.![]() After the application has been Assigned, click Done.Repeat this process for all groups that will use the Okta Verify application for MFA.Add users and assign them to a group.
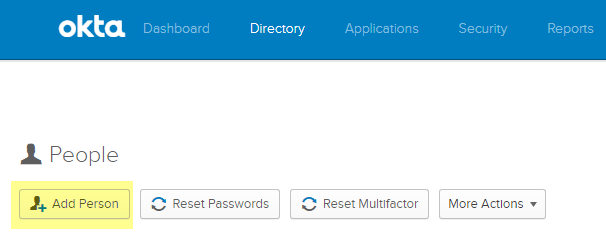
After the application has been Assigned, click Done.Repeat this process for all groups that will use the Okta Verify application for MFA.Add users and assign them to a group.- From the Okta Dashboard, select .
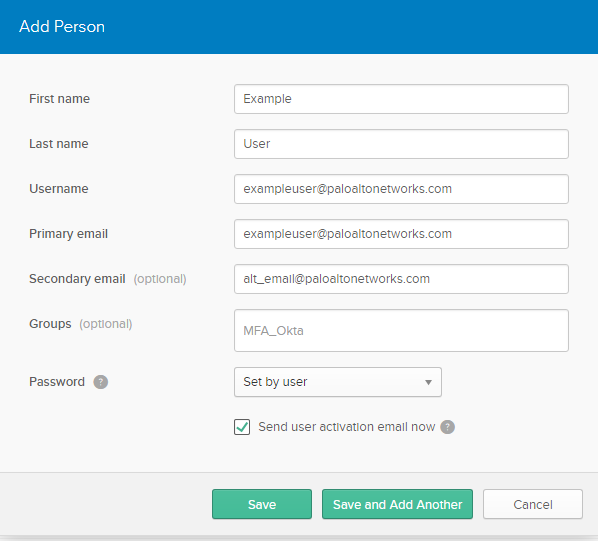
![]() Enter the user’s First Name, Last Name, and Username. The username must match the Primary email, which populates automatically, and the username entered on the firewall. You can optionally enter an alternate email address for the user as the Secondary Email.
Enter the user’s First Name, Last Name, and Username. The username must match the Primary email, which populates automatically, and the username entered on the firewall. You can optionally enter an alternate email address for the user as the Secondary Email.![]() Enter the name of the group or Groups to associate with this user. When you start typing, the group name populates automatically.Check Send user activation email now, then Save to add a single user or Save and Add Another to continue adding users.Assign a test policy to users.
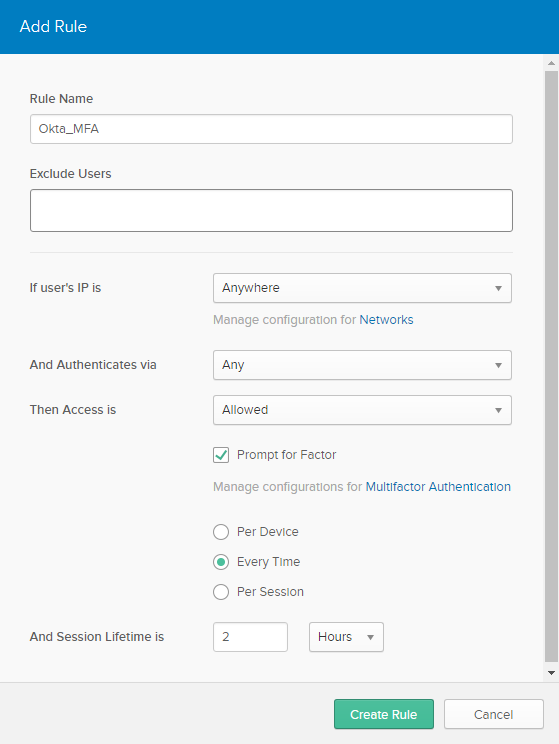
Enter the name of the group or Groups to associate with this user. When you start typing, the group name populates automatically.Check Send user activation email now, then Save to add a single user or Save and Add Another to continue adding users.Assign a test policy to users.- Select .There is a Default Policy with a Default Rule that does not prompt users to log in with MFA.Enter the Rule Name and check Prompt for Factor to enforce the MFA prompt, and select the type of prompt (Per Device, Every Time, or Per Session), then Create Rule.
![]() Record the Okta authentication token information in a safe place because it is only displayed once.
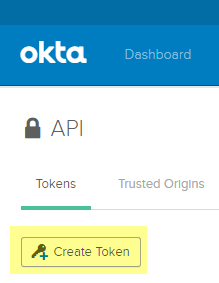
Record the Okta authentication token information in a safe place because it is only displayed once.- Select .Select Create Token.
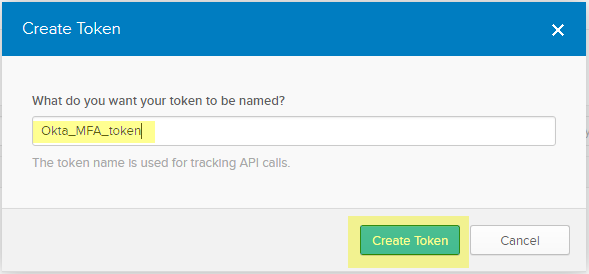
![]() Enter a name for the token, then Create Token.
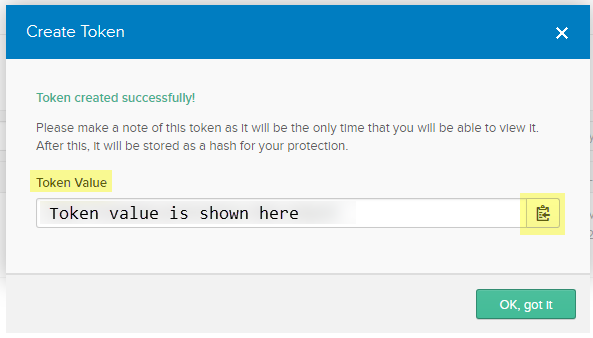
Enter a name for the token, then Create Token.![]() Copy the Token Value.You can click the Copy to clipboard button to copy the Token Value to your clipboard.
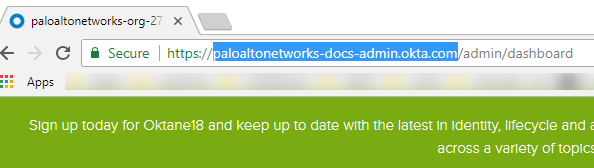
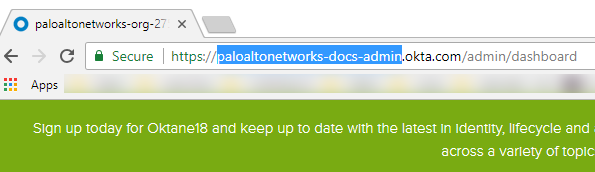
Copy the Token Value.You can click the Copy to clipboard button to copy the Token Value to your clipboard.![]() In the URL for the Okta Admin Dashboard, copy the portion of the URL after https:// up to /admin to use as the API host.
In the URL for the Okta Admin Dashboard, copy the portion of the URL after https:// up to /admin to use as the API host.![]() Omit the domain okta.com from this URL to use as the Organization.
Omit the domain okta.com from this URL to use as the Organization.![]() For example, in the example Okta Admin Dashboard URL above, https://paloaltonetworks-doc-admin.okta.com/admin/dashboard:
For example, in the example Okta Admin Dashboard URL above, https://paloaltonetworks-doc-admin.okta.com/admin/dashboard:- The API hostname is paloaltonetworks-doc-admin.okta.com.
- The Organization is paloaltonetworks-doc-admin.
Export all certificates in the certificate chain using Base-64 encoding:- Depending on your browser, use one of the following methods to export all certificates in the chain.
- Chrome—Press F12, then select .
- Firefox—Select .
- Internet Explorer—Select .
Use the Certificate Export Wizard to export all certificates in the chain and select Base-64 encoded X.509 as the format.Configure the firewall to integrate with Okta
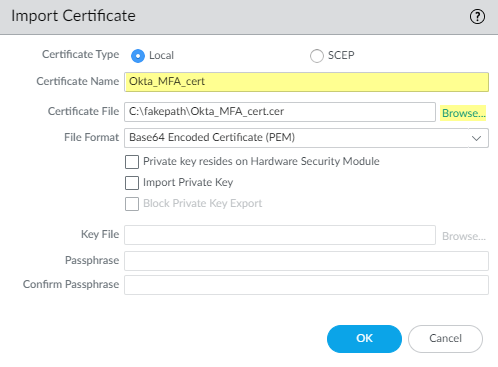
As a prerequisite, confirm that you have mapped all users that you want to authenticate using Okta.- Import all certificates in the certificate chain on the firewall and add the imported CA certificates (root and intermediate) to a Certificate Profile.
![]() Add a Multi Factor Authentication Server Profile for Okta.
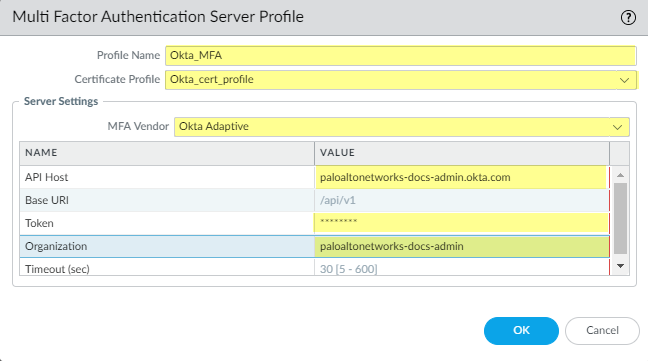
Add a Multi Factor Authentication Server Profile for Okta.- Select .Add an MFA server profile.
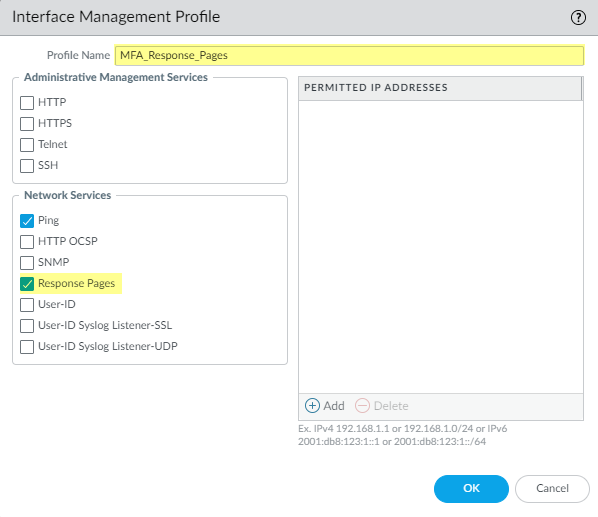
![]() Enter a Profile Name.Select the Certificate Profile you created in Step 1 in Configure the firewall to integrate with Okta.Select Okta Adaptive as the MFA Vendor.Enter the API Host, Token, and Organization from Step 4 in Configure the firewall to integrate with Okta.Configure Authentication Portal using Redirect Mode to redirect users to the MFA vendor’s challenge.Enable response pages on the Interface Management Profile to redirect users to the response page challenge.
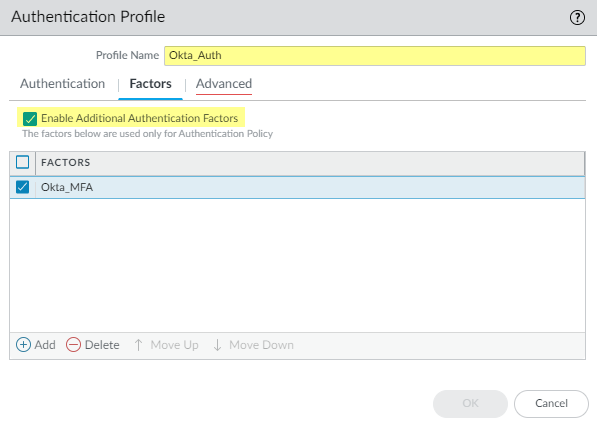
Enter a Profile Name.Select the Certificate Profile you created in Step 1 in Configure the firewall to integrate with Okta.Select Okta Adaptive as the MFA Vendor.Enter the API Host, Token, and Organization from Step 4 in Configure the firewall to integrate with Okta.Configure Authentication Portal using Redirect Mode to redirect users to the MFA vendor’s challenge.Enable response pages on the Interface Management Profile to redirect users to the response page challenge.![]() Create an Authentication Profile and add the MFA vendor as a Factor (see Configure Multi-Factor Authentication, Step 3.)
Create an Authentication Profile and add the MFA vendor as a Factor (see Configure Multi-Factor Authentication, Step 3.)![]() Enable User-ID on the source zone to require identified users to respond to the challenge using your MFA vendor.Create an Authentication Enforcement Object to use the MFA vendor and create an Authentication policy rule (see Configure Authentication Policy, Steps 4 and 5).Commit your changes.
Enable User-ID on the source zone to require identified users to respond to the challenge using your MFA vendor.Create an Authentication Enforcement Object to use the MFA vendor and create an Authentication policy rule (see Configure Authentication Policy, Steps 4 and 5).Commit your changes.Verify MFA with Okta
- Verify your users received their enrollment emails, have activated their accounts, and have downloaded the Okta Verify app on their devices.Go to a website that will prompt the response page challenge.If you are using a self-signed certificate instead of a PKI-assigned certificate from your organization, a security warning displays that users must click through to access the challenge.Log in to the response page using your Okta credentials.Confirm the device receives the challenge push notification.Confirm users can successfully access the page after authenticating the challenge by accepting the push notification on their devices.