Prisma Access
Configure Prisma Access Agent App Settings for Dynamic Privilege Access
Table of Contents
Expand All
|
Collapse All
Prisma Access Docs
-
- 6.1 Preferred and Innovation
- 6.0 Preferred and Innovation
- 5.2 Preferred and Innovation
- 5.1 Preferred and Innovation
- 5.0 Preferred and Innovation
- 4.2 Preferred
- 4.1 Preferred
- 4.0 Preferred
- 3.2 Preferred and Innovation
- 3.1 Preferred and Innovation
- 3.0 Preferred and Innovation
- 2.2 Preferred
-
-
- 4.0 & Later
- Prisma Access China
-
-
Configure Prisma Access Agent App Settings for Dynamic Privilege Access
Learn how to configure app settings for Dynamic Privilege Access for the Prisma Access Agent.
| Where Can I Use This? | What Do I Need? |
|---|---|
|
|
Strata Cloud Manager provides the default Prisma Access Agent app
configurations that apply to all user groups in all projects. You can add an app
configuration to customize how your end users in a project interact with the Prisma Access Agent.
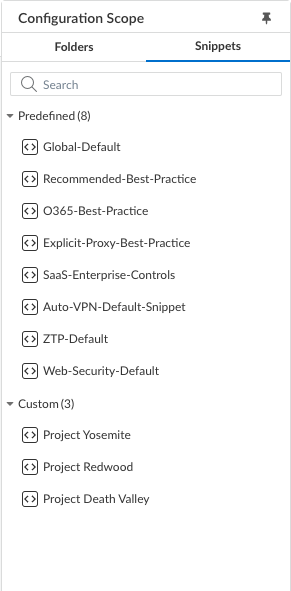
- Log in to Strata Cloud Manager as the Project Admin.Select ConfigurationNGFW and Prisma AccessOverview and expand the Configuration Scope to view the Snippets.
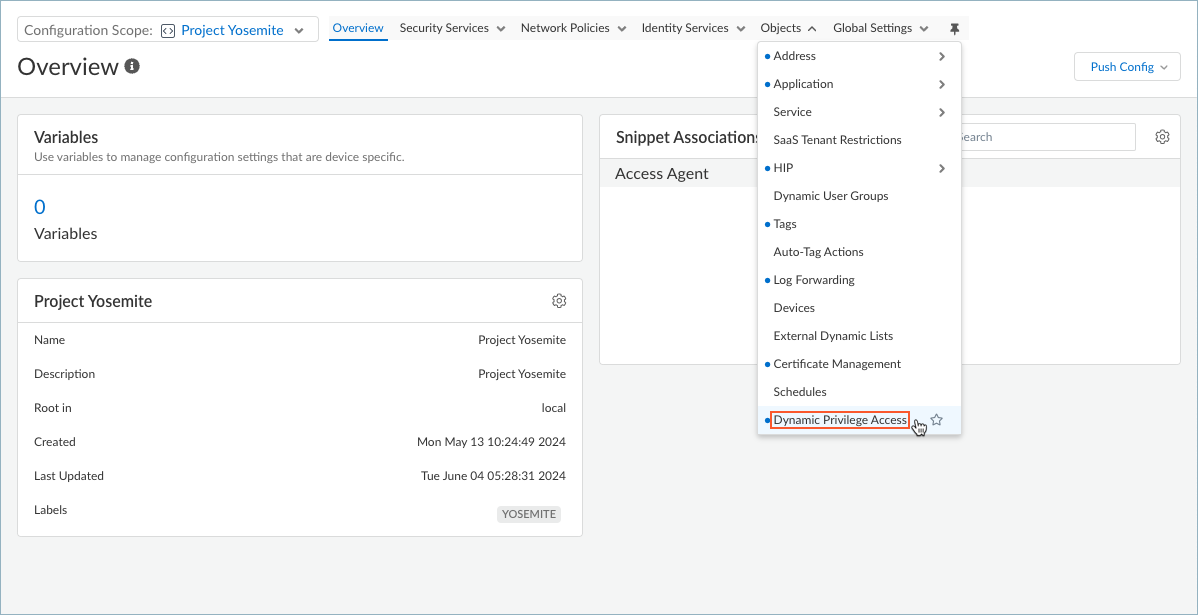
![]() Select the snippet that the Superuser admin assigned to you.You can also view the snippets that are not assigned to you, but you cannot interact with them, such as to change the configuration.Select ObjectsDynamic Privilege Access to open the Dynamic Privilege Access settings.
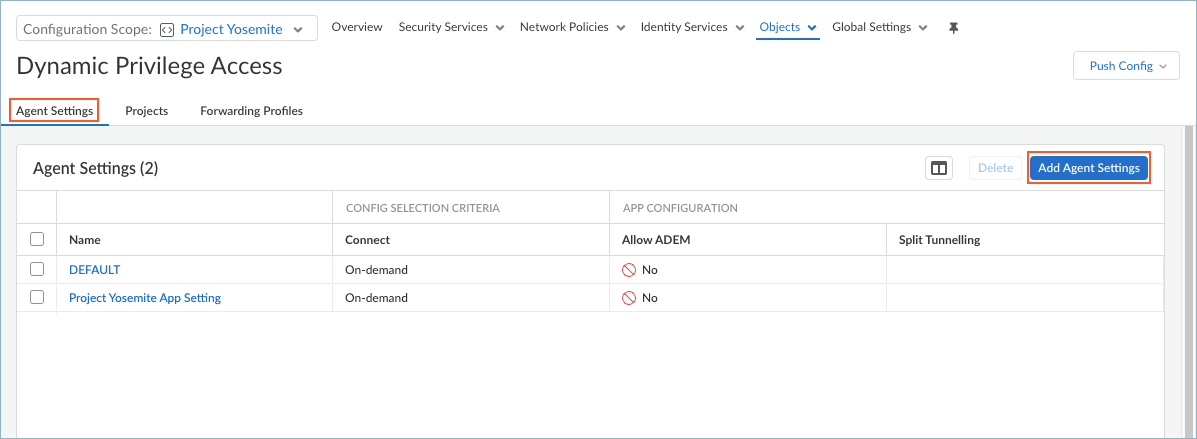
Select the snippet that the Superuser admin assigned to you.You can also view the snippets that are not assigned to you, but you cannot interact with them, such as to change the configuration.Select ObjectsDynamic Privilege Access to open the Dynamic Privilege Access settings.![]() Select the Agent Settings tab.Strata Cloud Manager provides you with the default agent settings. If you don't want to use the default settings. Select Add Agent Settings.To edit the settings for an agent, select an agent name from the table.
Select the Agent Settings tab.Strata Cloud Manager provides you with the default agent settings. If you don't want to use the default settings. Select Add Agent Settings.To edit the settings for an agent, select an agent name from the table.![]() Create an app configuration rule. The configuration rule associates one or more projects with certain settings that are specific to those projects.
Create an app configuration rule. The configuration rule associates one or more projects with certain settings that are specific to those projects.- Enter a Name for the rule.Specify the Match Criteria by adding Projects. Users and groups that match the Project criteria will receive the app settings when they log in to the project using the Prisma Access Agent.
- To deploy the configuration to all users, set Projects to Any.
- To deploy the configuration to users who log in to specific projects, set Projects to Add Projects and select from the list of projects.
![]()
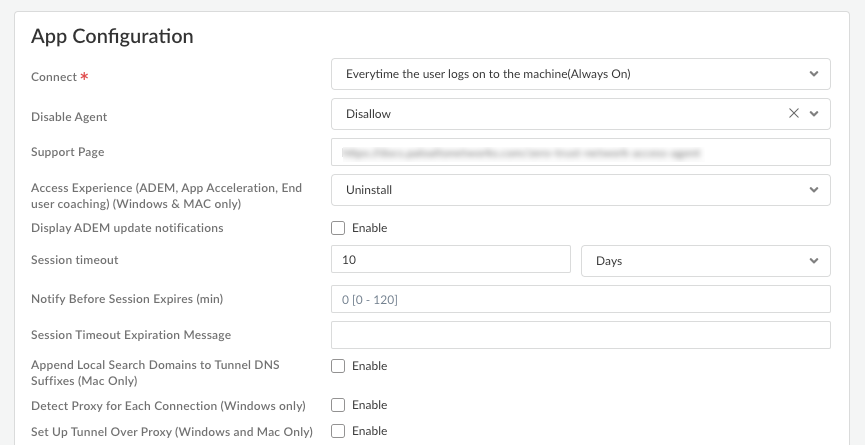
Configure the app settings for the Prisma Access Agent.![]()
- Connect—Specify how the Prisma Access Agent connects to Prisma Access. This setting is required.
- Select Every time the user logs on to the machine (Always on) to automatically establish a connection to Prisma Access every time the user logs on to an endpoint.
- Select Only when the user clicks Connect (On demand) to connect to Prisma Access only when the user clicks Connect (the lock icon) in the Prisma Access Agent.
- Support Page—Enter the website that users can access for assistance when they click Support Resources in the Prisma Access Agent.The default support page is the website for the Prisma Access Agent documentation
- Access Experience (ADEM, App Acceleration, End user coaching) (Windows & MAC only)—Specify whether to install the ADEM Access Experience agent during the Prisma Access Agent app installation and allow end users to enable or disable user experience tests from the app.
- Install
- No action (The agent state remains as is)
- Uninstall
For details about getting started with ADEM on Cloud Managed Prisma Access, see Get Started with Autonomous DEM. - Display ADEM update notifications—Enable this setting to display notifications from ADEM when an update is available on the endpoint.
- Session timeout—Prisma Access Agent user sessions are created when a user connects to the gateway (location) and successfully authenticates. The session is then assigned to a specific gateway that determines which traffic to tunnel based on any defined split tunnel rules. The minimum Prisma Access dataplane version must be 11.2.Specify the amount of time that must elapse before the session times out due to inactivity. This setting is required.If you're using the Nebula (10.2) dataplane in Prisma Access, the Session timeout value isn’t configurable and by default is seven days.
- Append Local Search Domains to Tunnel DNS Suffixes (Mac only)—Enable this setting to append tunnel DNS search domains to local DNS search domains on macOS endpoints. Appending tunnel search domains to an endpoint's local DNS search domains enables users to quickly access local and remote corporate websites and servers that they visit frequently without entering the complete address.
- Detect Proxy for Each Connection (Windows only)—Enable this setting to automatically detect the proxy at every connection. Disable this setting if you want to automatically detect the proxy for the gateway connection and use that proxy for subsequent connections to Prisma Access.
- Set Up Tunnel Over Proxy (Windows and Mac Only)—Enable this setting to configure network traffic behavior based on Prisma Access Agent proxy use. Select Enable to require the Prisma Access Agent to use proxies. Disable this setting if you want to require the Prisma Access Agent to bypass proxies. Based on the Prisma Access Agent proxy use, endpoint OS, and tunnel type, network traffic will behave differently.If you disable this option, Prisma Access Agent will bypass the proxies. All HTTP or HTTPS traffic that matches the proxy or PAC file rules is required to traverse the Prisma Access Agent tunnel before reaching the intended destination. By bypassing proxies, you can prevent users from setting up a personal proxy to access web resources without going through the tunnel for inspection and policy enforcement.
![]()
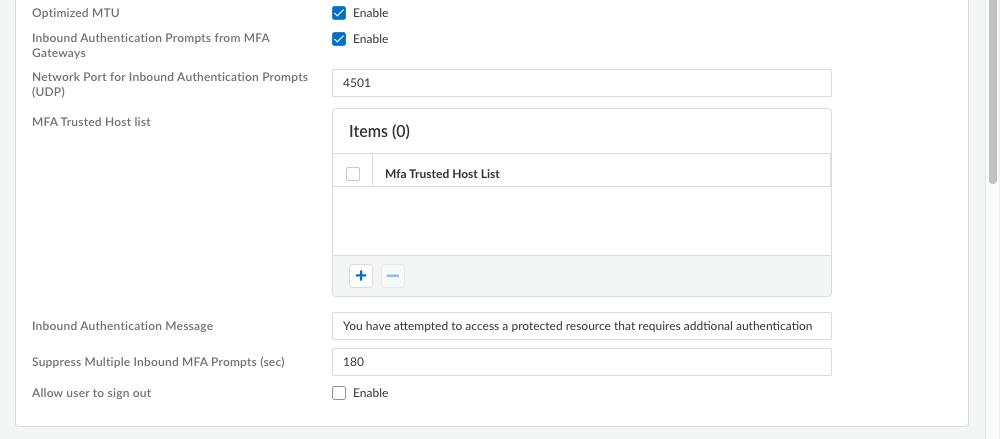
- Inbound Authentication Prompts from MFA Gateways—To support multi-factor authentication (MFA), a Prisma Access Agent endpoint must receive and acknowledge UDP prompts that are inbound from the gateway. Enable this setting to allow a Prisma Access Agent endpoint to receive and acknowledge the UDP prompts. This setting is enabled by default. Disable this setting to block UDP prompts from the gateway.
- Network Port for Inbound Authentication Prompts (UDP)—Specifies the port number a Prisma Access Agent endpoint uses to receive inbound authentication prompts from MFA gateways. The default port is 4501. To change the port, specify a number 1-65535.
- MFA Trusted Host list—Add the hosts for firewalls or authentication gateways that a Prisma Access Agent endpoint can trust for multi-factor authentication. When an endpoint receives a UDP message on the specified network port, the Prisma Access Agent displays an authentication message only if the UDP prompt comes from a trusted gateway.
- Inbound Authentication Messages—Customize a notification message to display when users try to access a resource that requires additional authentication.When users try to access a resource that requires additional authentication, Prisma Access Agent receives a UDP packet containing the inbound authentication prompt and displays this message. The UDP packet also contains the URL for the Authentication Portal page you specified when you configured multi-factor authentication. Prisma Access Agent automatically appends the URL to the message.For example:
You have attempted to access a protected resource that requires additional authentication. Do you want to continue?
The message can have 255 or fewer characters. - Suppress Multiple Inbound MFA Prompts (sec)—Specify the number of seconds to wait before Prisma Access Agent can suppress multiple inbound UDP prompts. The default is 180 seconds.
- Allow user to sign out—Enable this setting to permit your users to sign out of the Prisma Access Agent. This setting is disabled by default.
Select a Forwarding Profile that you configured previously to manage how traffic flows between the agent and Prisma Access.![]() Configure DNS settings for Dynamic Privilege Access.Configure Host Information Profile settingsWhen you have finished setting up the Prisma Access Agent settings, click Save.
Configure DNS settings for Dynamic Privilege Access.Configure Host Information Profile settingsWhen you have finished setting up the Prisma Access Agent settings, click Save.

